吴裕雄 PYTHON 神经网络——TENSORFLOW 无监督学习处理MNIST手写数字数据集
# 导入模块

import numpy as np

import tensorflow as tf

import matplotlib.pyplot as plt

# 加载数据

from tensorflow.examples.tutorials.mnist import input_data

mnist = input_data.read_data_sets("E:\\MNIST_data\\", one_hot=True)

#模型训练

# 设置超参数

learning_rate = 0.01 # 学习率

training_epochs = 20 # 训练轮数

batch_size = 256 # 每次训练的数据

display_step = 1 # 每隔多少轮显示一次训练结果

examples_to_show = 10 # 提示从测试集中选择10张图片取验证自动编码器的结果

# 网络参数

n_hidden_1 = 256 # 第一个隐藏层神经元个数(特征值格式)

n_hidden_2 = 128 # 第二个隐藏层神经元格式

n_input = 784 # 输入数据的特征个数  28*28=784

# 定义输入数据,无监督不需要标注数据,所以只有输入图片

X = tf.placeholder("float", [None, n_input])

#初始化每一层的权重和偏置

weights = {

    'encoder_h1': tf.Variable(tf.random_normal([n_input, n_hidden_1])),

    'encoder_h2': tf.Variable(tf.random_normal([n_hidden_1, n_hidden_2])),

    'decoder_h1': tf.Variable(tf.random_normal([n_hidden_2, n_hidden_1])),

    'decoder_h2': tf.Variable(tf.random_normal([n_hidden_1, n_input])),

}

biases = {

    'encoder_b1': tf.Variable(tf.random_normal([n_hidden_1])),

    'encoder_b2': tf.Variable(tf.random_normal([n_hidden_2])),

    'decoder_b1': tf.Variable(tf.random_normal([n_hidden_1])),

    'decoder_b2': tf.Variable(tf.random_normal([n_input])),

}

#定义自动编码模型的网络结构,包括压缩和解压的过程

# 定义压缩函数

def encoder(x):

    # Encoder Hidden layer with sigmoid activation #1

    layer_1 = tf.nn.sigmoid(tf.add(tf.matmul(x, weights['encoder_h1']),biases['encoder_b1']))

    # Decoder Hidden layer with sigmoid activation #2

    layer_2 = tf.nn.sigmoid(tf.add(tf.matmul(layer_1, weights['encoder_h2']),biases['encoder_b2']))

    return layer_2

# 定义解压函数

def decoder(x):

    # Encoder Hidden layer with sigmoid activation #1

    layer_1 = tf.nn.sigmoid(tf.add(tf.matmul(x, weights['decoder_h1']),biases['decoder_b1']))

    # Decoder Hidden layer with sigmoid activation #2

    layer_2 = tf.nn.sigmoid(tf.add(tf.matmul(layer_1, weights['decoder_h2']),biases['decoder_b2']))

    return layer_2

# 建立模型

encoder_op = encoder(X)

decoder_op = decoder(encoder_op)

# 得出预测分类值

y_pred = decoder_op

# 得出真实值,即输入值

y_true = X

# 定义损失函数和优化器

cost = tf.reduce_mean(tf.pow(y_true - y_pred, 2))

optimizer = tf.train.RMSPropOptimizer(learning_rate).minimize(cost)

# 初始化变量

init = tf.global_variables_initializer()

# 3 训练数据及评估模型

with tf.Session() as sess:

    sess.run(init)

    total_batch = int(mnist.train.num_examples/batch_size)

    # 开始训练

    for epoch in range(training_epochs):

        # Loop over all batches

        for i in range(total_batch):

            batch_xs, batch_ys = mnist.train.next_batch(batch_size)

            # Run optimization op (backprop) and cost op (to get loss value)

            _, c = sess.run([optimizer, cost], feed_dict={X: batch_xs})

        # 每一轮,打印一次损失值

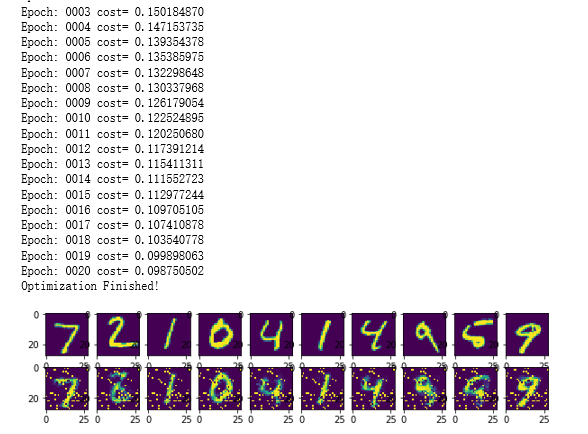
        if epoch % display_step == 0:

            print("Epoch:", '%04d' % (epoch+1),"cost=", "{:.9f}".format(c))

    print("Optimization Finished!")

    # 对测试集应用训练好的自动编码网络

    encode_decode = sess.run(

        y_pred, feed_dict={X: mnist.test.images[:examples_to_show]})

    # 比较测试集原始图片和自动编码网络的重建结果

    f, a = plt.subplots(2, 10, figsize=(10, 2))

    for i in range(examples_to_show):

        a[0][i].imshow(np.reshape(mnist.test.images[i], (28, 28)))

        a[1][i].imshow(np.reshape(encode_decode[i], (28, 28)))

    f.show()

    plt.draw()

    #plt.waitforbuttonpress()

吴裕雄 PYTHON 神经网络——TENSORFLOW 无监督学习处理MNIST手写数字数据集的更多相关文章
- 吴裕雄 python 神经网络TensorFlow实现LeNet模型处理手写数字识别MNIST数据集
import tensorflow as tf tf.reset_default_graph() # 配置神经网络的参数 INPUT_NODE = 784 OUTPUT_NODE = 10 IMAGE ...
- 吴裕雄 python 神经网络——TensorFlow实现AlexNet模型处理手写数字识别MNIST数据集
import tensorflow as tf # 输入数据 from tensorflow.examples.tutorials.mnist import input_data mnist = in ...
- 吴裕雄 python 神经网络——TensorFlow 循环神经网络处理MNIST手写数字数据集
#加载TF并导入数据集 import tensorflow as tf from tensorflow.contrib import rnn from tensorflow.examples.tuto ...
- 吴裕雄 python 神经网络——TensorFlow 使用卷积神经网络训练和预测MNIST手写数据集
import tensorflow as tf import numpy as np from tensorflow.examples.tutorials.mnist import input_dat ...
- 吴裕雄 python 神经网络——TensorFlow 训练过程的可视化 TensorBoard的应用
#训练过程的可视化 ,TensorBoard的应用 #导入模块并下载数据集 import tensorflow as tf from tensorflow.examples.tutorials.mni ...
- 吴裕雄 python 神经网络——TensorFlow实现搭建基础神经网络
import numpy as np import tensorflow as tf import matplotlib.pyplot as plt def add_layer(inputs, in_ ...
- 吴裕雄 python 神经网络——TensorFlow图片预处理调整图片
import numpy as np import tensorflow as tf import matplotlib.pyplot as plt def distort_color(image, ...
- 吴裕雄 python 神经网络——TensorFlow pb文件保存方法
import tensorflow as tf from tensorflow.python.framework import graph_util v1 = tf.Variable(tf.const ...
- 吴裕雄 python 神经网络——TensorFlow 数据集高层操作
import tempfile import tensorflow as tf train_files = tf.train.match_filenames_once("E:\\output ...
随机推荐
- [bzoj1905] [ZJOI2007] Hide 捉迷藏
题意简述 给定一棵 \(n\) 个点的树,起初每个点都为黑色. 2种操作,要么改变某个点的颜色(由黑至白或由白至黑),要么询问距离最远的两个黑点间的距离. 共 \(m\) 次操作. \(n\leq 1 ...
- 解决pycharm创建github工程但push失败的问题
1.运行git-cmd.exe; 2.d: cd 工程路径 3.执行命令:git remote set-url origin https://github.com/wawj901124/jmet ...
- docker使用nginx实现ssl(https)反向代理其他容器应用
安装nginx容器 搜索nginx镜像 docker search nginx 拉取最新版nginx docker pull nginx:latest 运行容器 docker run --name=n ...
- 消息中间件之ActiveMQ
一.什么是消息中间件(MQ) 1.1 为什么会需要消息队列(MQ)? 主要原因是由于在高并发环境下,由于来不及同步处理,请求往往会发生堵塞,比如说,大量的insert,update之类的请求同时到达M ...
- 来了,就给自己立个flag
2019-09-16,刚刚申请的博客园. 不知道不觉,自己已经大四毕业了. 说来惭愧,已经接触IT这方面已经四年了. 但仍然感觉自己像个萌新,啥也不懂,这也不会,那也不会. 8月开始在公司大佬的指导下 ...
- dremio的学习点滴
在连接数据源后,进行数据源反射的创建,dremio会在本地创建一个类似于副本的文件,具体目录未知,当下次去执行sql时,则会启动加速器进行查询速度的优化. 反射策略: full update:数据源全 ...
- vue updated
updated方法的触发条件———— 当data中定义的数据有变化时就会加载updated方法
- 做新时代的奋斗者!(好吧,我还没弄出python的编译环境)
Pictures: 今日分来的补记来嘞: Game 1:Guess the number. Python包含许多内建的函数,有些函数存在于称为模块的单独的程序中,可以使用import语句把它们的模块导 ...
- 程序设计实验:一个Python游戏,体验软件开发。
小组在GitHub上找了一个Pygame实现的超级马里奥游戏.所以我的学习过程大致如下: 1.快速学习Python基础语法. 2.学习pygame并着手理解这个项目. 3.完成作业以及各种文档报告. ...
- Visual Studio 2017:SQLite/SQL Server Compact ToolBox使用
1.首先是下载安装插件:SQLite/SQL Server Compact Toolbox,也可以从工具-->扩展和更新-->联机-->搜索:SQLite/SQL Server Co ...
