
Learning OSG programing---osgwindows
/* OpenSceneGraph example, osgwindows.

*

*  Permission is hereby granted, free of charge, to any person obtaining a copy

*  of this software and associated documentation files (the "Software"), to deal

*  in the Software without restriction, including without limitation the rights

*  to use, copy, modify, merge, publish, distribute, sublicense, and/or sell

*  copies of the Software, and to permit persons to whom the Software is

*  furnished to do so, subject to the following conditions:

*

*  THE SOFTWARE IS PROVIDED "AS IS", WITHOUT WARRANTY OF ANY KIND, EXPRESS OR

*  IMPLIED, INCLUDING BUT NOT LIMITED TO THE WARRANTIES OF MERCHANTABILITY,

*  FITNESS FOR A PARTICULAR PURPOSE AND NONINFRINGEMENT. IN NO EVENT SHALL THE

*  AUTHORS OR COPYRIGHT HOLDERS BE LIABLE FOR ANY CLAIM, DAMAGES OR OTHER

*  LIABILITY, WHETHER IN AN ACTION OF CONTRACT, TORT OR OTHERWISE, ARISING FROM,

*  OUT OF OR IN CONNECTION WITH THE SOFTWARE OR THE USE OR OTHER DEALINGS IN

*  THE SOFTWARE.

*/

#include <osgDB/ReadFile>

#include <osgUtil/Optimizer>

#include <osgViewer/Viewer>

#include <iostream>

int main( int argc, char **argv )

{

    // use an ArgumentParser object to manage the program arguments.

    osg::ArgumentParser arguments(&argc,argv);

    // read the scene from the list of file specified commandline args.

    osg::ref_ptr<osg::Node> loadedModel = osgDB::readRefNodeFiles(arguments);

    // if not loaded assume no arguments passed in, try use default mode instead.

    if (!loadedModel) loadedModel = osgDB::readRefNodeFile("/home/ding/Downloads/OpenSceneGraph-Data/cow.osgt");
  //this path was modified because the OSG_FILE_PATH is not configed correctly in my computer!
  //so it is an alternative method

    // if no model has been successfully loaded report failure.

    if (!loadedModel)

    {

        std::cout << arguments.getApplicationName() <<": No data loaded" << std::endl;

        return ;

    }

    // construct the viewer.

    osgViewer::Viewer viewer;

    int xoffset = ;

    int yoffset = ;

    // left window + left slave camera

    {

        osg::ref_ptr<osg::GraphicsContext::Traits> traits = new osg::GraphicsContext::Traits;

        traits->x = xoffset + ;

        traits->y = yoffset + ;

        traits->width = ;

        traits->height = ;

        traits->windowDecoration = true;

        traits->doubleBuffer = true;

        traits->sharedContext = ;

        traits->readDISPLAY();

        traits->setUndefinedScreenDetailsToDefaultScreen();

        osg::ref_ptr<osg::GraphicsContext> gc = osg::GraphicsContext::createGraphicsContext(traits.get());

        osg::ref_ptr<osg::Camera> camera = new osg::Camera;

        camera->setGraphicsContext(gc.get());

        camera->setViewport(new osg::Viewport(,, traits->width, traits->height));

        GLenum buffer = traits->doubleBuffer ? GL_BACK : GL_FRONT;

        camera->setDrawBuffer(buffer);

        camera->setReadBuffer(buffer);

        // add this slave camera to the viewer, with a shift left of the projection matrix

        viewer.addSlave(camera.get(), osg::Matrixd::translate(1.0,-1.0,0.0), osg::Matrixd());

    }

    // right window + right slave camera

    {

        osg::ref_ptr<osg::GraphicsContext::Traits> traits = new osg::GraphicsContext::Traits;

        traits->x = xoffset + ;

        traits->y = yoffset + ;

        traits->width = ;

        traits->height = ;

        traits->windowDecoration = true;

        traits->doubleBuffer = true;

        traits->sharedContext = ;

        traits->readDISPLAY();

        traits->setUndefinedScreenDetailsToDefaultScreen();

        osg::ref_ptr<osg::GraphicsContext> gc = osg::GraphicsContext::createGraphicsContext(traits.get());

        osg::ref_ptr<osg::Camera> camera = new osg::Camera;

        camera->setGraphicsContext(gc.get());

        camera->setViewport(new osg::Viewport(,, traits->width, traits->height));

        GLenum buffer = traits->doubleBuffer ? GL_BACK : GL_FRONT;

        camera->setDrawBuffer(buffer);

        camera->setReadBuffer(buffer);

        // add this slave camera to the viewer, with a shift right of the projection matrix

        viewer.addSlave(camera.get(), osg::Matrixd::translate(-1.0,-1.0,0.0), osg::Matrixd());

    }

    // left_down window + right slave camera

    {

        osg::ref_ptr<osg::GraphicsContext::Traits> traits = new osg::GraphicsContext::Traits;

        traits->x = xoffset + ;

        traits->y = yoffset + ;

        traits->width = ;

        traits->height = ;

        traits->windowDecoration = true;

        traits->doubleBuffer = true;

        traits->sharedContext = ;

        traits->readDISPLAY();

        traits->setUndefinedScreenDetailsToDefaultScreen();

        osg::ref_ptr<osg::GraphicsContext> gc = osg::GraphicsContext::createGraphicsContext(traits.get());

        osg::ref_ptr<osg::Camera> camera = new osg::Camera;

        camera->setGraphicsContext(gc.get());

        camera->setViewport(new osg::Viewport(,, traits->width, traits->height));

        GLenum buffer = traits->doubleBuffer ? GL_BACK : GL_FRONT;

        camera->setDrawBuffer(buffer);

        camera->setReadBuffer(buffer);

        // add this slave camera to the viewer, with a shift right of the projection matrix

        viewer.addSlave(camera.get(), osg::Matrixd::translate(1.0,1.0,0.0), osg::Matrixd());

    }

    // right_down window + right slave camera

    {

        osg::ref_ptr<osg::GraphicsContext::Traits> traits = new osg::GraphicsContext::Traits;

        traits->x = xoffset + ;

        traits->y = yoffset + ;

        traits->width = ;

        traits->height = ;

        traits->windowDecoration = true;

        traits->doubleBuffer = true;

        traits->sharedContext = ;

        traits->readDISPLAY();

        traits->setUndefinedScreenDetailsToDefaultScreen();

        osg::ref_ptr<osg::GraphicsContext> gc = osg::GraphicsContext::createGraphicsContext(traits.get());

        osg::ref_ptr<osg::Camera> camera = new osg::Camera;

        camera->setGraphicsContext(gc.get());

        camera->setViewport(new osg::Viewport(,, traits->width, traits->height));

        GLenum buffer = traits->doubleBuffer ? GL_BACK : GL_FRONT;

        camera->setDrawBuffer(buffer);

        camera->setReadBuffer(buffer);

        // add this slave camera to the viewer, with a shift right of the projection matrix

        viewer.addSlave(camera.get(), osg::Matrixd::translate(-1.0,1.0,0.0), osg::Matrixd());

    }

    // optimize the scene graph, remove redundant nodes and state etc.

    osgUtil::Optimizer optimizer;

    optimizer.optimize(loadedModel);

    // set the scene to render

    viewer.setSceneData(loadedModel);

    return viewer.run();

}
The routine of each slave camera is alike. While the key point is this sentence:
viewer.addSlave(camera.get(), osg::Matrixd::translate(-1.0,1.0,0.0), osg::Matrixd());
This sentence set the viewpoint of slave camera,which translate the position of view point. Four slave camera view the common model in different direction, combine together.
the command to complie this program is following:
g++ -o osgwindows_1 osgwindows_1.cpp -losg -losgDB -losgViewer -lOpenThreads -losgUtil
After compling, just run it with:
sudo ./osgwindows_1
The outcome of above program is shown:
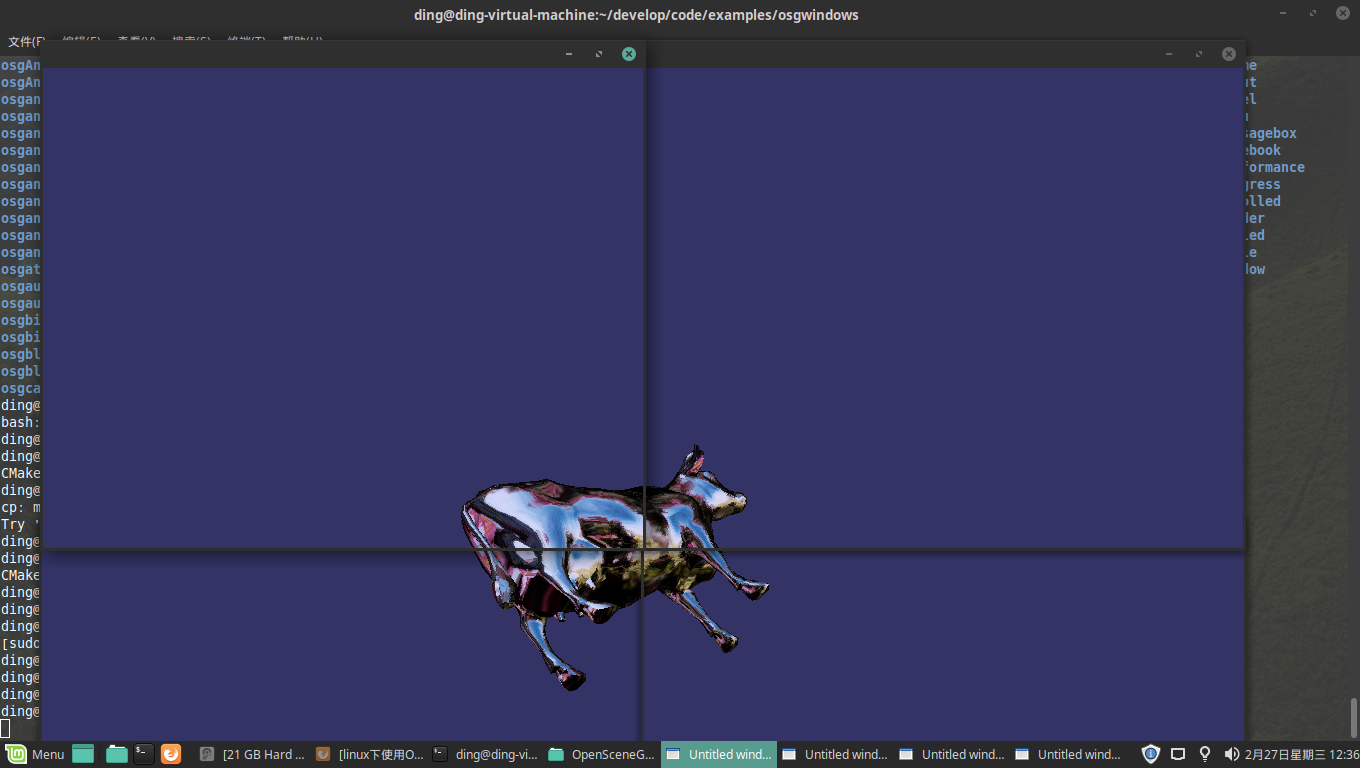
Like moniter constructed with four screen. Drag mouse in one window, the model will rotate in other three screen meanwhile. Great!
Learning OSG programing---osgwindows的更多相关文章
- Learning OSG programing---osgScribe
Learning OSG programing---osgScribe Scribe可以翻译为素描,抄写等.本例通过在模型表面添加一层素描,来显示模型的骨架. 关键代码: osg::ref_ptr&l ...
- Learning OSG programing---Multi Camera in Multi window 在多窗口中创建多相机
这个例子演示了在多个窗口中创建多个相机,函数的代码如下: void multiWindowMultipleCameras(osgViewer::Viewer& viewer,bool mult ...
- Learning OSG programing---Multi Camera in one window 在单窗口中创建多相机
在学习OSG提供的例子osgCamera中,由于例子很长,涉及很多细节,考虑将其分解为几个小例子.本文介绍实现在一个窗口中添加多个相机的功能. 此函数接受一个Viewer引用类型参数,设置图形上下文的 ...
- Learning OSG programing---osgAnimation(3)
接下来是用createModel函数创建模型: osg::ref_ptr<osg::Group> createModel(bool overlay, osgSim::OverlayNode ...
- Learning OSG programing---osgAnimation(2)
osg::Node* createBase(const osg::Vec3& center,float radius) { ; ; *radius; *radius; osg::Vec3 v0 ...
- Learning OSG programing---osgAnimation(1)
osg::AnimationPath* createAnimationPath(const osg::Vec3& center,float radius,double looptime) { ...
- Learning OSG programing---osgShape
本例示范了osg中Shape ---- 基本几何元素的绘制过程.参照osg官方文档,Shape 类包含以下子类: 在示例程序中,函数createShapes函数用于生成需要绘制的几何形状. osg:: ...
- Learning OSG programing---osgClip
OSG Clip例程剖析 首先是创建剪切节点的函数代码: osg::ref_ptr<osg::Node> decorate_with_clip_node(const osg::ref_pt ...
- Coursera Deep Learning 2 Improving Deep Neural Networks: Hyperparameter tuning, Regularization and Optimization - week3, Hyperparameter tuning, Batch Normalization and Programming Frameworks
Tuning process 下图中的需要tune的parameter的先后顺序, 红色>黄色>紫色,其他基本不会tune. 先讲到怎么选hyperparameter, 需要随机选取(sa ...
随机推荐
- Codeforces Round #460 (Div. 2) B Perfect Number(二分+数位dp)
题目传送门 B. Perfect Number time limit per test 2 seconds memory limit per test 256 megabytes input stan ...
- 如何为自己的网站添加HTTPS服务
如何为自己的网站添加HTTPS服务,针对单个域名而言的,下面介绍网站添加https方法,拿阿里云方法 1.准备证书文件 进入阿里云管理控制台-安全-证书服务点击购买证书服务,进入证书购买页面(放心,我 ...
- spark连接hive找不到table
Caused by: org.apache.spark.sql.catalyst.analysis.NoSuchTableException: Table or view 'xxxx' not fou ...
- P3515 [POI2011]Lightning Conductor(决策单调性分治)
P3515 [POI2011]Lightning Conductor 式子可转化为:$p>=a_j-a_i+sqrt(i-j) (j<i)$ $j>i$的情况,把上式翻转即可得到 下 ...
- installing-sql-server-2012-error-prior-visual-studio-2010-instances-requiring 转摘
there are two way: First : Inside your CD of SQL Server 2012 you can go to this path \redist\VisualS ...
- 【问题解决方案】Linux中进入目录下文件夹
win系统中直接 cd+空格+文件夹名 Linux下 cd+空格+./+文件名 其中句点表示"当前目录" 除非在根目录不加,或者把路径写全用绝对路径进入 Linux下切换路径的相关 ...
- JavaScript——实现继承的几种方式
实现继承的6中方法: 借用构造函数 组合继承 原型式继承 寄生式继承 寄生组合式继承 拷贝继承 1. 借用构造函数 在子类型构造函数的内部调用超类构造函数.通过使用apply()和call()方法在新 ...
- vue项目一个页面使用多个轮播图详解
1.html代码: <div v-for="(item,index) in arrDataList.Floor"> // 根据后台数据循环渲染多个轮播图组件 <d ...
- YouCompleteMe报错可能是第三方库没有
git submodule update --init --recursive 到YouCompleteMe安装目录下,执行上面的命令
- Swoole 的运行模式
Swoole 做了什么 Swoole 是 php 的一个扩展,但是他又不是普通的扩展,其最明显的特点就是:一但运行后就会接管PHP的控制权,进入事件循环. 当某种IO事件发生时, Swoole 会回调 ...