iOS学习之UINavigationController详解与使用(二)页面切换和segmentedController
iOS学习之UINavigationController详解与使用(一)添加UIBarButtonItem是上篇,我们接着讲UINavigationController的重要作用,页面的管理和切换。
1、RootView 跳到SecondView
首先我们需要新一个View。新建SecondView,按住Command键然后按N,弹出新建页面,我们新建SecondView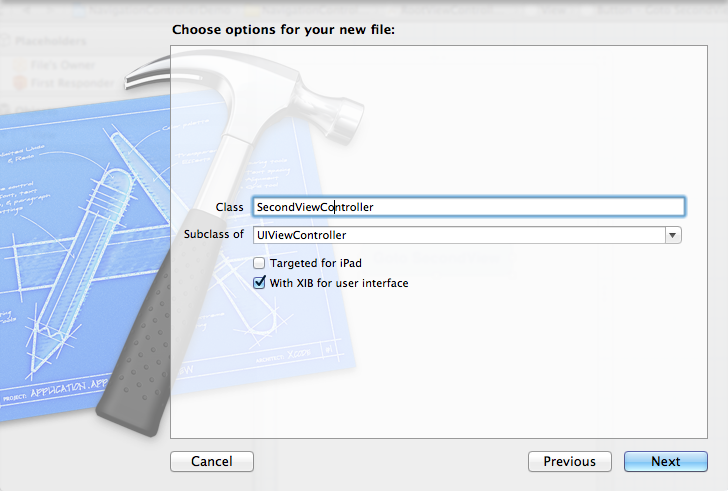
2、为Button 添加点击事件,实现跳转
在RootViewController.xib中和RootViewController.h文件建立连接

在RootViewController.m中实现代码,alloc一个SecondViewController,用pushViewController到navigationController中去,并为
SecondViewController这是title为 secondView.title =@"Second View"; 默认情况下,titie为下个页面返回按钮的名字。
- - (IBAction)gotoSecondView:(id)sender {
- SecondViewController *secondView = [[SecondViewController alloc] init];
- [self.navigationController pushViewController:secondView animated:YES];
- secondView.title = @"Second View";
- }
这是点击GotoSecondView 按钮,出现
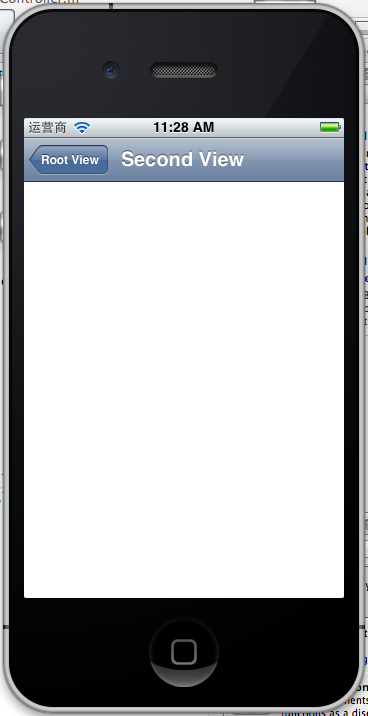
这就是SecondView了。
3、添加segmentedController
在nav bar这样的效果是如何实现的呢?
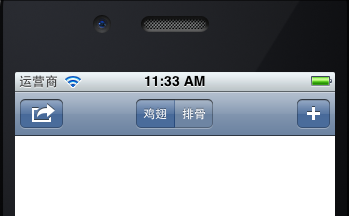
这就是segmentedController。
3.1在RootViewController.m的viewDidLoad添加如下代码:
- NSArray *array = [NSArray arrayWithObjects:@"鸡翅",@"排骨", nil];
- UISegmentedControl *segmentedController = [[UISegmentedControl alloc] initWithItems:array];
- segmentedController.segmentedControlStyle = UISegmentedControlSegmentCenter;
- [segmentedController addTarget:self action:@selector(segmentAction:) forControlEvents:UIControlEventValueChanged];
- self.navigationItem.titleView = segmentedController;
3.2[segmentedController addTarget:selfaction:的实现
- -(void)segmentAction:(id)sender
- {
- switch ([sender selectedSegmentIndex]) {
- case 0:
- {
- UIAlertView *alter = [[UIAlertView alloc] initWithTitle:@"提示" message:@"你点击了鸡翅" delegate:self cancelButtonTitle:@"确定" otherButtonTitles:nil, nil];
- [alter show];
- }
- break;
- case 1:
- {
- UIAlertView *alter = [[UIAlertView alloc] initWithTitle:@"提示" message:@"你点击了排骨" delegate:self cancelButtonTitle:@"确定" otherButtonTitles:nil, nil];
- [alter show];
- }
- break;
- default:
- break;
- }
- }
这样就能响应鸡翅和排骨按钮了
4、自定义backBarButtonItem
左上角的返回上级View的barButtonitem的名字是上级目录的Title,如果title或者适合做button的名字,怎么办呢?我们可以自己定义
代码如下:
- UIBarButtonItem *backButton = [[UIBarButtonItem alloc] initWithTitle:@"根视图" style:UIBarButtonItemStyleDone target:nil action:nil];
- self.navigationItem.backBarBu
效果:

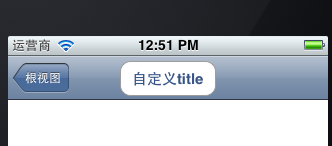
6、自定义title
UINavigationController的title可以用别view替代,比如用UIButton UILable等,下面我用UIButton.
在SecondViewController.m中添加下面如下。
- - (void)viewDidLoad
- {
- [super viewDidLoad];
- UIButton *button = [UIButton buttonWithType: UIButtonTypeRoundedRect];
- [button setTitle: @"自定义title" forState: UIControlStateNormal];
- [button sizeToFit];
- self.navigationItem.titleView = button;}
运行程序,goto secondView,运行效果
下篇文件讲下Navigation 的Toobar如何显示和如何自己定义。
下篇:
iOS学习之UINavigationController详解与使用(三)ToolBar
iOS学习之UINavigationController详解与使用(二)页面切换和segmentedController的更多相关文章
- [转]iOS学习之UINavigationController详解与使用(二)页面切换和segmentedController
转载地址:http://blog.csdn.net/totogo2010/article/details/7682433 iOS学习之UINavigationController详解与使用(一)添加U ...
- iOS学习之UINavigationController详解与使用(一)添加UIBarButtonItem
http://blog.csdn.net/totogo2010/article/details/7681879 1.UINavigationController导航控制器如何使用 UINavigati ...
- [转]iOS学习之UINavigationController详解与使用(三)ToolBar
转载地址:http://blog.csdn.net/totogo2010/article/details/7682641 iOS学习之UINavigationController详解与使用(二)页面切 ...
- iOS学习之UINavigationController详解与使用(三)ToolBar
1.显示Toolbar 在RootViewController.m的- (void)viewDidLoad方法中添加代码,这样Toobar就显示出来了. [cpp] view plaincopy [ ...
- [转]iOS学习之UINavigationController详解与使用(一)添加UIBarButtonItem
转载地址:http://blog.csdn.net/totogo2010/article/details/7681879 1.UINavigationController导航控制器如何使用 UINav ...
- JavaScript学习笔记-实例详解-类(二)
实例详解-类(二) //===给Object.prototype添加只读\不可枚举\不可配置的属性objectId(function(){ Object.defineProperty(Object ...
- IOS开发之UINavigationController详解
UINavigationController是IOS编程中比较常用的一种容器view controller,很多系统的控件(如UIImagePickerViewController)以及很多有名的AP ...
- UINavigationController详解一(转)UIBarButtonItem
本文出自:http://www.cnblogs.com/smileEvday/archive/2012/05/14/2495153.html 特别感谢. 1.UINavigationControlle ...
- IOS 友盟使用详解
IOS 友盟使用详解 这篇博客将会详细介绍友盟的使用,希望对博友们有所帮助. 首先我们在浏览器上搜索友盟. 在这里我们选择官网这个,进去友盟官网后我们按照下图进行选择. 接下来选择如下图 Next 这 ...
随机推荐
- .NET Standard / dotnet-core / net472 —— .NET 究竟应该如何大小写?
本文将解释在 .NET 技术栈中各种不同使用方式下 N E T 三个字母何时大写何时小写:前面的 “.” 什么时候加上,什么时候去掉,什么时候又使用 “dot”. .NET 在技术文档中 如果你阅 ...
- 使 32 位程序使用大于 2GB 的内存
不管在 32 位 Windows 上还是在 64 位 Windows 上,32 位的应用程序都只能使用最大 2GB 的内存,这是我们司空见惯的一个设定.但其实 Windows 提供了一些方法让我们打破 ...
- JavaScript for 循环累加 json 字符串
var msg = {"status":1,"data":[{"id":"12","words":& ...
- 《DSP using MATLAB》示例9.3
增采样操作是时变的.
- RabbitMQ消息队列———安装(一)
一.RabbitMQ队列 不同进程间的通信,简称IPC.不同的进程间的通信,可以基于队列解决,将生产者和消费者进行解耦,中间的队列作为其桥梁.RabbitMQ是一个在AMQP基础上完整的,可复用的企业 ...
- mongooseim xmpp 服务器docker 安装试用
备注: 预备环境docker xmpp client 1. 启动mongooseim docker run -d -t -h mongooseim-1 --name mongooseim- ...
- struts 2整合spring要注意的问题(二)
在 struts2_spring_plugin.xml配置文件里有一个strus.objectFactory.spring.autoWire 属性 默认值为name 也就是说你不想装载.它都会找个 ...
- jsp_include
jsp__include指令先包含后编译 include 行为 先编译后包含 <jsp:include page="head.jsp"></jsp:include ...
- Ipython notebook 一些技巧
在模块后面输入:?,运行可以显示说明: 输入:??,运行可以显示源代码. 输入%matplotlib inline将matplotlib库导入,要显示的图片就可以嵌入到网页中了 %prun用于代码的执 ...
- centos 限制只能访问某个目录的php文件
vi /etc/php.ini #编辑 open_basedir = .:/tmp/ #在380行 设置表示允许访问当前目录(即PHP脚本文件所在之目录)和/tmp/目录,可以防止php木马跨站,如果 ...