iphone Dev 开发实例9:Create Grid Layout Using UICollectionView in iOS 6
In this tutorial, we will build a simple app to display a collection of recipe photos in grid layout. Here are what you’re going to learn:
- Introduction to UICollectionView
- How to Use UICollectionView to build a simple Grid-based layout
- Customizing the Collection Cell Background
Create Simple App with Grid Layout
To better understand how UICollectionView work, let’s get some hand-on experience and build a simple app. Open Xcode and create a new project using the “Single View application” template. Name the project as “RecipePhoto” with “Use Storyboard” and “Use Automatic Reference Count” enabled.

RecipePhoto – New Xcode Project
Designing the Collection View
Go to Storyboard and delete the default view controller. Instead, add a Collection View Controller from object library.

Add a Collection View Controller
In the “Size Inspector” of the Collection View, you can change various size-related attributes. Let’s alter the size of the cell and change it to 100 by 100 pixels.

Change the size of Collection View Cell
Next, select the Collection View Cell and set the identifier as “Cell” in the Attribute Inspector.

Cell Reuse Identifier
Then, add an Image View to the cell. Xcode automatically resizes the image view and make it fit into the cell. In the “Attribute Inspector”, set the tag value to 100 for later reference.

Add Image View to Cell
Coding the Collection View
In Project Navigator, right-click and select “New File”. Create a new class that is a subclass of UICollectionViewController and name it as RecipeCollectionViewController.

Create RecipeCollectionViewController
Go back to Storyboard and assign it as the custom class of the Collection View Controller.

Assign RecipeCollectionViewController as the custom class
As said, the UICollectionView operates in a very similar way to UITableView. To populate data in UITableView, we have to implement two methods defined in the UITableViewDataSource protocol. Much like the UITableView, the UICollectionViewDataSource protocol defines data source methods for providing the data of the collection view. At least, you have to implement the collectionView:numberOfItemsInSection: and collectionView:cellForItemAtIndexPath: methods.
Let’s move on to code the RecipeCollectionViewController class. First, download this image pack, unzip it and add all the images into the Xcode project.
In RecipeCollectionViewController.m, declare an array for the image files:
|
1
2 3 |
And initialize it in viewDidLoad method:
|
1
2 3 4 5 6 7 8 |
- (void)viewDidLoad
{ [super viewDidLoad]; // Initialize recipe image array recipeImages = [NSArray arrayWithObjects:@"angry_birds_cake.jpg", @"creme_brelee.jpg", @"egg_benedict.jpg", @"full_breakfast.jpg", @"green_tea.jpg", @"ham_and_cheese_panini.jpg", @"ham_and_egg_sandwich.jpg", @"hamburger.jpg", @"instant_noodle_with_egg.jpg", @"japanese_noodle_with_pork.jpg", @"mushroom_risotto.jpg", @"noodle_with_bbq_pork.jpg", @"starbucks_coffee.jpg", @"thai_shrimp_cake.jpg", @"vegetable_curry.jpg", @"white_chocolate_donut.jpg", nil]; } |
Next, implement the two mandatory methods of UICollectionViewDataSource protocol:
|
1
2 3 4 5 6 7 8 9 10 11 12 13 14 15 |
- (NSInteger)collectionView:(UICollectionView *)collectionView numberOfItemsInSection:(NSInteger)section {
return recipeImages.count; } - (UICollectionViewCell *)collectionView:(UICollectionView *)collectionView cellForItemAtIndexPath:(NSIndexPath *)indexPath{ |
The collectionView:numberOfItemsInSection: method returns the number of recipe images. The cellForItemAtIndexPath: method provides the data for the collection view cells. We first define a cell identifier and then request the collectionView to dequeue a reusable cell using that reuse identifier. In iOS 6, you no longer need to create the cell manually. The dequeueReusableCellWithReuseIdentifier: method will automatically create a cell or return you with a cell from re-use queue. At last, we get the image view by using the tag value and assign it with a recipe image.
Now compile and run the app. You should have a grid-based photo app.

RecipePhoto App with Grid-based Layout
Customizing the Collection Cell Background
Isn’t UICollectionView great? With a few lines of code, you can create a grid-based photo app. But what if you want to add a picture frame to the photos? Like other UI elements, the design of the collection view cell lets developers customize the background easily. The UICollectionViewCell is actually comprised of three different views including background, selected background and content view. It’s best to illustrate the cell views using a picture: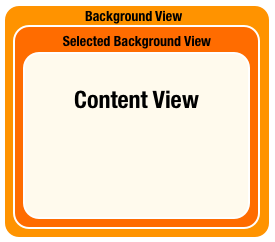
- Background View – background view of the cell
- Selected Background View – the background view when the cell is selected. When user selects the cell, this selected background view will be layered above the background view.
- Content View – obviously, it’s the cell content.
We have already used the content view to display the recipe photo. We’ll make use of the background view to show the picture frame. In the image pack you downloaded earlier, it includes a file named “pic_frame.png”, which is the picture frame. The size of the frame is 100 by 100 pixel. In order to frame the recipe photo, we’ll first resize the image view of cell and re-arrange its position.
Go to Storyboard and select the image view. Set X to 5 and Y to 8. The width and height should be changed to 90 and 72 pixels respectively.

Resize image view to fit into the photo frame
In the cellForItemAtIndexPath: method of RecipeCollectionViewController.m, add the following line of code:
|
1
|
cell.backgroundView = [[UIImageView alloc] initWithImage:[UIImage imageNamed:@"photo-frame.png"]];
|
We first load the photo frame image and set it as the cell background. Now compile and run the app again. Your app should look like this:

iphone Dev 开发实例9:Create Grid Layout Using UICollectionView in iOS 6的更多相关文章
- iphone Dev 开发实例10:How To Add a Slide-out Sidebar Menu in Your Apps
Creating the Xcode Project With a basic idea about what we’ll build, let’s move on. You can create t ...
- iphone Dev 开发实例8: Parsing an RSS Feed Using NSXMLParser
From : http://useyourloaf.com/blog/2010/10/16/parsing-an-rss-feed-using-nsxmlparser.html Structure o ...
- iphone dev 入门实例6:How To Use UIScrollView to Scroll and Zoom and Page
http://www.raywenderlich.com/10518/how-to-use-uiscrollview-to-scroll-and-zoom-content Getting Starte ...
- iphone dev 入门实例5:Get the User Location & Address in iPhone App
Create the Project and Design the Interface First, create a new Xcode project using the Single View ...
- iphone dev 入门实例4:CoreData入门
The iPhone Core Data Example Application The application developed in this chapter will take the for ...
- iphone dev 入门实例1:Use Storyboards to Build Table View
http://www.appcoda.com/use-storyboards-to-build-navigation-controller-and-table-view/ Creating Navig ...
- iphone dev 入门实例7:How to Add Splash Screen in Your iOS App
http://www.appcoda.com/how-to-add-splash-screen-in-your-ios-app/ What’s Splash Screen? For those who ...
- iphone dev 入门实例2:Pass Data Between View Controllers using segue
Assigning View Controller Class In the first tutorial, we simply create a view controller that serve ...
- iphone dev 入门实例3:Delete a Row from UITableView
How To Delete a Row from UITableView I hope you have a better understanding about Model-View-Control ...
随机推荐
- BUTTON标签和INPUT标签的区别【转】
一句话概括主题:<button>具有<input type="button" ... >相同的作用但是在可操控性方面更加强大. HTML 4.01规范的Fo ...
- Spring MVC 属性文件读取注入到静态字段
目录(?)[-] servlet-contextxml configproperties 示例属性 ConfigInfo 对应的配置bean 使用 在项目中,有些参数需要配置到属性文件xxx.pr ...
- Web端文件打包.zip下载
使用ant.jar包的API进行文件夹打包.直接上代码: String zipfilename = "test.zip"; File zipfile = new File(zipf ...
- Codeforces Round #130 (Div. 2)
A. Dubstep 字符串模拟. string.find()用法 string str; size_t pos = str.find("WUB"); // 返回匹配的第一个位置 ...
- Python文件格式化写入
[root@localhost test]# cat 1.py fd = open('format.txt','w') head = "%10s%10s%10s\n"%('id', ...
- 通过laravel理解IoC(控制反转)容器和DI(依赖注入)
原文地址: http://www.insp.top/learn-laravel-container ,转载务必保留来源,谢谢了! 容器,字面上理解就是装东西的东西.常见的变量.对象属性等都可以算是容器 ...
- LESS中文版函数手册
LESS是一种由Alexis Sellier设计的动态层叠样式表语言.LESS 做为 CSS 的一种形式的扩展,它并没有减少 CSS 的功能,而是在现有的 CSS 语法之上,添加了许多其它的功能. 在 ...
- DATA GUARD架构(一)
Data Guard传输-应用架构.>图1-1 ------------------------------------------------------------ 重做传输架构>图1 ...
- IIS用户权限备忘
经常在网站部署到IIS遇到IIS帐户没有权限的问题,总是在看IIS Admin Service,但发现些帐户是有权限的. 其实针对相应的站点,应该看的是Application Pool的运行帐户,这个 ...
- jQuery return false
在jQuery代码中,我们常见用return false来阻止浏览器的默认行为.例如点击链接,浏览器默认打开一个新窗口/标签,为了阻止浏览器的默认行为,我们往往这样操作: $("a.togg ...