
iphone dev 入门实例3:Delete a Row from UITableView
How To Delete a Row from UITableView
I hope you have a better understanding about Model-View-Controller. Now let’s move onto the coding part and see how we can delete a row from UITableView. To make thing simple, I’ll use the plain version of Simple Table app as an example.
If you thoroughly understand the MVC model, you probably have some ideas how to implement row deletion. There are three main things we need to do:
1. Write code to switch to edit mode for row deletion
2. Delete the corresponding table data from the model
3. Reload the table view in order to reflect the change of table data
1. Write code to switch to edit mode for row deletion
In iOS app, user normally swipes across a row to initiate the delete button. Recalled that we have adopted the UITableViewDataSource protocol, if you refer to the API doc, there is a method namedtableView:commitEditingStyle:forRowAtIndexPath. When user swipes across a row, the table view will check to see if the method has been implemented. If the method is found, the table view will automatically show the “Delete” button.
Simply add the following code to your table view app and run your app:
- (void)tableView:(UITableView *)tableView commitEditingStyle:(UITableViewCellEditingStyle)editingStyle forRowAtIndexPath:(NSIndexPath *)indexPath

{

}
Even the method is empty and doesn’t perform anything, you’ll see the “Delete” button when you swipe across a row.
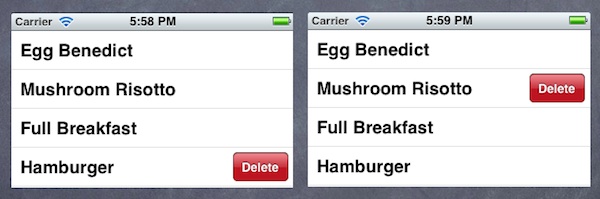
Swipe to Delete a Table Row
2. Delete the corresponding table data from the model
The next thing is to add code to the method and remove the actual table data. Like other table view methods, it passes the indexPath as parameter that tells you the row number for the deletion. So you can make use of this information and remove the corresponding element from the data array.
In the original code of Simple Table App, we use NSArray to store the table data (which is the model). The problem of NSArray is it’s non-editable. That is, you can’t add/remove its content once the array is initialized. Alternatively, we’ll change the NSArray to NSMutableArray, which adds insertion and deletion operations:
@implementation SimpleTableViewController

{

    NSMutableArray *tableData;

}

- (void)viewDidLoad

{

    [super viewDidLoad];

    // Initialize table data

    tableData = [NSMutableArray arrayWithObjects:@"Egg Benedict", @"Mushroom Risotto", @"Full Breakfast", @"Hamburger", @"Ham and Egg Sandwich", @"Creme Brelee", @"White Chocolate Donut", @"Starbucks Coffee", @"Vegetable Curry", @"Instant Noodle with Egg", @"Noodle with BBQ Pork", @"Japanese Noodle with Pork", @"Green Tea", @"Thai Shrimp Cake", @"Angry Birds Cake", @"Ham and Cheese Panini", nil];

}
In the tableView:commitEditingStyle method, add the following code to remove the actual data from the array. Your method should look like this:
- (void)tableView:(UITableView *)tableView commitEditingStyle:(UITableViewCellEditingStyle)editingStyle forRowAtIndexPath:(NSIndexPath *)indexPath

{

    // Remove the row from data model

    [tableData removeObjectAtIndex:indexPath.row];

}
The NSMutableArray provides a number of operations for you to manipulate the content of an array. Here we utilize the “removeObjectAtIndex” method to remove a particular item from the array. You can try to run the app and delete a row. Oops! The app doesn’t work as expected.
It’s not a bug. The app does delete the item from the array. The reason why the deleted item still appears is the view hasn’t been refreshed to reflect the update of the data model.
3. Reload the table view
Therefore, once the underlying data is removed, we need to invoke “reloadData” method to request the table View to refresh. Here is the updated code:
- (void)tableView:(UITableView *)tableView commitEditingStyle:(UITableViewCellEditingStyle)editingStyle forRowAtIndexPath:(NSIndexPath *)indexPath

{

    // Remove the row from data model

    [tableData removeObjectAtIndex:indexPath.row];

    // Request table view to reload

    [tableView reloadData];

}
iphone dev 入门实例3:Delete a Row from UITableView的更多相关文章
- iphone dev 入门实例6:How To Use UIScrollView to Scroll and Zoom and Page
http://www.raywenderlich.com/10518/how-to-use-uiscrollview-to-scroll-and-zoom-content Getting Starte ...
- iphone dev 入门实例7:How to Add Splash Screen in Your iOS App
http://www.appcoda.com/how-to-add-splash-screen-in-your-ios-app/ What’s Splash Screen? For those who ...
- iphone dev 入门实例5:Get the User Location & Address in iPhone App
Create the Project and Design the Interface First, create a new Xcode project using the Single View ...
- iphone dev 入门实例4:CoreData入门
The iPhone Core Data Example Application The application developed in this chapter will take the for ...
- iphone dev 入门实例2:Pass Data Between View Controllers using segue
Assigning View Controller Class In the first tutorial, we simply create a view controller that serve ...
- iphone dev 入门实例1:Use Storyboards to Build Table View
http://www.appcoda.com/use-storyboards-to-build-navigation-controller-and-table-view/ Creating Navig ...
- iphone Dev 开发实例9:Create Grid Layout Using UICollectionView in iOS 6
In this tutorial, we will build a simple app to display a collection of recipe photos in grid layout ...
- iphone Dev 开发实例10:How To Add a Slide-out Sidebar Menu in Your Apps
Creating the Xcode Project With a basic idea about what we’ll build, let’s move on. You can create t ...
- iphone Dev 开发实例8: Parsing an RSS Feed Using NSXMLParser
From : http://useyourloaf.com/blog/2010/10/16/parsing-an-rss-feed-using-nsxmlparser.html Structure o ...
随机推荐
- JavaScript学习记录总结(七)——dom对象应用之用户简单管理
<!DOCTYPE html><html><head><title>users.html</title> <meta name=&qu ...
- linux之pid文件
在命令行中经常看到*.pid文件 其实这些文件是在启动进程的时候系统给这个进程的master进程分配的进程号 比如/usr/local/nginx/logs/nginx.pid文件 打开这个文件会发现 ...
- maven&&gradle
https://maven.apache.org/guides/introduction/introduction-to-the-lifecycle.html http://maven.apache. ...
- C#字符补位
C#字符补位 .byte类型的字符,用5位2进制数表示,右对齐,不足5位,前面补零. byte b; Convert.ToString(b, ).PadLeft(, ') .byte类型的字符,用2位 ...
- 执行bat文件
set CLASSPATH=E:\kuaipan\work\J2SE_workspace\JavaSEbasic\bin;E:\kuaipan\study\jar\jxl\*; set HEAP=-X ...
- Linux进程间通信-命名管道
前面我们讲了进程间通信的一种方式,匿名管道.我们知道,匿名管道只能用于父子关系的进程之间.那么没有这种关系的进程之间该如何进行数据传递呢? 1.什么是命名管道 匿名管道是在缓存中开辟的输出和输入文件流 ...
- 怎么给OCR文字识别软件设置正确的扫描分辨率
ABBYY FineReader 12是一款专业的OCR文字识别软件,可快速方便地将扫描纸质文档.PDF文件和数码相机的图像转换成可编辑.可搜索的文本,不仅支持对页扫描,还支持多页扫描,扫描分辨率的选 ...
- C# 开发BHO插件
BHO(Browser Helper Object)是插件,它寄存在IE浏览器中运行.在咱们的日常生活中无时无刻都在使用BHO,比如:迅雷检测用户是否单击了下载链接的BHO.用BHO也能做出些非常有意 ...
- python compile
compile(source, filename, mode[, flags[, dont_inherit]]) 参数source:字符串或者AST(Abstract Syntax Trees)对象. ...
- Nginx出现413 Request Entity Too Large错误解决方法
Nginx出现的413 Request Entity Too Large错误,这个错误一般在上传文件的时候出现,打开nginx主配置文件nginx.conf,找到http{}段,添加 解决方法就是 打 ...