
iphone dev 入门实例5:Get the User Location & Address in iPhone App
Create the Project and Design the Interface
First, create a new Xcode project using the Single View Template. Let’s name the project as “MyLocationDemo” and set the project with the following parameters:

MyLocationDemo Xcode Project
Once you’ve successfully created your project, go to the Storyboard and design the user interface. In the View, add three labels for latitude, longitude and address. For each label, place another label next to it. Later we’ll use these labels to display the GPS coordinates and address. Finally, insert a button and name it as “Get My Location”. Your user interface should be similar to the one shown below.

MyLocationDemo User Interface
For the “For Address” label, change the “lines” option from 1 to 4, as we’ll display address in multi-lines. You may also decrease the font size to 14 points in the Attribute Inspector.
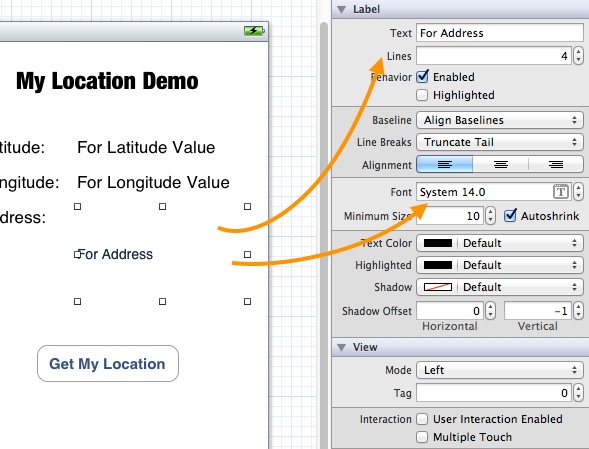
Customize Address Label
Establish the Connection Between Variables and UI Elements
Next, we’ll connect the UI elements with our code. In the Storyboard, select the view controller and switch to the Assistant Editor.

Show Assistant Editor and Hide Utility Area
Press and hold the control key, click the “For Latitude Value” label and drag it towards the “MyLocationViewController.h”. Place the cursor between the @interface and @end keywords, you should see a prompt that allows you to insert an outlet.

Establish the Connection Between Variables and UI Elements
Name the outlet as “latitudeLabel”.

Create the Instance Variable and Name it as latitudeLabel
Repeat the same procedures and create the outlet for the “For Longitude Value” label and “For Address” label. Finally, create an action method for the “Get My Location” button and name it as “getCurrentLocation”. This method will be invoked when it detects a Touch Up Inside event.

Create a method for Get My Location Button
If you follow us correctly, the code of MyLocationViewController.h should look like below:
|
1
2 3 4 5 6 7 8 9 |
#import <UIKit/UIKit.h>
@interface MyLocationViewController : UIViewController @end |
Adding Core Location Framework
To retrieve the current user location, as mentioned earlier, we’ll make use of the CoreLocation framework provided by the iOS SDK. By default, however, the Core Location Framework is not bundled in any Xcode project. We have to add it manually. In the Project Navigator, select the “MyLocationDemo” project. In the Content Area, select “MyLocationDemo” under Targets and click “Build Phases”. Expand “Link Binary with Libraries” and click the “+” button to add the CoreLocation framework.

Add a new library to Your Xcode Project

Adding CoreLocation Framework to Your Project
Jump into the Code
Let’s move onto the core part of this tutorial. Core Location framework, that you’ve just added, allows you to retrieve the user’s current location in the form of latitude and longitude. It can even give you continuous location update if the user is on the move.
Like other libraries in the iOS SDK, Core Location makes use of the delegate pattern. To work with the Core Location framework, our view controller should conform to the CLLocationManagerDelegateprotocol. This protocol defines methods used to receive location and heading updates from a CLLocationManager object.
To let the view controller know about the CLLocationManagerDelegate, you first import the corresponding header file. In the “MyLocationViewController.h”, add the #import statement and implement the “CLLocationManagerDelegate”.
|
1
2 3 |
#import <CoreLocation/CoreLocation.h>
@interface MyLocationViewController : UIViewController <CLLocationManagerDelegate> |
Now go to the “MyLocationViewController.m”. Declare an instance variable and name it as locationManager.
|
1
2 3 |
@implementation MyLocationViewController {
CLLocationManager *locationManager; } |
The CLLocationManager is the object that provides you the location data.
Add the following code in the viewDidLoad method to instantiate the CLLocationManager object:
|
1
2 3 4 5 6 |
- (void)viewDidLoad
{ [super viewDidLoad]; // Do any additional setup after loading the view, typically from a nib. locationManager = [[CLLocationManager alloc] init]; } |
Once you initialize a CLLocationManager object, you can simply call the startUpdatingLocation method to the location service. The service will then continuously send your application a stream of location data.
Add the following code to the getCurrentLocation method, which is hooked up the to “Get My Location” button:
|
1
2 3 4 5 6 |
- (IBAction)getCurrentLocation:(id)sender {
locationManager.delegate = self; locationManager.desiredAccuracy = kCLLocationAccuracyBest; [locationManager startUpdatingLocation]; } |
As discussed earlier, the location data is reported to your app via the location manager’s associated delegate object. Here, we assign MyLocationViewController as the delegate object. All the location updates will send to the delegate. To capture the location event, we have to implement the delegate methods as defined in the protocol.
Add the following code to MyLocationViewController.m and place them right below the “getCurrentLocation” method:
|
1
2 3 4 5 6 7 8 9 10 11 12 13 14 15 16 17 18 19 20 |
#pragma mark - CLLocationManagerDelegate
- (void)locationManager:(CLLocationManager *)manager didFailWithError:(NSError *)error - (void)locationManager:(CLLocationManager *)manager didUpdateToLocation:(CLLocation *)newLocation fromLocation:(CLLocation *)oldLocation |
Test Your App with Fake Location
Now you can compile the app and test it by using the Simulator. You may wonder how you can use the iPhone Simulator to test location-aware application. How can the Simulator retrieve the current location?
There is no way for the Simulator to get the current location as your computer doesn’t have GPS built-in (even you have, Xcode won’t use it). However, the Simulator allows you to fake it.
After you launch the app, click the “Get My Location” button. For the very first time you run the app, it’ll prompt the following alert to request for the access of location manager:
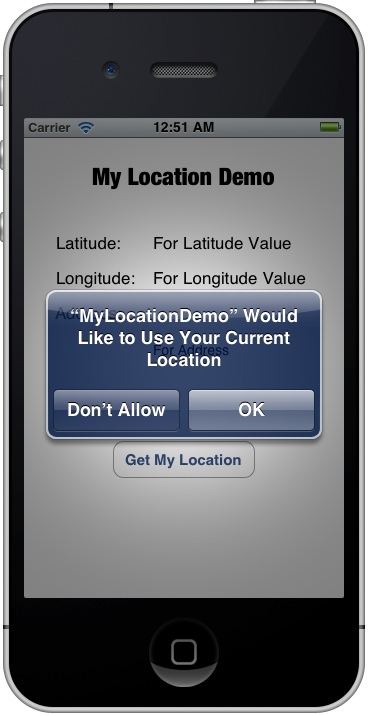
Remember to accept it, otherwise, the app will not be able to access the location service. Oops! The app displays an error even you tap the OK button.

Failed to get the current location
Why? By default, the Simulator doesn’t know its own location. In the menu bar, select “Debug” -> “Location”. The default location is set to “None”. That’s the reason why you get the “Fail to Get Your Location” error. Now change the location setting to “Apple” (or “Apple Stores”). Your app should now show you the latitude and longitude values.
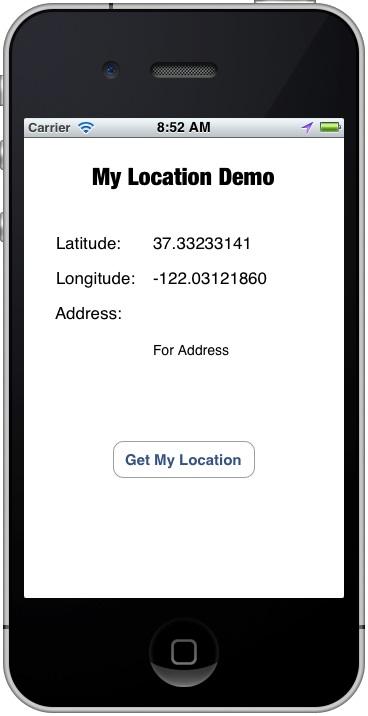
Xcode offers another way to simulate location. While running the app, you can change to other locations by using the arrow button in the top bar of the debug area.

Simulate Other Locations
Finding the Address
The CLGeocoder class provides services for converting between a GPS coordinate and the user-readable address of that coordinate. By specify the latitude and longitude of a given location, you can use CLGeocoder to find a user-readable address. The result (i.e. the address) returned by CLGeocoder is saved in a CLPlacemark object.
Back to your Xcode project. Add two instance variables: geocoder and placemark.
|
1
2 3 4 5 |
@implementation MyLocationViewController {
CLLocationManager *locationManager; CLGeocoder *geocoder; CLPlacemark *placemark; } |
Initialize the “geocoder” in the “viewDidLoad” method:
|
1
2 3 4 5 6 7 |
- (void)viewDidLoad
{ [super viewDidLoad]; // Do any additional setup after loading the view, typically from a nib. locationManager = [[CLLocationManager alloc] init]; geocoder = [[CLGeocoder alloc] init]; } |
Update the “didUpdateToLocation” method to include the code for reverse geocoding:
|
1
2 3 4 5 6 7 8 9 10 11 12 13 14 15 16 17 18 19 20 21 22 23 24 25 26 27 |
- (void)locationManager:(CLLocationManager *)manager didUpdateToLocation:(CLLocation *)newLocation fromLocation:(CLLocation *)oldLocation
{ NSLog(@"didUpdateToLocation: %@", newLocation); CLLocation *currentLocation = newLocation; if (currentLocation != nil) { longitudeLabel.text = [NSString stringWithFormat:@"%.8f", currentLocation.coordinate.longitude]; latitudeLabel.text = [NSString stringWithFormat:@"%.8f", currentLocation.coordinate.latitude]; } // Reverse Geocoding NSLog(@"Resolving the Address"); [geocoder reverseGeocodeLocation:currentLocation completionHandler:^(NSArray *placemarks, NSError *error) { NSLog(@"Found placemarks: %@, error: %@", placemarks, error); if (error == nil && [placemarks count] > 0) { placemark = [placemarks lastObject]; addressLabel.text = [NSString stringWithFormat:@"%@ %@\n%@ %@\n%@\n%@", placemark.subThoroughfare, placemark.thoroughfare, placemark.postalCode, placemark.locality, placemark.administrativeArea, placemark.country]; } else { NSLog(@"%@", error.debugDescription); } } ]; } |
We use the “reverseGeocodeLocation” method to translate the locate data into a human-readable address. The geocoding operations doesn’t happen on the device. The method instead submits the given data to the geocoding server in the cloud in order to resolve the address. Other than the location data, you have to provide the handler that contains code to execute after the address is resolved. In this case, we’ll update the address label to display the address on screen.
The syntax of the completionHandler may be new to you. Instead of using delegate to provide feedback, the CLGeocoder uses “block” to deal with the response. By using block, you do not need to write a separate method. Just provide the code inline to execute after the geocoding call completes.
Upon completion of a geocoding request, the completionHandler will be invoked automatically. The resolved address is saved in CLPlacemark array. Placemark data includes information such as the country, state, city, and street address. So we simply pick the CLPlacemark object from the array and show the address in the address label.
That’s it. Run the app again, pick a location (e.g. Apple) and you should get its address:
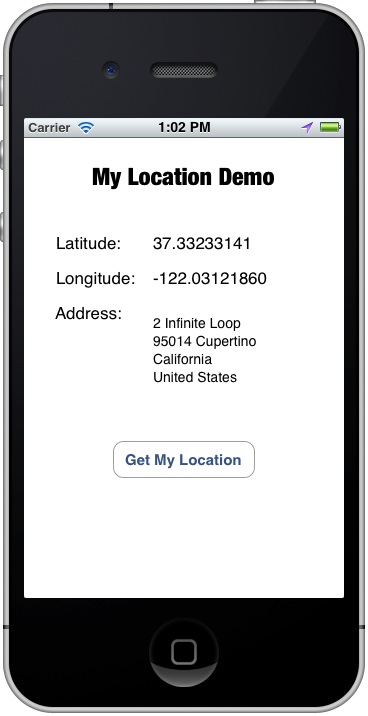
Saving Battery Power
The app works but it consumes a lot of power. Why? What the app does is to retrieve the current user’s location. It shouldn’t consume much power, right?
Let’s revisit our code again. Once the user taps the “Get My Location” button, we’ll call up the “startUpdatingLocation” method to retrieve the user’s location.
|
1
2 3 4 5 6 |
- (IBAction)getCurrentLocation:(id)sender {
locationManager.delegate = self; locationManager.desiredAccuracy = kCLLocationAccuracyBest; [locationManager startUpdatingLocation]; } |
The problem is that the method will report the location data continuously. It just keeps going and gives location update every second, even the location is unchanged. Take a look at the output of the Debug area. You should have something similar to the below:
|
1
2 3 4 5 6 7 8 9 10 11 12 |
2012-09-09 14:32:33.940 MyLocationDemo[13690:c07] didUpdateToLocation: <+37.33240905,-122.03051211> +/- 65.00m (speed -1.00 mps / course -1.00) @ 9/9/12 2:32:33 PM Hong Kong Time
2012-09-09 14:32:33.941 MyLocationDemo[13690:c07] Resolving the Address 2012-09-09 14:32:34.793 MyLocationDemo[13690:c07] didUpdateToLocation: <+37.33240818,-122.03049049> +/- 65.00m (speed -1.00 mps / course -1.00) @ 9/9/12 2:32:34 PM Hong Kong Time 2012-09-09 14:32:34.793 MyLocationDemo[13690:c07] Resolving the Address 2012-09-09 14:32:34.997 MyLocationDemo[13690:c07] Found placemarks: ( "Apple Inc., Apple Inc., 2 Infinite Loop, Cupertino, CA 95014-2083, United States @ <+37.33270820,-122.03033640> +/- 100.00m, region (identifier <+37.33270823,-122.03021599> radius 58.34) <+37.33270823,-122.03021599> radius 58.34m" ), error: (null) 2012-09-09 14:32:35.792 MyLocationDemo[13690:c07] didUpdateToLocation: <+37.33240773,-122.03047951> +/- 65.00m (speed -1.00 mps / course -1.00) @ 9/9/12 2:32:35 PM Hong Kong Time 2012-09-09 14:32:35.793 MyLocationDemo[13690:c07] Resolving the Address 2012-09-09 14:32:35.973 MyLocationDemo[13690:c07] Found placemarks: ( "Apple Inc., Apple Inc., 2 Infinite Loop, Cupertino, CA 95014-2083, United States @ <+37.33270820,-122.03033640> +/- 100.00m, region (identifier <+37.33270823,-122.03021599> radius 58.34) <+37.33270823,-122.03021599> radius 58.34m" ), error: (null) |
As you can see, the “didUpdateToLocation” is invoked multiple times and it just keeps going on and on.
So how can you tell the location manager to stop from updating the location? You can use the “stopUpdatingLocation” method to disable the location update. For our app, we can stop the location update once we retrieve the current location.
|
1
2 3 4 5 6 7 8 9 10 11 12 13 14 15 16 17 18 19 20 21 22 23 24 25 26 27 28 29 |
- (void)locationManager:(CLLocationManager *)manager didUpdateToLocation:(CLLocation *)newLocation fromLocation:(CLLocation *)oldLocation
{ NSLog(@"didUpdateToLocation: %@", newLocation); CLLocation *currentLocation = newLocation; if (currentLocation != nil) { longitudeLabel.text = [NSString stringWithFormat:@"%.8f", currentLocation.coordinate.longitude]; latitudeLabel.text = [NSString stringWithFormat:@"%.8f", currentLocation.coordinate.latitude]; } // Stop Location Manager NSLog(@"Resolving the Address"); } |
Try to run the app again and check out the output message in the output area. You should notice that the “didUpdateToLocation” is called once and stopped.
iphone dev 入门实例5:Get the User Location & Address in iPhone App的更多相关文章
- iphone dev 入门实例7:How to Add Splash Screen in Your iOS App
http://www.appcoda.com/how-to-add-splash-screen-in-your-ios-app/ What’s Splash Screen? For those who ...
- iphone dev 入门实例6:How To Use UIScrollView to Scroll and Zoom and Page
http://www.raywenderlich.com/10518/how-to-use-uiscrollview-to-scroll-and-zoom-content Getting Starte ...
- iphone dev 入门实例4:CoreData入门
The iPhone Core Data Example Application The application developed in this chapter will take the for ...
- iphone dev 入门实例3:Delete a Row from UITableView
How To Delete a Row from UITableView I hope you have a better understanding about Model-View-Control ...
- iphone dev 入门实例2:Pass Data Between View Controllers using segue
Assigning View Controller Class In the first tutorial, we simply create a view controller that serve ...
- iphone dev 入门实例1:Use Storyboards to Build Table View
http://www.appcoda.com/use-storyboards-to-build-navigation-controller-and-table-view/ Creating Navig ...
- iphone Dev 开发实例10:How To Add a Slide-out Sidebar Menu in Your Apps
Creating the Xcode Project With a basic idea about what we’ll build, let’s move on. You can create t ...
- iphone Dev 开发实例9:Create Grid Layout Using UICollectionView in iOS 6
In this tutorial, we will build a simple app to display a collection of recipe photos in grid layout ...
- iphone Dev 开发实例8: Parsing an RSS Feed Using NSXMLParser
From : http://useyourloaf.com/blog/2010/10/16/parsing-an-rss-feed-using-nsxmlparser.html Structure o ...
随机推荐
- jquery获取第几个元素的方法总结
使用jquery时经常会遇到,选择器选择一组元素后,需要在这组元素中找到第几个元素. jquery中使用eq()方法找到第几个元素或第N个元素,jquery中eq()的使用如下: eq() 选择器选取 ...
- 【转】SQL Server与Oracle的区别
转自:http://soft.chinabyte.com/database/255/12258255.shtml SQL Server与Oracle的区别 2012-02-10 00:00 中国IT实 ...
- 笨小猴 2008年NOIP全国联赛提高组
题目描述 Description 笨小猴的词汇量很小,所以每次做英语选择题的时候都很头疼.但是他找到了一种方法,经试验证明,用这种方法去选择选项的时候选对的几率非常大! 这种方法的具体描述如下:假设m ...
- POJ1149 PIGS (网络流)
PIGS Time Limit: 1000MS M ...
- HDU-4521 小明系列问题――小明序列(线段树)
题目大意:求LIS,但是要求LIS中相邻的两个元素之间的距离要大于d. 题目分析:线段树.节点(l,r)保存信息为LIS的最后一个元素落在[l,r]之间的最大长度.从第d+2个元素开始查询更新操作,但 ...
- 【NOI2011】【P1308】道路修建
这题也太水了吧,为什么不是我这届的NOI(╯‵□′)╯︵┻━┻ 原题: 在 W 星球上有 n 个国家.为了各自国家的经济发展,他们决定在各个国家 之间建设双向道路使得国家之间连通.但是每个国家的国王都 ...
- java多线程:并发包中ReentrantReadWriteLock读写锁的锁降级模板
写锁降级为读锁,但读锁不可升级或降级为写锁. 锁降级是为了让当前线程感知到数据的变化. //读写锁 private ReentrantReadWriteLock lock=new ReentrantR ...
- fs event_socket
mod_event_socket Skip to end of metadata Created by John Boteler, last modified by Niek Vlesse ...
- weblogic管理1——创建 和 删除一个domain
说明本文环境 WLS_HOME=/home/weblogic/Oracle/Middleware创建一个domian 第一种方法通过console 创建>[weblogic@11g Mid ...
- mvc:view-controller
This tag is a shorcut for defining a ParameterizableViewController that immediately forwards to a vi ...