吴裕雄 python 机器学习——半监督学习LabelSpreading模型
import numpy as np

import matplotlib.pyplot as plt

from sklearn import  metrics

from sklearn import datasets

from sklearn.semi_supervised.label_propagation import LabelSpreading

def load_data():

    '''

    加载数据集

    '''

    digits = datasets.load_digits()

    ######   混洗样本 ########

    rng = np.random.RandomState(0)

    indices = np.arange(len(digits.data)) # 样本下标集合

    rng.shuffle(indices) # 混洗样本下标集合

    X = digits.data[indices]

    y = digits.target[indices]

    ###### 生成未标记样本的下标集合 ####

    # 只有 10% 的样本有标记

    n_labeled_points = int(len(y)/10)

    # 后面 90% 的样本未标记

    unlabeled_indices = np.arange(len(y))[n_labeled_points:]

    return X,y,unlabeled_indices

#半监督学习LabelSpreading模型

def test_LabelSpreading(*data):

    X,y,unlabeled_indices=data

    y_train=np.copy(y) # 必须拷贝,后面要用到 y

    y_train[unlabeled_indices]=-1 # 未标记样本的标记设定为 -1

    clf=LabelSpreading(max_iter=100,kernel='rbf',gamma=0.1)

    clf.fit(X,y_train)

    ### 获取预测准确率

    predicted_labels = clf.transduction_[unlabeled_indices] # 预测标记

    true_labels = y[unlabeled_indices] # 真实标记

    print("Accuracy:%f"%metrics.accuracy_score(true_labels,predicted_labels))

    # 或者 print("Accuracy:%f"%clf.score(X[unlabeled_indices],true_labels))

# 获取半监督分类数据集

data=load_data()

# 调用 test_LabelSpreading

test_LabelSpreading(*data)

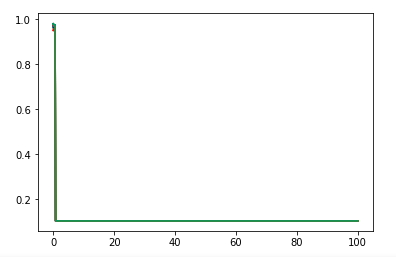
def test_LabelSpreading_rbf(*data):

    '''

    测试 LabelSpreading 的 rbf 核时,预测性能随 alpha 和 gamma 的变化

    '''

    X,y,unlabeled_indices=data

    # 必须拷贝,后面要用到 y

    y_train=np.copy(y)

    # 未标记样本的标记设定为 -1

    y_train[unlabeled_indices]=-1

    fig=plt.figure()

    ax=fig.add_subplot(1,1,1)

    alphas=np.linspace(0.01,1,num=10,endpoint=True)

    gammas=np.logspace(-2,2,num=50)

    # 颜色集合,不同曲线用不同颜色

    colors=((1,0,0),(0,1,0),(0,0,1),(0.5,0.5,0),(0,0.5,0.5),(0.5,0,0.5),(0.4,0.6,0),(0.6,0.4,0),(0,0.6,0.4),(0.5,0.3,0.2))

    ## 训练并绘图

    for alpha,color in zip(alphas,colors):

        scores=[]

        for gamma in gammas:

            clf=LabelSpreading(max_iter=100,gamma=gamma,alpha=alpha,kernel='rbf')

            clf.fit(X,y_train)

            scores.append(clf.score(X[unlabeled_indices],y[unlabeled_indices]))

        ax.plot(gammas,scores,label=r"$\alpha=%s$"%alpha,color=color)

    ### 设置图形

    ax.set_xlabel(r"$\gamma$")

    ax.set_ylabel("score")

    ax.set_xscale("log")

    ax.legend(loc="best")

    ax.set_title("LabelSpreading rbf kernel")

    plt.show()

# 调用 test_LabelSpreading_rbf

test_LabelSpreading_rbf(*data)
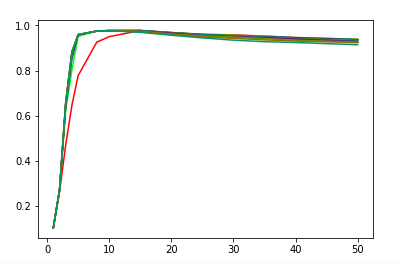
def test_LabelSpreading_knn(*data):

    '''

   测试 LabelSpreading 的 knn 核时,预测性能随 alpha 和 n_neighbors 的变化

    '''

    X,y,unlabeled_indices=data

    # 必须拷贝,后面要用到 y

    y_train=np.copy(y)

    # 未标记样本的标记设定为 -1

    y_train[unlabeled_indices]=-1

    fig=plt.figure()

    ax=fig.add_subplot(1,1,1)

    alphas=np.linspace(0.01,1,num=10,endpoint=True)

    Ks=[1,2,3,4,5,8,10,15,20,25,30,35,40,50]

    # 颜色集合,不同曲线用不同颜色

    colors=((1,0,0),(0,1,0),(0,0,1),(0.5,0.5,0),(0,0.5,0.5),(0.5,0,0.5),(0.4,0.6,0),(0.6,0.4,0),(0,0.6,0.4),(0.5,0.3,0.2))

    ## 训练并绘图

    for alpha,color in zip(alphas,colors):

        scores=[]

        for K in Ks:

            clf=LabelSpreading(kernel='knn',max_iter=100,n_neighbors=K,alpha=alpha)

            clf.fit(X,y_train)

            scores.append(clf.score(X[unlabeled_indices],y[unlabeled_indices]))

        ax.plot(Ks,scores,label=r"$\alpha=%s$"%alpha,color=color)

    ### 设置图形

    ax.set_xlabel(r"$k$")

    ax.set_ylabel("score")

    ax.legend(loc="best")

    ax.set_title("LabelSpreading knn kernel")

    plt.show()

# 调用 test_LabelSpreading_knn

test_LabelSpreading_knn(*data)
吴裕雄 python 机器学习——半监督学习LabelSpreading模型的更多相关文章
- 吴裕雄 python 机器学习——半监督学习标准迭代式标记传播算法LabelPropagation模型
import numpy as np import matplotlib.pyplot as plt from sklearn import metrics from sklearn import d ...
- 吴裕雄 python 机器学习——层次聚类AgglomerativeClustering模型
import numpy as np import matplotlib.pyplot as plt from sklearn import cluster from sklearn.metrics ...
- 吴裕雄 python 机器学习——密度聚类DBSCAN模型
import numpy as np import matplotlib.pyplot as plt from sklearn import cluster from sklearn.metrics ...
- 吴裕雄 python 机器学习——支持向量机非线性回归SVR模型
import numpy as np import matplotlib.pyplot as plt from sklearn import datasets, linear_model,svm fr ...
- 吴裕雄 python 机器学习——KNN回归KNeighborsRegressor模型
import numpy as np import matplotlib.pyplot as plt from sklearn import neighbors, datasets from skle ...
- 吴裕雄 python 机器学习——KNN分类KNeighborsClassifier模型
import numpy as np import matplotlib.pyplot as plt from sklearn import neighbors, datasets from skle ...
- 吴裕雄 python 机器学习——支持向量机线性回归SVR模型
import numpy as np import matplotlib.pyplot as plt from sklearn import datasets, linear_model,svm fr ...
- 吴裕雄 python 机器学习——分类决策树模型
import numpy as np import matplotlib.pyplot as plt from sklearn import datasets from sklearn.model_s ...
- 吴裕雄 python 机器学习——回归决策树模型
import numpy as np import matplotlib.pyplot as plt from sklearn import datasets from sklearn.model_s ...
随机推荐
- LaTeX技巧007:每一章开始的header引用名言应该怎么做?
[问题描述] 看到很多论文的每一章开始的右上角都有一段名人名言, 我试验了很多次一直都搞不清楚是怎么搞?是用fancyhead么?谁可以说说呢? 多谢了 [解决方案] 使用epigraph宏包来制作即 ...
- 51Nod 1091 线段的重叠 (贪心)
X轴上有N条线段,每条线段包括1个起点和终点.线段的重叠是这样来算的,[10 20]和[12 25]的重叠部分为[12 20]. 给出N条线段的起点和终点,从中选出2条线段,这两条线段的重叠部分是最长 ...
- 微信小程序之数组操作:push与concat的区别
微信小程序中需要用到数组的操作,push和concat二者功能很相像,但有两点区别. 先看如下例子: var arr = []; arr.push(); arr.push(); arr.push([, ...
- many connection errors,更改max_connection_errors的值
https://www.cnblogs.com/tonyccc/p/11496101.html https://blog.csdn.net/li_li_lin/article/details/7276 ...
- Python里的Flask开发环境的搭建
在已经安装好了Python后,我这里用的是Python3.5,准备进一步学习Flask框架,下面记录搭建Flask环境 这里使用了虚拟环境,在虚拟环境里,最小化的安装Flask. 参考步骤: 1.首先 ...
- Django---Django初始
现在测试行业慢慢的也需要存在代码能力了,从以前的点点点到通过工具进行测试接口,到目前的自动化测试,需要测试会代码的越来越多了.慢慢的测试开发这一行业出现在我们的面前,测试不仅仅会点点,还能自己帮助开发 ...
- 复选框与bitmap算法实践
bitmap(位图)算法 bitmap算法是利用数据二进制的每一位的值来表示数据的算法,可用来压缩保存数据集. 如何保存 如 5(int)的二进制表示为 101b,第一位和第三位的值是1就可以表示数据 ...
- Python入门4 —— 输入与输出
一:输入(Input) 1.python3中的input(输入) inp_username=input("请输入您的密码:") # "18" print(inp ...
- Android监听消息通知栏点击事件
Android监听消息通知栏点击事件 使用BroadCastReceiver 1 新建一个NotificationClickReceiver 类,并且在清单文件中注册!! public class N ...
- linux下部署Mono oracle配置,oracle客户端安装
一.Mono,apache安装,配置网站(以 centos 7 +apache 2为例): 安装教程以官网的教程为追,百度来的多少有版本问题. mono官网连接: 1. Mono的安装:https:/ ...