SpringCloud的学习记录(2)
这一章节主要讲如何搭建eureka-client项目.
在我们生成的Demo项目上右键点击New->Module->spring Initializr, 然后next, 填写Group和Artifact等信息,
这里Artifact填写eurekaclient, 再次next,
这里选择的Web下的web和Cloud Discovery下的Eureka Discovery.
最后在Module Name中填写eureka-client.
生成的pom.xml文件如下:
<?xml version="1.0" encoding="UTF-8"?>

<project xmlns="http://maven.apache.org/POM/4.0.0" xmlns:xsi="http://www.w3.org/2001/XMLSchema-instance"

         xsi:schemaLocation="http://maven.apache.org/POM/4.0.0 http://maven.apache.org/xsd/maven-4.0.0.xsd">

    <modelVersion>4.0.0</modelVersion>

    <parent>

        <groupId>org.springframework.boot</groupId>

        <artifactId>spring-boot-starter-parent</artifactId>

        <version>2.1.3.RELEASE</version>

        <relativePath/> <!-- lookup parent from repository -->

    </parent>

    <groupId>com.xum</groupId>

    <artifactId>eureka-client</artifactId>

    <version>0.0.1-SNAPSHOT</version>

    <name>eureka-client</name>

    <description>Demo project for Spring Boot</description>

    <properties>

        <project.build.sourceEncoding>UTF-8</project.build.sourceEncoding>

        <project.reporting.outputEncoding>UTF-8</project.reporting.outputEncoding>

        <java.version>1.8</java.version>

        <spring-cloud.version>Greenwich.RELEASE</spring-cloud.version>

    </properties>

    <dependencies>

        <dependency>

            <groupId>org.springframework.boot</groupId>

            <artifactId>spring-boot-starter-web</artifactId>

        </dependency>

        <dependency>

            <groupId>org.springframework.cloud</groupId>

            <artifactId>spring-cloud-starter-netflix-eureka-client</artifactId>

        </dependency>

        <dependency>

            <groupId>org.springframework.boot</groupId>

            <artifactId>spring-boot-starter-test</artifactId>

            <scope>test</scope>

        </dependency>

    </dependencies>

    <dependencyManagement>

        <dependencies>

            <dependency>

                <groupId>org.springframework.cloud</groupId>

                <artifactId>spring-cloud-dependencies</artifactId>

                <version>${spring-cloud.version}</version>

                <type>pom</type>

                <scope>import</scope>

            </dependency>

        </dependencies>

    </dependencyManagement>

    <build>

        <plugins>

            <plugin>

                <groupId>org.springframework.boot</groupId>

                <artifactId>spring-boot-maven-plugin</artifactId>

            </plugin>

        </plugins>

    </build>

    <repositories>

        <repository>

            <id>spring-milestones</id>

            <name>Spring Milestones</name>

            <url>https://repo.spring.io/milestone</url>

        </repository>

    </repositories>

</project>
然后在EurekaClientApplication上加@EnableEurekaClient注解:
package com.xum.eurekaclient;

import org.springframework.boot.SpringApplication;

import org.springframework.boot.autoconfigure.SpringBootApplication;

import org.springframework.cloud.netflix.eureka.EnableEurekaClient;

@EnableEurekaClient

@SpringBootApplication

public class EurekaClientApplication {

    public static void main(String[] args) {

        SpringApplication.run(EurekaClientApplication.class, args);

    }

}
然后新建application.yml文件, 内容如下:
eureka:

  client:

    serviceUrl:

      defaultZone: http://localhost:8761/eureka/    这里的defaultZone是上一章节的对应eureka-server

server:

  port: 8762

spring:

  application:

    name: eureka-client
然后写一个controller去获取数据, 这里是获取git上的数据, 关于config-server的项目下一章节说
package com.xum.eurekaclient.controller;

import org.slf4j.Logger;

import org.slf4j.LoggerFactory;

import org.springframework.beans.factory.annotation.Autowired;

import org.springframework.beans.factory.annotation.Value;

import org.springframework.cloud.client.ServiceInstance;

import org.springframework.cloud.client.discovery.DiscoveryClient;

import org.springframework.cloud.context.config.annotation.RefreshScope;

import org.springframework.web.bind.annotation.RequestMapping;

import org.springframework.web.bind.annotation.RequestMethod;

import org.springframework.web.bind.annotation.RequestParam;

import org.springframework.web.bind.annotation.RestController;

import java.lang.reflect.Method;

import java.util.List;

@RefreshScope   //这里加上RefreshScope注解,这样才能获取到git上的内容

@RestController

@RequestMapping(value = "/testone")

public class TestOneController {

    private static final Logger LOG = LoggerFactory.getLogger(TestOneController.class);

    @Autowired

    private DiscoveryClient discoveryClient;

    @Value("${server.port}")

    String port;

    /* from git config */

    @Value("${democonfigclient.message}")

    String message;

    /* from git config */

    @Value("${foo}")

    String foo;

    @RequestMapping(value = "/test")

    public String test(@RequestParam(value = "name", required = false, defaultValue = "testOneClient")String name) {

        /*List<ServiceInstance> list = discoveryClient.getInstances("eureka-client");

        LOG.info("discoveryClient.getServices().size() = " + discoveryClient.getServices().size());

        for( String s :  discoveryClient.getServices()){

            List<ServiceInstance> serviceInstances =  discoveryClient.getInstances(s);

            for(ServiceInstance si : serviceInstances){

                LOG.info("services:" + s + ":getHost()=" + si.getHost());

                LOG.info("services:" + s + ":getPort()=" + si.getPort());

                LOG.info("services:" + s + ":getServiceId()=" + si.getServiceId());

                LOG.info("services:" + s + ":getUri()=" + si.getUri());

            }

        }*/

        String info = "Hi " + name + ", this is EurekaClient, port is " + port;

        return info;

    }

    @RequestMapping(value = "/config", method = RequestMethod.GET)

    public String config() {

        String info = "port:" + port + ",message:" + message + ",foo:" + foo;

        return info;

    }

}
最后通过Run DashBoard运行项目,
首先运行上一章节的eureka-server项目, 然后运行eureka-client的项目.
在浏览器上输入http://localhost:8761,显示如下: (我这里同时运行了config-server项目, 这个项目下一章节讲)

先在浏览器中输入http://localhost:8762/testone/test, 显示如下
port是eureka-client的端口

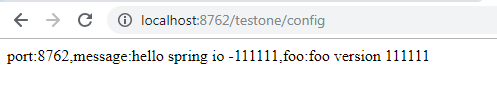
然后在浏览器中输入http://localhost:8762/testone/config, 显示如下
port是eureka-client的端口, message和foo是从git仓库中获取的, 是通过config-server项目获取的.
下一章节讲config-server项目的搭建.
SpringCloud的学习记录(2)的更多相关文章
- SpringCloud的学习记录(1)
最近一段时间重新学习一边SpringCloud(有半年不用了),这里简单记录一下. 我用的是IntelliJ IDEA开发工具, SpringBoot的版本是2.1.3.RELEASE. 1. 构建M ...
- SPRINGCLOUD 开发学习记录
一个简单的微服务系统:服务注册和发现,服务消费,负载均衡,断路器,智能路由,配置管理 服务注册中心: eureka是一个高可用组件,没有后端缓存,每一个实例注册后向注册中心发送心跳,默认情况下,eru ...
- SpringCloud的学习记录(8)
这一章节讲zipkin-server. 在我们生成的Demo项目上右键点击New->Module->spring Initializr, 然后next, 填写Group和Artifact等 ...
- SpringCloud的学习记录(7)
这一章节讲zuul的使用. 在我们生成的Demo项目上右键点击New->Module->spring Initializr, 然后next, 填写Group和Artifact等信息, 这里 ...
- SpringCloud的学习记录(6)
这一章节讲fegin的使用. 在我们生成的Demo项目上右键点击New->Module->spring Initializr, 然后next, 填写Group和Artifact等信息, 这 ...
- SpringCloud的学习记录(5)
这一章节讲如何使用ribbon和hystrix. 在我们生成的Demo项目上右键点击New->Module->spring Initializr, 然后next, 填写Group和Arti ...
- SpringCloud的学习记录(3)
这一章节讲搭建config-server的项目. 在我们生成的Demo项目上右键点击New->Module->spring Initializr, 然后next, 填写Group和Arti ...
- SpringCloud的学习记录(4)
本篇基于上一篇写的, 在git上更改配置后, eureka-client如何更新. 我们只需要在配置文件中配置 spring-cloud-starter-bus-amqp; 这就是说我们需要装rabb ...
- SpringCloud基础教程学习记录
这个学习记录是学习自翟永超前辈的SpringCloud的基础教程. 自己写这个教程的目的主要是在于,想要更凝练总结一些其中的一些实用点,顺便做个汇总,这样自己在复习查看的时候更加方便,也能顺着自己的思 ...
随机推荐
- 2017第八届蓝桥杯决赛(C++ B组)4.发现环
描述 小明的实验室有N台电脑,编号1~N.原本这N台电脑之间有N-1条数据链接相连,恰好构成一个树形网络.在树形网络上,任意两台电脑之间有唯一的路径相连. 不过在最近一次维护网络时,管理员误操作使得某 ...
- POI操作Excel:cell的背景颜色类型
POI中背景颜色设置方法如下: HSSFCellStyle style = workbook.createCellStyle(); style.setFillBackgroundColor(HSSFC ...
- 读经典——《CLR via C#》(Jeffrey Richter著) 笔记_new新建对象
CLR使用 new 操作符来创建新对象,例如:Employee e=new Employee("Param1"); 以下是 new 操作符所做的事情. 它计算类型及其所有基类型 ...
- day23 模块
1. 模块 1. 首先,我们先看个老生常谈的问题. 什么是模块. 模块就是一个包含了python定义和声 明的文件, 文件名就是模块的名字加上.py后缀. 换句话说我们目前写的所有的py文件都可以 看 ...
- Spyder清除Variable Explorer&&手动安装protobuf3.0(为了配置windows的python接口)
输入:reset 选择:y PS:建议在windows下,安装anaconda32bit版本的,可以兼容更多第三方包. Conda使用清华镜像 配置镜像 在conda安装好之后,默认的镜像是官方的 ...
- Java学习笔记day03_引用数据类型
1.引用数据类型 步骤: 1. 导包 2. 创建引用类型变量 类型 变量名 = new 类型名(); 3. 使用数据类型的功能 变量名.功能名(); 如Scanner类: import jav ...
- Web前端常见问题
一.理论知识 1.1.讲讲输入完网址按下回车,到看到网页这个过程中发生了什么 a. 域名解析 b. 发起TCP的3次握手 c. 建立TCP连接后发起http请求 d. 服务器端响应http请求,浏览器 ...
- SQL SERVER LEFT JOIN, INNER JOIN, RIGHT JOIN
JOIN: 如果表中有至少一个匹配,则返回行 LEFT JOIN: 即使右表中没有匹配,也从左表返回所有的行 RIGHT JOIN: 即使左表中没有匹配,也从右表返回所有的行 FULL JOIN: 只 ...
- pdf.js使用爬过的坑
最近项目里需要做一个在浏览器直接预览pdf的功能,有些浏览器可以直接预览pdf文件,但是有些不能(不要躲,说的就是你IE)查资料普遍推荐pdf.js,兼容能到ie9,很不错了. 1. 从pdf.js官 ...
- robotframework自动化测试之测试数据
相信很多人在做自动化测试的时候都会遇到一个问题,就是用例不能重复执行,比如名称不能重复,手机号码不能重复等等问题,或者在测试用例执行完后通过操作数据库把相关的数据删除: 那么怎么样让我们的测试用例能重 ...