
吴裕雄 python深度学习与实践(16)
import struct

import  numpy as np

import matplotlib.pyplot as plt

dateMat = np.ones((7,7))

kernel = np.array([[2,1,1],[3,0,1],[1,1,0]])

def convolve(dateMat,kernel):

    m,n = dateMat.shape

    km,kn = kernel.shape

    newMat = np.ones(((m - km + 1),(n - kn + 1)))

    tempMat = np.ones(((km),(kn)))

    for row in range(m - km + 1):

        for col in range(n - kn + 1):

            for m_k in range(km):

                for n_k in range(kn):

                    tempMat[m_k,n_k] = dateMat[(row + m_k),(col + n_k)] * kernel[m_k,n_k]

            newMat[row,col] = np.sum(tempMat)

    return newMat

newMat = convolve(dateMat,kernel)

print(newMat)
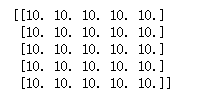
import tensorflow as tf

input1 = tf.Variable(tf.random_normal([1, 3, 3, 1]))

filter1 = tf.Variable(tf.ones([1, 1, 1, 1]))

init = tf.global_variables_initializer()

with tf.Session() as sess:

    sess.run(init)

    conv2d = tf.nn.conv2d(input1, filter1, strides=[1, 1, 1, 1], padding='VALID')

    print(sess.run(conv2d))
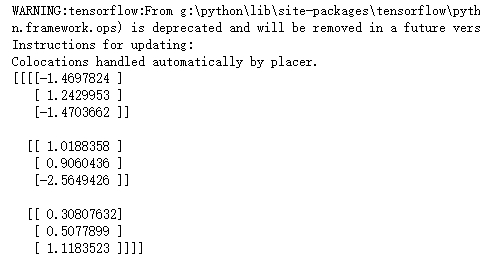
import tensorflow as tf

input1 = tf.Variable(tf.random_normal([1, 5, 5, 5]))

filter1 = tf.Variable(tf.ones([3, 3, 5, 1]))

init = tf.global_variables_initializer()

with tf.Session() as sess:

    sess.run(init)

    conv2d = tf.nn.conv2d(input1, filter1, strides=[1, 1, 1, 1], padding='VALID')

    print(sess.run(conv2d))
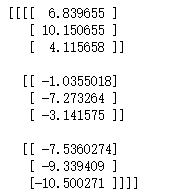
import tensorflow as tf

input1 = tf.Variable(tf.random_normal([1, 5, 5, 5]))

filter1 = tf.Variable(tf.ones([3, 3, 5, 1]))

init = tf.global_variables_initializer()

with tf.Session() as sess:

    sess.run(init)

    conv2d = tf.nn.conv2d(input1, filter1, strides=[1, 1, 1, 1], padding='SAME')

    print(sess.run(conv2d))

import tensorflow as tf

input1 = tf.Variable(tf.random_normal([1, 5, 5, 5]))

filter1 = tf.Variable(tf.ones([3, 3, 5, 1]))

init = tf.global_variables_initializer()

with tf.Session() as sess:

    sess.run(init)

    conv2d = tf.nn.conv2d(input1, filter1, strides=[1, 2, 2, 1], padding='SAME')

    print(sess.run(conv2d))

import cv2

import numpy as np

import tensorflow as tf

img = cv2.imread("D:\\F\\TensorFlow_deep_learn\\data\\lena.jpg")

img = np.array(img,dtype=np.float32)

x_image=tf.reshape(img,[1,512,512,3])

filter1 = tf.Variable(tf.ones([7, 7, 3, 1]))

init = tf.global_variables_initializer()

with tf.Session() as sess:

    sess.run(init)

    res = tf.nn.conv2d(x_image, filter1, strides=[1, 2, 2, 1], padding='SAME')

    res_image = sess.run(tf.reshape(res,[256,256]))/128 + 1

cv2.imshow("lover",res_image.astype('uint8'))

cv2.waitKey()
import cv2

import numpy as np

import tensorflow as tf

img = cv2.imread("D:\\F\\TensorFlow_deep_learn\\data\\lena.jpg")

img = np.array(img,dtype=np.float32)

x_image=tf.reshape(img,[1,512,512,3])

filter1 = tf.Variable(tf.ones([11, 11, 3, 1]))

init = tf.global_variables_initializer()

with tf.Session() as sess:

    sess.run(init)

    res = tf.nn.conv2d(x_image, filter1, strides=[1, 2, 2, 1], padding='SAME')

    res_image = sess.run(tf.reshape(res,[256,256]))/128 + 1

cv2.imshow("lover",res_image.astype('uint8'))

cv2.waitKey()
import tensorflow as tf

data=tf.constant([

        [[3.0,2.0,3.0,4.0],

        [2.0,6.0,2.0,4.0],

        [1.0,2.0,1.0,5.0],

        [4.0,3.0,2.0,1.0]]

        ])

data = tf.reshape(data,[1,4,4,1])

maxPooling=tf.nn.max_pool(data, [1, 2, 2, 1], [1, 2, 2, 1], padding='VALID')

with tf.Session() as sess:

    print(sess.run(maxPooling))
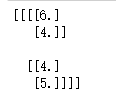
import cv2

import numpy as np

import tensorflow as tf

img = cv2.imread("D:\\F\\TensorFlow_deep_learn\\data\\lena.jpg")

img = np.array(img,dtype=np.float32)

x_image=tf.reshape(img,[1,512,512,3])

filter1 = tf.Variable(tf.ones([7, 7, 3, 1]))

init = tf.global_variables_initializer()

with tf.Session() as sess:

    sess.run(init)

    res = tf.nn.conv2d(x_image, filter1, strides=[1, 2, 2, 1], padding='SAME')

    res = tf.nn.max_pool(res, [1, 2, 2, 1], [1, 2, 2, 1], padding='VALID')

    res_image = sess.run(tf.reshape(res,[128,128]))/128 + 1

cv2.imshow("lover",res_image.astype('uint8'))

cv2.waitKey()
import time

import tensorflow as tf

from tensorflow.examples.tutorials.mnist import input_data

# 声明输入图片数据,类别

x = tf.placeholder('float', [None, 784])

y_ = tf.placeholder('float', [None, 10])

# 输入图片数据转化

x_image = tf.reshape(x, [-1, 28, 28, 1])

#第一层卷积层,初始化卷积核参数、偏置值,该卷积层5*5大小,一个通道,共有6个不同卷积核

filter1 = tf.Variable(tf.truncated_normal([5, 5, 1, 6]))

bias1 = tf.Variable(tf.truncated_normal([6]))

conv1 = tf.nn.conv2d(x_image, filter1, strides=[1, 1, 1, 1], padding='SAME')

h_conv1 = tf.nn.sigmoid(conv1 + bias1)

maxPool2 = tf.nn.max_pool(h_conv1, ksize=[1, 2, 2, 1],strides=[1, 2, 2, 1], padding='SAME')

filter2 = tf.Variable(tf.truncated_normal([5, 5, 6, 16]))

bias2 = tf.Variable(tf.truncated_normal([16]))

conv2 = tf.nn.conv2d(maxPool2, filter2, strides=[1, 1, 1, 1], padding='SAME')

h_conv2 = tf.nn.sigmoid(conv2 + bias2)

maxPool3 = tf.nn.max_pool(h_conv2, ksize=[1, 2, 2, 1],strides=[1, 2, 2, 1], padding='SAME')

filter3 = tf.Variable(tf.truncated_normal([5, 5, 16, 120]))

bias3 = tf.Variable(tf.truncated_normal([120]))

conv3 = tf.nn.conv2d(maxPool3, filter3, strides=[1, 1, 1, 1], padding='SAME')

h_conv3 = tf.nn.sigmoid(conv3 + bias3)

# 全连接层

# 权值参数

W_fc1 = tf.Variable(tf.truncated_normal([7 * 7 * 120, 80]))

# 偏置值

b_fc1 = tf.Variable(tf.truncated_normal([80]))

# 将卷积的产出展开

h_pool2_flat = tf.reshape(h_conv3, [-1, 7 * 7 * 120])

# 神经网络计算,并添加sigmoid激活函数

h_fc1 = tf.nn.sigmoid(tf.matmul(h_pool2_flat, W_fc1) + b_fc1)

# 输出层,使用softmax进行多分类

W_fc2 = tf.Variable(tf.truncated_normal([80, 10]))

b_fc2 = tf.Variable(tf.truncated_normal([10]))

y_conv = tf.nn.softmax(tf.matmul(h_fc1, W_fc2) + b_fc2)

# 损失函数

cross_entropy = -tf.reduce_sum(y_ * tf.log(y_conv))

# 使用GDO优化算法来调整参数

train_step = tf.train.GradientDescentOptimizer(0.001).minimize(cross_entropy)

sess = tf.InteractiveSession()

# 测试正确率

correct_prediction = tf.equal(tf.argmax(y_conv, 1), tf.argmax(y_, 1))

accuracy = tf.reduce_mean(tf.cast(correct_prediction, "float"))

# 所有变量进行初始化

sess.run(tf.initialize_all_variables())

# 获取mnist数据

mnist_data_set = input_data.read_data_sets("D:\\F\\TensorFlow_deep_learn\\MNIST\\", one_hot=True)

# 进行训练

start_time = time.time()

for i in range(20000):

    # 获取训练数据

    batch_xs, batch_ys = mnist_data_set.train.next_batch(200)

    # 每迭代100个 batch,对当前训练数据进行测试,输出当前预测准确率

    if i % 2 == 0:

        train_accuracy = accuracy.eval(feed_dict={x: batch_xs, y_: batch_ys})

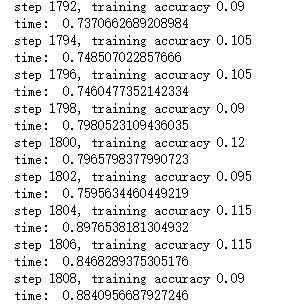
        print("step %d, training accuracy %g" % (i, train_accuracy))

        # 计算间隔时间

        end_time = time.time()

        print('time: ', (end_time - start_time))

        start_time = end_time

    # 训练数据

    train_step.run(feed_dict={x: batch_xs, y_: batch_ys})

# 关闭会话

sess.close()

import time

import tensorflow as tf

from tensorflow.examples.tutorials.mnist import input_data

# 声明输入图片数据,类别

x = tf.placeholder('float', [None, 784])

y_ = tf.placeholder('float', [None, 10])

# 输入图片数据转化

x_image = tf.reshape(x, [-1, 28, 28, 1])

#第一层卷积层,初始化卷积核参数、偏置值,该卷积层5*5大小,一个通道,共有6个不同卷积核

filter1 = tf.Variable(tf.truncated_normal([5, 5, 1, 6]))

bias1 = tf.Variable(tf.truncated_normal([6]))

conv1 = tf.nn.conv2d(x_image, filter1, strides=[1, 1, 1, 1], padding='SAME')

h_conv1 = tf.nn.relu(conv1 + bias1)

maxPool2 = tf.nn.max_pool(h_conv1, ksize=[1, 2, 2, 1],strides=[1, 2, 2, 1], padding='SAME')

filter2 = tf.Variable(tf.truncated_normal([5, 5, 6, 16]))

bias2 = tf.Variable(tf.truncated_normal([16]))

conv2 = tf.nn.conv2d(maxPool2, filter2, strides=[1, 1, 1, 1], padding='SAME')

h_conv2 = tf.nn.relu(conv2 + bias2)

maxPool3 = tf.nn.max_pool(h_conv2, ksize=[1, 2, 2, 1],strides=[1, 2, 2, 1], padding='SAME')

filter3 = tf.Variable(tf.truncated_normal([5, 5, 16, 120]))

bias3 = tf.Variable(tf.truncated_normal([120]))

conv3 = tf.nn.conv2d(maxPool3, filter3, strides=[1, 1, 1, 1], padding='SAME')

h_conv3 = tf.nn.relu(conv3 + bias3)

# 全连接层

# 权值参数

W_fc1 = tf.Variable(tf.truncated_normal([7 * 7 * 120, 80]))

# 偏置值

b_fc1 = tf.Variable(tf.truncated_normal([80]))

# 将卷积的产出展开

h_pool2_flat = tf.reshape(h_conv3, [-1, 7 * 7 * 120])

# 神经网络计算,并添加relu激活函数

h_fc1 = tf.nn.relu(tf.matmul(h_pool2_flat, W_fc1) + b_fc1)

# 输出层,使用softmax进行多分类

W_fc2 = tf.Variable(tf.truncated_normal([80, 10]))

b_fc2 = tf.Variable(tf.truncated_normal([10]))

y_conv = tf.nn.softmax(tf.matmul(h_fc1, W_fc2) + b_fc2)

# 损失函数

cross_entropy = -tf.reduce_sum(y_ * tf.log(y_conv))

# 使用GDO优化算法来调整参数

train_step = tf.train.GradientDescentOptimizer(0.001).minimize(cross_entropy)

sess = tf.InteractiveSession()

# 测试正确率

correct_prediction = tf.equal(tf.argmax(y_conv, 1), tf.argmax(y_, 1))

accuracy = tf.reduce_mean(tf.cast(correct_prediction, "float"))

# 所有变量进行初始化

sess.run(tf.initialize_all_variables())

# 获取mnist数据

mnist_data_set = input_data.read_data_sets("D:\\F\\TensorFlow_deep_learn\\MNIST\\", one_hot=True)

# 进行训练

start_time = time.time()

for i in range(20000):

    # 获取训练数据

    batch_xs, batch_ys = mnist_data_set.train.next_batch(200)

    # 每迭代100个 batch,对当前训练数据进行测试,输出当前预测准确率

    if i % 2 == 0:

        train_accuracy = accuracy.eval(feed_dict={x: batch_xs, y_: batch_ys})

        print("step %d, training accuracy %g" % (i, train_accuracy))

        # 计算间隔时间

        end_time = time.time()

        print('time: ', (end_time - start_time))

        start_time = end_time

    # 训练数据

    train_step.run(feed_dict={x: batch_xs, y_: batch_ys})

# 关闭会话

sess.close()
吴裕雄 python深度学习与实践(16)的更多相关文章
- 吴裕雄 python深度学习与实践(17)
import tensorflow as tf from tensorflow.examples.tutorials.mnist import input_data import time # 声明输 ...
- 吴裕雄 python深度学习与实践(13)
import numpy as np import matplotlib.pyplot as plt x_data = np.random.randn(10) print(x_data) y_data ...
- 吴裕雄 python深度学习与实践(5)
import numpy as np data = np.mat([[1,200,105,3,False], [2,165,80,2,False], [3,184.5,120,2,False], [4 ...
- 吴裕雄 python深度学习与实践(18)
# coding: utf-8 import time import numpy as np import tensorflow as tf import _pickle as pickle impo ...
- 吴裕雄 python深度学习与实践(15)
import tensorflow as tf import tensorflow.examples.tutorials.mnist.input_data as input_data mnist = ...
- 吴裕雄 python深度学习与实践(14)
import numpy as np import tensorflow as tf import matplotlib.pyplot as plt threshold = 1.0e-2 x1_dat ...
- 吴裕雄 python深度学习与实践(12)
import tensorflow as tf q = tf.FIFOQueue(,"float32") counter = tf.Variable(0.0) add_op = t ...
- 吴裕雄 python深度学习与实践(11)
import numpy as np from matplotlib import pyplot as plt A = np.array([[5],[4]]) C = np.array([[4],[6 ...
- 吴裕雄 python深度学习与实践(10)
import tensorflow as tf input1 = tf.constant(1) print(input1) input2 = tf.Variable(2,tf.int32) print ...
随机推荐
- 解决使用angular2路由后,页面刷新后报404错误。
点击路由链接跳转页面是正常的,但是当刷新页面时就出现了404错误. 解决方法如下: 在app.module.ts中添加import: import {HashLocationStrategy,Loca ...
- awrrpt.sqll生成awr报ORA-06502,ORA-06512
客户环境SumOS操作系统,数据库版本11.2.0.3,rac两节点: 在节点2,执行awr报告,输出报错,有时候可以成功,有时候失败. 报错现象 SQL>@?/rdbms/admin/awrr ...
- Vue: 用 key 管理可复用的元素
<div id="login"> <template v-if="loginType === 'username'"> <labe ...
- CIFAR-10数据集读取
参考:https://jingyan.baidu.com/article/656db9183296c7e381249cf4.html 1.使用读取方式pickle def unpickle(file) ...
- Cache架构设计
Cache策略 定时过期策略 定时过期的好处是Cache节点的个数符合实际需求,不会造成资源滥用和服务器压力 定时过期适合访问量较大,实时性要求不高的情况 如果访问量小,定时过期会造成Cache命中率 ...
- Go Example--状态协程
package main import ( "fmt" "math/rand" "sync/atomic" "time" ...
- SSM框架的配置
主要是这三个配置文件 web.xml(用来加载和初始化下面的配置文件) applicationcontet.xml(就是Spring的配置文件,一般包括声明式失误等等AOP) Sprimgmvc,xm ...
- BSS, DATA, TEXT, HEAP, STACK
BSS, block start segment, static memory, to store the global data which are not initialized. DATA, d ...
- 依据Axis2官网的高速入门英文文档总结
版权声明:本文为博主原创文章,未经博主同意不得转载. https://blog.csdn.net/ksdb0468473/article/details/29918027 首先在Eclipse中创建一 ...
- java_GC
垃圾回收1 内存分配 垃圾回收 调用垃圾回收器 对象终结 调用垃圾回收器 System.gc()和Runtime.getRuntime(). ...