SpringCloud的学习记录(5)
这一章节讲如何使用ribbon和hystrix.
在我们生成的Demo项目上右键点击New->Module->spring Initializr, 然后next, 填写Group和Artifact等信息,
这里Artifact填写ribbonconsumer, 再次next,
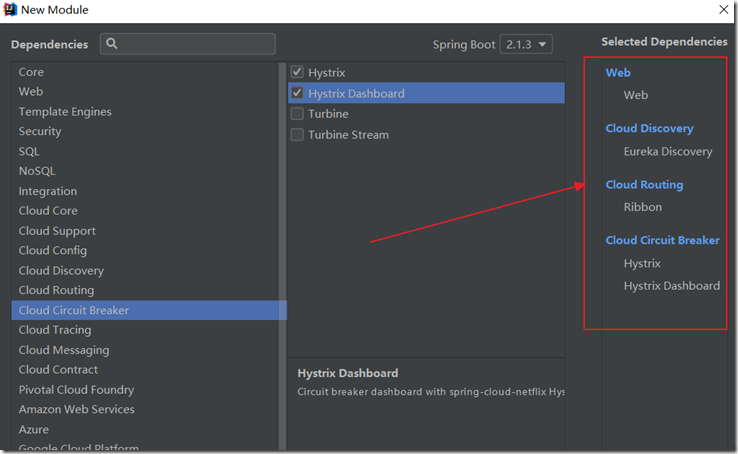
这里选择如下图:
最后在Module Name中填写ribbon-consumer.
生成的pom.xml文件如下:
<?xml version="1.0" encoding="UTF-8"?>

<project xmlns="http://maven.apache.org/POM/4.0.0" xmlns:xsi="http://www.w3.org/2001/XMLSchema-instance"

         xsi:schemaLocation="http://maven.apache.org/POM/4.0.0 http://maven.apache.org/xsd/maven-4.0.0.xsd">

    <modelVersion>4.0.0</modelVersion>

    <parent>

        <groupId>org.springframework.boot</groupId>

        <artifactId>spring-boot-starter-parent</artifactId>

        <version>2.1.3.RELEASE</version>

        <relativePath/> <!-- lookup parent from repository -->

    </parent>

    <groupId>com.xum</groupId>

    <artifactId>ribbon-consumer</artifactId>

    <version>0.0.1-SNAPSHOT</version>

    <name>ribbon-consumer</name>

    <description>Demo project for Spring Boot</description>

    <properties>

        <project.build.sourceEncoding>UTF-8</project.build.sourceEncoding>

        <project.reporting.outputEncoding>UTF-8</project.reporting.outputEncoding>

        <java.version>1.8</java.version>

        <spring-cloud.version>Greenwich.RELEASE</spring-cloud.version>

    </properties>

    <dependencies>

        <dependency>

            <groupId>org.springframework.boot</groupId>

            <artifactId>spring-boot-starter-web</artifactId>

        </dependency>

        <dependency>

            <groupId>org.springframework.cloud</groupId>

            <artifactId>spring-cloud-starter-netflix-eureka-client</artifactId>

        </dependency>

        <dependency>

            <groupId>org.springframework.cloud</groupId>

            <artifactId>spring-cloud-starter-netflix-ribbon</artifactId>

        </dependency>

        <dependency>

            <groupId>org.springframework.cloud</groupId>

            <artifactId>spring-cloud-starter-netflix-hystrix</artifactId>

        </dependency>

        <dependency>

            <groupId>org.springframework.cloud</groupId>

            <artifactId>spring-cloud-starter-netflix-hystrix-dashboard</artifactId>

        </dependency>

        <dependency>

            <groupId>org.springframework.boot</groupId>

            <artifactId>spring-boot-starter-actuator</artifactId>

        </dependency>

        <dependency>

            <groupId>org.springframework.boot</groupId>

            <artifactId>spring-boot-starter-test</artifactId>

            <scope>test</scope>

        </dependency>

        <dependency>

            <groupId>com.netflix.hystrix</groupId>

            <artifactId>hystrix-javanica</artifactId>

            <version>RELEASE</version>

            <scope>compile</scope>

        </dependency>

    </dependencies>

    <dependencyManagement>

        <dependencies>

            <dependency>

                <groupId>org.springframework.cloud</groupId>

                <artifactId>spring-cloud-dependencies</artifactId>

                <version>${spring-cloud.version}</version>

                <type>pom</type>

                <scope>import</scope>

            </dependency>

        </dependencies>

    </dependencyManagement>

    <build>

        <plugins>

            <plugin>

                <groupId>org.springframework.boot</groupId>

                <artifactId>spring-boot-maven-plugin</artifactId>

            </plugin>

        </plugins>

    </build>

    <repositories>

        <repository>

            <id>spring-milestones</id>

            <name>Spring Milestones</name>

            <url>https://repo.spring.io/milestone</url>

        </repository>

    </repositories>

</project>
在src->main->resources下建立application.yml文件, 内容如下
eureka:

  client:

    serviceUrl:

      defaultZone: http://localhost:8761/eureka/

server:

  port: 8771

spring:

  application:

    name: ribbon-consumer

management:

  endpoint:

    health:

      show-details: always

  endpoints:

    web:

      exposure:

        include: '*'
在RibbonConsumerApplication.java里的内容如下, 要加上@EnableCircuitBreaker
@EnableHystrixDashboard
@EnableDiscoveryClient这三个注解.
package com.xum.ribbonconsumer;

import org.springframework.boot.SpringApplication;

import org.springframework.boot.autoconfigure.SpringBootApplication;

import org.springframework.cloud.client.circuitbreaker.EnableCircuitBreaker;

import org.springframework.cloud.client.discovery.EnableDiscoveryClient;

import org.springframework.cloud.client.loadbalancer.LoadBalanced;

import org.springframework.cloud.netflix.hystrix.dashboard.EnableHystrixDashboard;

import org.springframework.context.annotation.Bean;

import org.springframework.web.client.RestTemplate;

@EnableCircuitBreaker

@EnableHystrixDashboard

@EnableDiscoveryClient

@SpringBootApplication

public class RibbonConsumerApplication {

    @Bean

    @LoadBalanced  // 这里是加载平衡, 我这里使用RestTemplate

    RestTemplate restTemplate () {

        return new RestTemplate();

    }

    public static void main(String[] args) {

        SpringApplication.run(RibbonConsumerApplication.class, args);

    }

}
然后在RibbonConsumerApplication.java文件夹同级目录下建立Controller文件夹, 里面写一个RibbonConsumerController.java, 内容如下:
package com.xum.ribbonconsumer.controller;

import com.netflix.hystrix.contrib.javanica.annotation.HystrixCommand;

import org.slf4j.Logger;

import org.slf4j.LoggerFactory;

import org.springframework.beans.factory.annotation.Autowired;

import org.springframework.web.bind.annotation.RequestMapping;

import org.springframework.web.bind.annotation.RestController;

import org.springframework.web.client.RestTemplate;

@RestController

@RequestMapping(value = "/ribbonconsumer")

public class RibbonConsumerController {

    private static final Logger LOG = LoggerFactory.getLogger(RibbonConsumerController.class);

    @Autowired

    RestTemplate restTemplate;

    @RequestMapping(value = "/test")

    @HystrixCommand(fallbackMethod = "testConsumer_ribbon")  // 这里是HystrixCommand注解, 如果eureka-client项目没有启动, 那么就会转到本项目的fallbackMethod方法,即testConsumer_ribbon(), 就是下面的方法

    public String testConsumer() { // 这里是通过getForEntity属性来调用eureka-client里的testone/test这条api

        LOG.info("RibbonConsumerController=>testConsumer");

        return restTemplate.getForEntity("http://eureka-client/testone/test",String.class).getBody();

    }

  // 这里就是熔断器(Hystrix)自我保护的方法,其实是自定义的方法.

    public String testConsumer_ribbon() {

        LOG.info("RibbonConsumerController=>testConsumer_ribbon");

        return "testConsumer_ribbon";

    }

}
下面是eureka-client项目下testone/test的api返回内容, 这里是简写了,具体的内容可以回看前面eureka-client项目搭建.
    @RequestMapping(value = "/test")

    public String test(@RequestParam(value = "name", required = false, defaultValue = "testOneClient")String name) {

        String info = "Hi " + name + ", this is EurekaClient, port is " + port;

        return info;

    }
最后顺序启动如下项目:
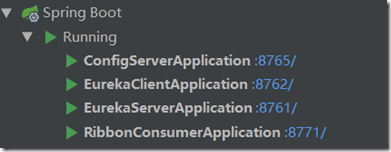
1. eureka-server
2. config-server
3. eureka-client
4. ribbon-consumer
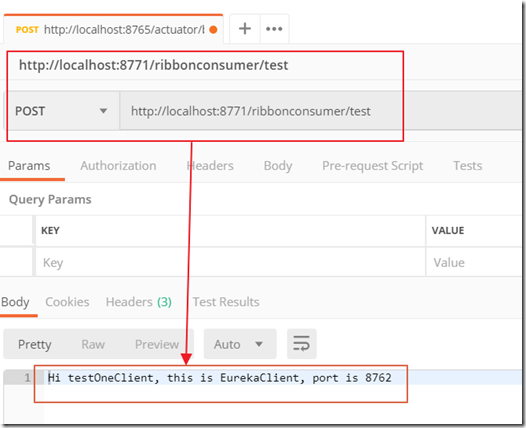
最后用post man发送api: http://localhost:8771/ribbonconsumer/test
或则浏览器打开这条api.
可以看到返回的内容就好像调用eureka-client下的api: http://localhost:8762/testone/test
如果eureka-client项目里没有启动, 那么Hystrix会实现自我保护, 会调用到(fallbackMethod = "testConsumer_ribbon")方法, 自定义的方法.
测试一下, 把eureka-client项目停止,
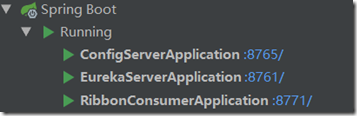
在post man或则浏览器中输入http://localhost:8771/ribbonconsumer/test, 内容如下:
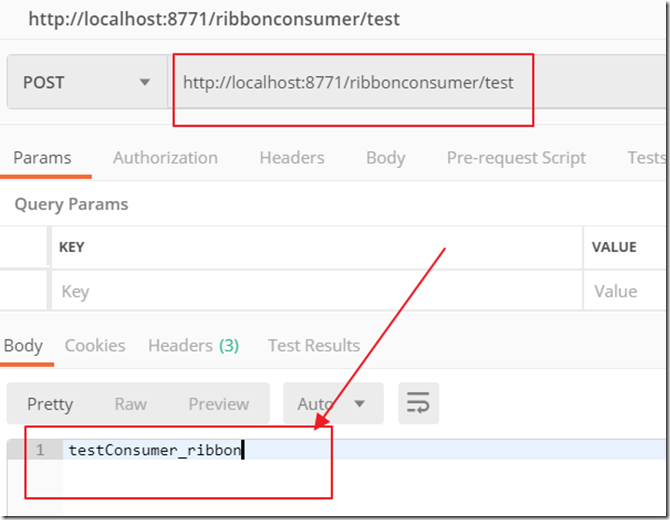
可以看到, 会调用到testConsumer_ribbon()的保护方法里去.
SpringCloud的学习记录(5)的更多相关文章
- SpringCloud的学习记录(1)
最近一段时间重新学习一边SpringCloud(有半年不用了),这里简单记录一下. 我用的是IntelliJ IDEA开发工具, SpringBoot的版本是2.1.3.RELEASE. 1. 构建M ...
- SPRINGCLOUD 开发学习记录
一个简单的微服务系统:服务注册和发现,服务消费,负载均衡,断路器,智能路由,配置管理 服务注册中心: eureka是一个高可用组件,没有后端缓存,每一个实例注册后向注册中心发送心跳,默认情况下,eru ...
- SpringCloud的学习记录(8)
这一章节讲zipkin-server. 在我们生成的Demo项目上右键点击New->Module->spring Initializr, 然后next, 填写Group和Artifact等 ...
- SpringCloud的学习记录(7)
这一章节讲zuul的使用. 在我们生成的Demo项目上右键点击New->Module->spring Initializr, 然后next, 填写Group和Artifact等信息, 这里 ...
- SpringCloud的学习记录(6)
这一章节讲fegin的使用. 在我们生成的Demo项目上右键点击New->Module->spring Initializr, 然后next, 填写Group和Artifact等信息, 这 ...
- SpringCloud的学习记录(3)
这一章节讲搭建config-server的项目. 在我们生成的Demo项目上右键点击New->Module->spring Initializr, 然后next, 填写Group和Arti ...
- SpringCloud的学习记录(2)
这一章节主要讲如何搭建eureka-client项目. 在我们生成的Demo项目上右键点击New->Module->spring Initializr, 然后next, 填写Group和A ...
- SpringCloud的学习记录(4)
本篇基于上一篇写的, 在git上更改配置后, eureka-client如何更新. 我们只需要在配置文件中配置 spring-cloud-starter-bus-amqp; 这就是说我们需要装rabb ...
- SpringCloud基础教程学习记录
这个学习记录是学习自翟永超前辈的SpringCloud的基础教程. 自己写这个教程的目的主要是在于,想要更凝练总结一些其中的一些实用点,顺便做个汇总,这样自己在复习查看的时候更加方便,也能顺着自己的思 ...
随机推荐
- IOS 浏览器上设置overflow: auto 不可滚动
项目中最近遇到一个bug,在ios上出现的问题:原页面是在某一块地方滚动,但是改版后,滚动区域改为最外层元素,最外层包裹了一层class为main的div .main { position: fixe ...
- 模仿 spring IOC Annotation版自动装配
spring 有两大核心 IOC和AOP. IOC (inversion of control) 译为 控制反转,也可以称为 依赖注入 ; AOP(Aspect Oriented Programmi ...
- Warning: Call to 'toArray()' with pre-sized array argument 'new String[list.size()]'
当使用如下代码将List转换为Array类型时: List<String> list = new ArrayList<>(); String[] array = list.to ...
- 使用Tensorflow object detection API——环境搭建与测试
[软件环境搭建] 操作系统:windows 10 64位 内存:8G CPU:I7-6700 Tensorflow: 1.4 Python:3.5 Anaconda3 (64-bit) 以上环境搭建请 ...
- bootstrap-table 选择行,并且获得选中行的所有数据内容
html代码如下: <table id="table" data-toggle="table" th:attr="data-url=@{/vie ...
- python 格式化时间含中文报错: 'locale' codec can't encode character '\u5e74'
执行下面代码报错: UnicodeEncodeError: 'locale' codec can't encode character '\u5e74' in position 2: Illegal ...
- NETCore 调试
https://www.cnblogs.com/MingQiu/p/8227644.html https://www.cnblogs.com/shumin/p/9967854.html 前言 core ...
- my18_mysql中的几个超时时间
连接的超时时间 set global interactive_timeout=120;set global wait_timeout=120; 该连接指类似应用访问数据库的连接,可以是查询.DML.D ...
- mgo01_window server 2012上安装mongo4.0
目前mongo最新版为4.0(2018-07-18),下载地址 https://fastdl.mongodb.org/win32/mongodb-win32-x86_64-2008plus-ssl-4 ...
- Error in event handler for "el.form.change": "TypeError: value.getTime is not a function"
首先说一下我使用的实际场景 html代码: js代码: 首先说明出现原因,elementUI的日期选择器[el-date-picker]在加上格式 value-format="yyyy-MM ...