吴裕雄 python 机器学习——回归决策树模型
import numpy as np
import matplotlib.pyplot as plt from sklearn import datasets
from sklearn.model_selection import train_test_split
from sklearn.tree import DecisionTreeClassifier,DecisionTreeRegressor def creat_data(n):
np.random.seed(0)
X = 5 * np.random.rand(n, 1)
y = np.sin(X).ravel()
noise_num=(int)(n/5)
# 每第5个样本,就在该样本的值上添加噪音
y[::5] += 3 * (0.5 - np.random.rand(noise_num))
return train_test_split(X, y,test_size=0.25,random_state=1) #决策树DecisionTreeRegressor模型
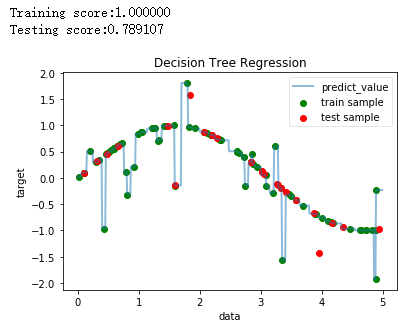
def test_DecisionTreeRegressor(*data):
X_train,X_test,y_train,y_test=data
regr = DecisionTreeRegressor()
regr.fit(X_train, y_train)
print("Training score:%f"%(regr.score(X_train,y_train)))
print("Testing score:%f"%(regr.score(X_test,y_test)))
#绘图
fig=plt.figure()
ax=fig.add_subplot(1,1,1)
X = np.arange(0.0, 5.0, 0.01)[:, np.newaxis]
Y = regr.predict(X)
ax.scatter(X_train, y_train, label="train sample",c='g')
ax.scatter(X_test, y_test, label="test sample",c='r')
ax.plot(X, Y, label="predict_value", linewidth=2,alpha=0.5)
ax.set_xlabel("data")
ax.set_ylabel("target")
ax.set_title("Decision Tree Regression")
ax.legend(framealpha=0.5)
plt.show() # 产生用于回归问题的数据集
X_train,X_test,y_train,y_test=creat_data(100)
# 调用 test_DecisionTreeRegressor
test_DecisionTreeRegressor(X_train,X_test,y_train,y_test)
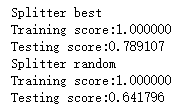
def test_DecisionTreeRegressor_splitter(*data):

    '''

    测试 DecisionTreeRegressor 预测性能随划分类型的影响

    '''

    X_train,X_test,y_train,y_test=data

    splitters=['best','random']

    for splitter in splitters:

        regr = DecisionTreeRegressor(splitter=splitter)

        regr.fit(X_train, y_train)

        print("Splitter %s"%splitter)

        print("Training score:%f"%(regr.score(X_train,y_train)))

        print("Testing score:%f"%(regr.score(X_test,y_test)))

# 调用 test_DecisionTreeRegressor_splitter

test_DecisionTreeRegressor_splitter(X_train,X_test,y_train,y_test)
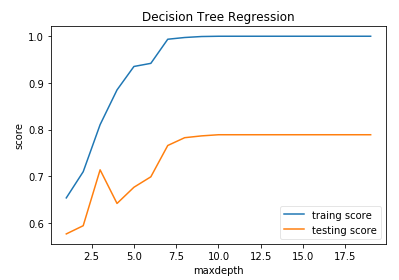
def test_DecisionTreeRegressor_depth(*data,maxdepth):

    '''

    测试 DecisionTreeRegressor 预测性能随  max_depth 的影响

    '''

    X_train,X_test,y_train,y_test=data

    depths=np.arange(1,maxdepth)

    training_scores=[]

    testing_scores=[]

    for depth in depths:

        regr = DecisionTreeRegressor(max_depth=depth)

        regr.fit(X_train, y_train)

        training_scores.append(regr.score(X_train,y_train))

        testing_scores.append(regr.score(X_test,y_test))

    # 绘图

    fig=plt.figure()

    ax=fig.add_subplot(1,1,1)

    ax.plot(depths,training_scores,label="traing score")

    ax.plot(depths,testing_scores,label="testing score")

    ax.set_xlabel("maxdepth")

    ax.set_ylabel("score")

    ax.set_title("Decision Tree Regression")

    ax.legend(framealpha=0.5)

    plt.show()

# 调用 test_DecisionTreeRegressor_depth

test_DecisionTreeRegressor_depth(X_train,X_test,y_train,y_test,maxdepth=20)
吴裕雄 python 机器学习——回归决策树模型的更多相关文章
- 吴裕雄 python 机器学习——分类决策树模型
import numpy as np import matplotlib.pyplot as plt from sklearn import datasets from sklearn.model_s ...
- 吴裕雄 python 机器学习——核化PCAKernelPCA模型
# -*- coding: utf-8 -*- import numpy as np import matplotlib.pyplot as plt from sklearn import datas ...
- 吴裕雄 python 机器学习——KNN回归KNeighborsRegressor模型
import numpy as np import matplotlib.pyplot as plt from sklearn import neighbors, datasets from skle ...
- 吴裕雄 python 机器学习——集成学习梯度提升决策树GradientBoostingRegressor回归模型
import numpy as np import matplotlib.pyplot as plt from sklearn import datasets,ensemble from sklear ...
- 吴裕雄 python 机器学习——集成学习随机森林RandomForestRegressor回归模型
import numpy as np import matplotlib.pyplot as plt from sklearn import datasets,ensemble from sklear ...
- 吴裕雄 python 机器学习——集成学习AdaBoost算法回归模型
import numpy as np import matplotlib.pyplot as plt from sklearn import datasets,ensemble from sklear ...
- 吴裕雄 python 机器学习——模型选择回归问题性能度量
from sklearn.metrics import mean_absolute_error,mean_squared_error #模型选择回归问题性能度量mean_absolute_error模 ...
- 吴裕雄 python 机器学习——线性回归模型
import numpy as np from sklearn import datasets,linear_model from sklearn.model_selection import tra ...
- 吴裕雄 python 机器学习——支持向量机非线性回归SVR模型
import numpy as np import matplotlib.pyplot as plt from sklearn import datasets, linear_model,svm fr ...
随机推荐
- C# 广告
新建一个XML页面,设置属性 选择架构,勾选下面的目标,确定即可添加广告 广告模板: <?xml version="1.0" encoding="utf-8&quo ...
- promise 基础知识
promise 基础知识 proise:1.Promise是异步编程的一种解决方案,它有三种状态,分别是pending-进行中.resolved-已完成.rejected-已失败2.创建实例//met ...
- JSON格式字符串作为存储过程参数解析
1.新建可编程性的表值函数(SQLSERVER) USE [xxxx] GO /****** Object: UserDefinedFunction [dbo].[parseJSON] Script ...
- WMware 中CentOS系统Hadoop 分布式环境搭建(一)——Hadoop安装环境准备
1.创建3台虚拟机并装好系统,这里使用64位CentOS. 2.Ping测试[确保两两能ping通]: [ping xxx.xxx.xxx.xxx] 3.安装SSH:[yum install ssh ...
- (转)android 中uri.parse()用法
1,调web浏览器 Uri myBlogUri = Uri.parse("http://xxxxx.com"); returnIt = new Intent(Intent.ACTI ...
- 使用命令行执行jmeter的方法
1. 简介 使用非 GUI 模式,即命令行模式运行 JMeter 测试脚本能够大大缩减所需要的系统资 本文介绍windows下以命令行模式运行的方法. 1.1. 命令介绍 jmeter -n -t & ...
- js通过replace()方法配合正则去除空格
<script> //去掉全部空格 var str = " 546546 4564 46 46 88 88 "; var str = str.replace(/\s+/ ...
- 初学爬虫,关于scrapy
对于anaconda与pycharm,因为在pycharm中一直下不成功tensorflow,所以后来又下了anaconda,pycharm就可以直接使用anaconda的编译器, 一直都很正常,但是 ...
- 刘志梅2017710101152.《面向对象程序设计(java)》第十三周学习总结
实验十三 图形界面事件处理技术 实验时间 2018-11-22 1.理论知识 (1)任何支持GUI的操作环境都要不断地监视按键或点击鼠标这样的事件. JAVA这样的面向对象语言,都将事件的相关的信息 ...
- Web 应用程序项目 Himall.Web 已配置为使用 IIS。 无法访问 IIS 元数据库
Web应用程序项目XXXX已配置为使用IIS.无法访问IIS元数据库.您没有足够的特权访问计算机上的IIS网站,xxxxiis 问题:Windows8下直接使用VS打开项目,出现问题:XXXX已配置为 ...