
大数据-hadoop HA集群搭建
一、安装hadoop、HA及配置journalnode
实现namenode HA
实现resourcemanager HA
namenode节点之间通过journalnode同步元数据
首先下载需要版本的hadoop,我用的版本是hadoop-2.9.1
安装到5台机器上
master1 master2上安装namenode
master1 master2上配置resourcemanager
slave1 slave2 slave3上安装datanode
slave1 slave2 slave3上配置journalnode
slave1 slave2 slave3上配置nodemanager
1、将文件下载到、opt/workspace/目录下
2、解压缩
tar -zxvf hadoop-2.9..tar.gz
3、进行文件配置
对hadoop-env.sh mapred-site.xml hdfs-site.xml yarn-site.xml core-site.xml slaves进行修改
(1)对core-site.xml进行配置
<?xml version="1.0" encoding="UTF-8"?>

<?xml-stylesheet type="text/xsl" href="configuration.xsl"?>

<!--

  Licensed under the Apache License, Version 2.0 (the "License");

  you may not use this file except in compliance with the License.

  You may obtain a copy of the License at

    http://www.apache.org/licenses/LICENSE-2.0

  Unless required by applicable law or agreed to in writing, software

  distributed under the License is distributed on an "AS IS" BASIS,

  WITHOUT WARRANTIES OR CONDITIONS OF ANY KIND, either express or implied.

  See the License for the specific language governing permissions and

  limitations under the License. See accompanying LICENSE file.

-->

<!-- Put site-specific property overrides in this file. -->

<configuration>

<property>

        <name>hadoop.tmp.dir</name>

        <value>/opt/hadoop/tmp</value>

        <description>Abase for other temporary directories.</description>

</property>

<property>

        <name>fs.default.name</name>

        <value>hdfs://hadoop-test</value>

</property>

<property>

       <name>io.file.buffer.size</name>

       <value></value>

</property>

<!-- 指定zookeeper地址 -->

<property>

        <name>ha.zookeeper.quorum</name>

        <value>master1:,master2:,slave1:,slave2:,slave3:</value>

</property>

<!-- hadoop链接zookeeper的超时时长设置 -->

<property>

        <name>ha.zookeeper.session-timeout.ms</name>

        <value></value>

        <description>ms</description>

</property>

<property>

      <name>hadoop.native.lib</name>

      <value>false</value>

      <description>Should native hadoop libraries, if present, be used.</description>

</property>

<property>

      <name>hadoop.proxyuser.root.hosts</name>

      <value>*</value>

</property>

<property>

      <name>hadoop.proxyuser.root.groups</name>

      <value>*</value>

</property>

</configuration>
(2)对hadoop-env.sh进行配置 添加
export JAVA_HOME=/opt/workspace/jdk1.8
有需要时才添加端口,不是22默认端口

export HADOOP_SSH_OPTS="-p 61333"
(3)对mapred-site.xml进行配置
<?xml version="1.0"?>

<?xml-stylesheet type="text/xsl" href="configuration.xsl"?>

<!--

  Licensed under the Apache License, Version 2.0 (the "License");

  you may not use this file except in compliance with the License.

  You may obtain a copy of the License at

    http://www.apache.org/licenses/LICENSE-2.0

  Unless required by applicable law or agreed to in writing, software

  distributed under the License is distributed on an "AS IS" BASIS,

  WITHOUT WARRANTIES OR CONDITIONS OF ANY KIND, either express or implied.

  See the License for the specific language governing permissions and

  limitations under the License. See accompanying LICENSE file.

-->

<!-- Put site-specific property overrides in this file. -->

<configuration>

<!-- MR YARN Application properties -->

<property>

     <name>mapreduce.framework.name</name>

     <value>yarn</value>

     <description>The runtime framework for executing MapReduce jobs. Can be one of local, classic or yarn.</description>

</property>

<!-- jobhistory properties -->

<property>

     <name>mapreduce.jobhistory.address</name>

     <value>159.226.48.203:</value>

     <description>MapReduce JobHistory Server IPC host:port</description>

</property>

<property>

     <name>mapreduce.jobhistory.webapp.address</name>

     <value>159.226.48.203:</value>

     <description>MapReduce JobHistory Server Web UI host:port</description>

</property>

<property>

        <name>mapreduce.task.io.sort.mb</name>

        <value></value>

</property>

<property>

        <name>mapreduce.reduce.shuffle.parallelcopies</name>

        <value></value>

</property>

<property>

        <name>mapred.child.java.opts</name>

        <value>-Xmx1024m</value>

</property>

<!--MR ApplicationMaster -->

<property>

        <name>yarn.app.mapreduce.am.resource.mb</name>

        <value></value>

</property>

<property>

        <name>yarn.app.mapreduce.am.command-opts</name>

        <value>-Xmx2867m</value>

</property>

</configuration>
(4)对hdfs-site.xml进行配置
<?xml version="1.0" encoding="UTF-8"?>

<?xml-stylesheet type="text/xsl" href="configuration.xsl"?>

<!--

  Licensed under the Apache License, Version 2.0 (the "License");

  you may not use this file except in compliance with the License.

  You may obtain a copy of the License at

    http://www.apache.org/licenses/LICENSE-2.0

  Unless required by applicable law or agreed to in writing, software

  distributed under the License is distributed on an "AS IS" BASIS,

  WITHOUT WARRANTIES OR CONDITIONS OF ANY KIND, either express or implied.

  See the License for the specific language governing permissions and

  limitations under the License. See accompanying LICENSE file.

-->

<!-- Put site-specific property overrides in this file. -->

<configuration>

<property>

     <name>dfs.nameservices</name>

     <value>hadoop-test</value>

     <description>

           Comma-separated list of nameservices.

     </description>

</property>

<property>

     <name>dfs.ha.namenodes.hadoop-test</name>

     <value>nn1,nn2</value>

     <description>

           The prefix for a given nameservice, contains a comma-separated

           list of namenodes for a given nameservice (eg EXAMPLENAMESERVICE).

     </description>

</property>

<property>

      <name>dfs.namenode.rpc-address.hadoop-test.nn1</name>

      <value>master1:</value>

      <description>

             RPC address for nomenode1 of hadoop-test

      </description>

</property>

<property>

      <name>dfs.namenode.rpc-address.hadoop-test.nn2</name>

      <value>master2:</value>

      <description>

             RPC address for nomenode2 of hadoop-test

      </description>

</property>

<property>

      <name>dfs.namenode.http-address.hadoop-test.nn1</name>

      <value>master1:</value>

      <description>

             The address and the base port where the dfs namenode1 web ui will listen on.

      </description>

</property>

<property>

      <name>dfs.namenode.http-address.hadoop-test.nn2</name>

      <value>master2:</value>

      <description>

             The address and the base port where the dfs namenode2 web ui will listen on.

      </description>

</property>

<!-- 启用webhdfs -->

<property>

       <name>dfs.webhdfs.enabled</name>

       <value>true</value>

</property>

<property>

      <name>dfs.namenode.name.dir</name>

      <value>/opt/hadoop/dfs/name</value>

      <description>Path on the local filesystem where theNameNode stores the namespace and transactions logs persistently.</description>

</property>

  <!--配置journalnode-->

<property>

  <name>dfs.namenode.shared.edits.dir</name>

  <value>qjournal://slave1:8485;slave2:8485;slave3:8485/hadoop-test</value>

  <description>A directory on shared storage between the multiple namenodes

  in an HA cluster. This directory will be written by the active and read

  by the standby in order to keep the namespaces synchronized. This directory

  does not need to be listed in dfs.namenode.edits.dir above. It should be

  left empty in a non-HA cluster.

  </description>

</property>

<property>

     <name>dfs.datanode.data.dir</name>

     <value>/opt/hadoop/dfs/data</value>

     <description>Comma separated list of paths on the localfilesystem of a DataNode where it should store its blocks.</description>

</property>

<property>

     <name>dfs.replication</name>

     <value></value>

</property>

<property>

    <name>dfs.ha.automatic-failover.enabled</name>

    <value>true</value>

    <description>

      Whether automatic failover is enabled. See the HDFS High

      Availability documentation for details on automatic HA

      configuration.

    </description>

</property>

<property>

    <name>dfs.journalnode.edits.dir</name>

    <value>/opt/hadoop/dfs/journalnode</value>

</property>

<!-- 开启NameNode失败自动切换 -->

<!-- 配置失败自动切换实现方式 -->

<property>

        <name>dfs.client.failover.proxy.provider.hadoop-test</name>

        <value>org.apache.hadoop.hdfs.server.namenode.ha.ConfiguredFailoverProxyProvider</value>

</property>

<!-- 配置隔离机制方法,多个机制用换行分割,即每个机制暂用一行 -->

<property>

        <name>dfs.ha.fencing.methods</name>

        <value>

            sshfence

            shell(/bin/true)

        </value>

</property>

<!-- 使用sshfence隔离机制时需要ssh免登陆 -->

<property>

        <name>dfs.ha.fencing.ssh.private-key-files</name>

        <value>/root/hadoop/.ssh/id_rsa</value>

</property>

<!-- 配置sshfence隔离机制超时时间 -->

<property>

        <name>dfs.ha.fencing.ssh.connect-timeout</name>

        <value></value>

</property>

<property>

        <name>ha.failover-controller.cli-check.rpc-timeout.ms</name>

        <value></value>

</property>

<property>

      <name>dfs.permissions</name>

      <value>false</value>

 </property>

</configuration>
(5)对yarn-site.xml进行配置 (注意修改下面第一段代码,不同的master需要修改value值)
<property>

  <name>yarn.resourcemanager.ha.id</name>

  <value>rm2</value>

  <description>If we want to launch more than one RM in single node,we need this configuration</description>

</property>
<?xml version="1.0"?>

<configuration>

<!--rm失联后重新链接的时间-->

<property>

  <name>yarn.resourcemanager.connect.retry-interval.ms</name>

  <value></value>

</property>

<!--开启resourcemanagerHA,默认为false-->

<property>

  <name>yarn.resourcemanager.ha.enabled</name>

  <value>true</value>

</property>

<!--配置resourcemanager-->

<property>

  <name>yarn.resourcemanager.ha.rm-ids</name>

  <value>rm1,rm2</value>

</property>

<property>

  <name>ha.zookeeper.quorum</name>

  <value>master1:,master2:,slave1:,slave2:,slave3:</value>

</property>

<!--开启故障自动切换-->

<property>

  <name>yarn.resourcemanager.ha.automatic-failover.enabled</name>

  <value>true</value>

</property>

<property>

  <name>yarn.resourcemanager.hostname.rm1</name>

  <value>master1</value>

</property>

<property>

  <name>yarn.resourcemanager.hostname.rm2</name>

  <value>master2</value>

</property>

<!--

     在hadoop001上配置rm1,在hadoop002上配置rm2,

注意:一般都喜欢把配置好的文件远程复制到其它机器上,但这个在YARN的另一个机器上一定要修改

-->

<property>

  <name>yarn.resourcemanager.ha.id</name>

  <value>rm2</value>

  <description>If we want to launch more than one RM in single node,we need this configuration</description>

</property>

<!--开启自动恢复功能-->

<property>

  <name>yarn.resourcemanager.recovery.enabled</name>

  <value>true</value>

</property>

<!--配置与zookeeper的连接地址-->

<property>

  <name>yarn.resourcemanager.zk-state-store.address</name>

  <value>master1:,master2:,slave1:,slave2:,slave3:</value>

</property>

<property>

  <name>yarn.resourcemanager.store.class</name>

  <value>org.apache.hadoop.yarn.server.resourcemanager.recovery.ZKRMStateStore</value>

</property>

<property>

  <name>yarn.resourcemanager.zk-address</name>

  <value>master1:,master2:,slave1:,slave2:,slave3:</value>

</property>

<property>

  <name>yarn.resourcemanager.cluster-id</name>

  <value>appcluster-yarn</value>

</property>

<!--schelduler失联等待连接时间-->

<property>

  <name>yarn.app.mapreduce.am.scheduler.connection.wait.interval-ms</name>

  <value></value>

</property>

<!--配置rm1-->

<property>

  <name>yarn.resourcemanager.address.rm1</name>

  <value>master1:</value>

</property>

<property>

  <name>yarn.resourcemanager.scheduler.address.rm1</name>

  <value>master1:</value>

</property>

<property>

  <name>yarn.resourcemanager.webapp.address.rm1</name>

  <value>159.226.48.202:</value>

</property>

<property>

  <name>yarn.resourcemanager.resource-tracker.address.rm1</name>

  <value>master1:</value>

</property>

<property>

  <name>yarn.resourcemanager.admin.address.rm1</name>

  <value>master1:</value>

</property>

<property>

  <name>yarn.resourcemanager.ha.admin.address.rm1</name>

  <value>master1:</value>

</property>

<!--配置rm2-->

<property>

  <name>yarn.resourcemanager.address.rm2</name>

  <value>master2:</value>

</property>

<property>

  <name>yarn.resourcemanager.scheduler.address.rm2</name>

  <value>master2:</value>

</property>

<property>

  <name>yarn.resourcemanager.webapp.address.rm2</name>

  <value>159.226.48.203:</value>

</property>

<property>

  <name>yarn.resourcemanager.resource-tracker.address.rm2</name>

  <value>master2:</value>

</property>

<property>

  <name>yarn.resourcemanager.admin.address.rm2</name>

  <value>master2:</value>

</property>

<property>

  <name>yarn.resourcemanager.ha.admin.address.rm2</name>

  <value>master2:</value>

</property>

<property>

  <name>yarn.nodemanager.aux-services</name>

  <value>mapreduce_shuffle</value>

</property>

<property>

  <name>yarn.nodemanager.aux-services.mapreduce.shuffle.class</name>

  <value>org.apache.hadoop.mapred.ShuffleHandler</value>

</property>

<property>

  <name>yarn.nodemanager.local-dirs</name>

  <value>/opt/workspace/hadoop/yarn/local</value>

</property>

<property>

  <name>yarn.nodemanager.log-dirs</name>

  <value>/opt/workspace/hadoop/yarn/log</value>

</property>

<property>

  <name>mapreduce.shuffle.port</name>

  <value></value>

</property>

<!--故障处理类-->

<property>

  <name>yarn.client.failover-proxy-provider</name>

  <value>org.apache.hadoop.yarn.client.ConfiguredRMFailoverProxyProvider</value>

</property>

<property>

<name>yarn.resourcemanager.ha.automatic-failover.zk-base-path</name>

  <value>/yarn-leader-election</value>

  <description>Optionalsetting.Thedefaultvalueis/yarn-leader-election</description>

</property>

<!--参数解释:启用的资源调度器主类。目前可用的有FIFO、Capacity Scheduler和Fair Scheduler。 -->

<!--<property>

    <description>The class to use as the resource scheduler.</description>

    <name>yarn.resourcemanager.scheduler.class</name>

    <value>org.apache.hadoop.yarn.server.resourcemanager.scheduler.fair.FairScheduler</value>

</property>

<property>

    <description>fair-scheduler conf location</description>

    <name>yarn.scheduler.fair.allocation.file</name>

    <value>${yarn.home.dir}/etc/hadoop/fairscheduler.xml</value>

</property>-->

<property>

    <name>yarn.nodemanager.pmem-check-enabled</name>

    <value>false</value>

</property>

<property>

    <name>yarn.nodemanager.vmem-check-enabled</name>

    <value>false</value>

</property>

<!--参数解释:启用的资源调度器主类。目前可用的有FIFO、Capacity Scheduler和Fair Scheduler。 -->

<property>

    <description>The class to use as the resource scheduler.</description>

    <name>yarn.resourcemanager.scheduler.class</name>

    <value>org.apache.hadoop.yarn.server.resourcemanager.scheduler.capacity.CapacityScheduler</value>

</property>

<!--yarn.scheduler.minimum-allocation-mb/ yarn.scheduler.maximum-allocation-mb

参数解释:单个可申请的最小/最大内存资源量。比如设置为1024和3072,则运行MapRedce作业时,每个Task最少可申请1024MB内存,最多可申请3072MB内存。 -->

<property>

    <description></description>

    <name>yarn.scheduler.minimum-allocation-mb</name>

    <value></value>

</property>

<property>

    <description></description>

    <name>yarn.scheduler.maximum-allocation-mb</name>

    <value></value>

</property>

<!--:单个可申请的最小/最大虚拟CPU个数。比如设置为1和4,则运行MapRedce作业时,每个Task最少可申请1个虚拟CPU,最多可申请4个虚拟CPU。 -->

<property>

    <description></description>

    <name>yarn.scheduler.minimum-allocation-vcores</name>

    <value></value>

</property>

<property>

    <description></description>

    <name>yarn.scheduler.maximum-allocation-vcores</name>

    <value></value>

</property>

<property>

     <description></description>

     <name>yarn.nodemanager.resource.cpu-vcores</name>

     <value></value>

</property>

<property>

     <description></description>

     <name>yarn.nodemanager.resource.memory-mb</name>

     <value></value>

</property>

<property>

        <name>yarn.nodemanager.aux-services</name>

        <value>mapreduce_shuffle</value>

</property>

</configuration>
(6)修改slaves文件

配置完成
二、启动服务
1、首先启动5台服务器的zookeeper服务
cd /opt/workspace/zookeeper/zookeeper-3.4.

bin/zkServer.sh
2、slave1 slave2 slave3 上启动journalnode
[root@slave1 hadoop-2.9.]# sbin/hadoop-daemon.sh start journalnode
[root@slave2 hadoop-2.9.]# sbin/hadoop-daemon.sh start journalnode
[root@slave3 hadoop-2.9.]# sbin/hadoop-daemon.sh start journalnode
3、对master1进行格式化
[root@master1 hadoop-2.9.]# bin/hdfs namenode -format
4、master2进行元数据同步
[root@master2 hadoop-2.9.]# bin/hdfs namenode -bootstrapStandby
5、启动hadoop
[root@master1 hadoop-2.9.]# sbin/start-dfs.sh
6、启动resourcemanager
[root@master1 hadoop-2.9.]# sbin/start-yarn.sh
master2上手动启动resourcemanager
[root@master1 hadoop-2.9.]# sbin/yarn-daemon.sh start resourcemanager
7、成功启动服务后的截图

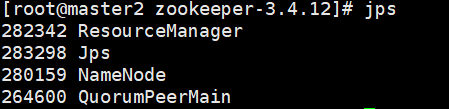
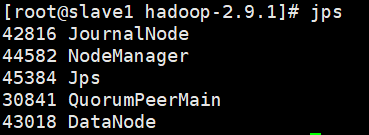


三、HA功能测试


问题解决:
在进行启动时,出现22端口拒绝访问,因为22端口为默认ssh访问端口,而我们的服务器不是22,所以需要修改一下
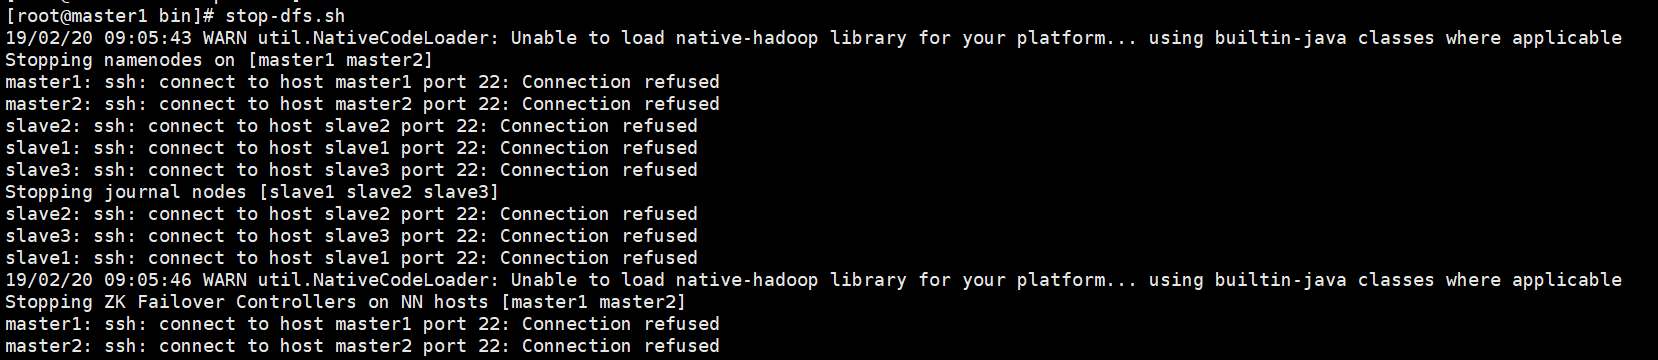
在hadoop-env.sh文件中添加
export HADOOP_SSH_OPTS="-p 61333"
防火墙问题:进行操作时需要将机器的防火墙关闭
[root@master1 bin]# systemctl start firewalld.service  #启动firewall

[root@master1 bin]# systemctl stop firewalld.service   #停止firewall

[root@master1 bin]# systemctl disable firewalld.service   #禁止firewall开机启动
参考:https://blog.csdn.net/sinat_25943197/article/details/81906060
大数据-hadoop HA集群搭建的更多相关文章
- 大数据-HBase HA集群搭建
1.下载对应版本的Hbase,在我们搭建的集群环境中选用的是hbase-1.4.6 将下载完成的hbase压缩包放到对应的目录下,此处我们的目录为/opt/workspace/ 2.对已经有的压缩包进 ...
- 大数据-spark HA集群搭建
一.安装scala 我们安装的是scala-2.11.8 5台机器全部安装 下载需要的安装包,放到特定的目录下/opt/workspace/并进行解压 1.解压缩 [root@master1 ~]# ...
- hadoop ha集群搭建
集群配置: jdk1.8.0_161 hadoop-2.6.1 zookeeper-3.4.8 linux系统环境:Centos6.5 3台主机:master.slave01.slave02 Hado ...
- hadoop HA集群搭建步骤
NameNode DataNode Zookeeper ZKFC JournalNode ResourceManager NodeManager node1 √ √ √ √ node2 ...
- 大数据中HBase集群搭建与配置
hbase是分布式列式存储数据库,前提条件是需要搭建hadoop集群,需要Zookeeper集群提供znode锁机制,hadoop集群已经搭建,参考 Hadoop集群搭建 ,该文主要介绍Zookeep ...
- hadoop HA集群搭建(亲测)
1.hadoop-env.sh 2.core-site.xml <configuration> <!-- 指定hdfs的nameservice为ns1 --> <prop ...
- 大数据:spark集群搭建
创建spark用户组,组ID1000 groupadd -g 1000 spark 在spark用户组下创建用户ID 2000的spark用户 获取视频中文档资料及完整视频的伙伴请加QQ群:9479 ...
- 大数据学习——Storm集群搭建
安装storm之前要安装zookeeper 一.安装storm步骤 1.下载安装包 2.解压安装包 .tar.gz storm 3.修改配置文件 mv /root/apps/storm/conf/st ...
- 大数据中Linux集群搭建与配置
因测试需要,一共安装4台linux系统,在windows上用vm搭建. 对应4个IP为192.168.1.60.61.62.63,这里记录其中一台的搭建过程,其余的可以直接复制虚拟机,并修改相关配置即 ...
随机推荐
- Powerdesigner逆向工程从mysql生成PDM
大家喜欢用powerDesigner进行数据库建模.通常都是先设计出物理模型图,再转换出数据库需要的SQL语句,从而生成数据库.但“powerDesigner逆向工程”就能将数据库逆向转为物理模型图. ...
- phpmailer配置qq邮箱
function send_email2($email = '*****@perspectivar.com'){ $this->autoRender = false; date_default_ ...
- JMS学习之理论基础
本文代码使用ActiveMq5.6 一.什么是JMS JMS(Java Message Service,Java消息服务)是一组Java应用程序接口(Java API),它提供创建.发送.接收.读取消 ...
- hra控件自动绑定
1.前台js代码 $.ajax({ type: "post", url: 'AlmMarketScenarioDetailManage.aspx?_method=queryPane ...
- Linux发送邮件
以下是自己收集的实用Linux下简单配置外部邮箱发送邮件的方法: 1.配置/etc/mail.rc,使用mail命令 # vim /etc/mail.rc ###调用外部邮箱 set from=t ...
- 为 pycharm 修改 Theme & Color
版本: pycharm-community-4.5.2 安装之后先导入 (File --> Import Setting --> django.jar) 将文件pycharm-themes ...
- [GO]并行和并发的区别
并行:指在同一时刻,有多条指令在多个处理器上同时执行 并发:指在同一时刻只能有一条指令执行,但多个进程指令被快速的轮换执行,使得在宏观上具有多个进程同时执行的效果,但在微观上并不是同时执行的,只有把时 ...
- C#开发重用方法
获取类型先关信息 GetType()及typeof()
- Mac Android8.0源码编译笔记
原因:内存不够 办法:添加限制,输入如下命令:export JACK_SERVER_VM_ARGUMENTS="-Dfile.encoding=UTF-8 -XX:+TieredCompil ...
- Find out your Java heap memory size
In this article, we will show you how to use the -XX:+PrintFlagsFinal to find out your heap size det ...