React Native商城项目实战05 - 设置首页的导航条
1.Home.js
/**

 * 首页

 */

import React, { Component } from 'react';

import {

    AppRegistry,

    StyleSheet,

    Text,

    View,

    TouchableOpacity,

    TextInput,

    Image,

    Platform

} from 'react-native';

var Dimensions = require('Dimensions');

var screenW = Dimensions.get('window').width;

var screenH = Dimensions.get('window').height;

/*======导入外部组件类======*/

var HomeDetail = require('./HomeDetail');

// ES5

var Home = React.createClass({

    render() {

        return (

            <View style={styles.container}>

                {/*首页的导航条*/}

                {this.renderNavBar()}

                <TouchableOpacity onPress={()=>{this.pushToDetail()}} >

                    <Text style={styles.welcome}>

                        Home

                    </Text>

                </TouchableOpacity>

            </View>

        );

    },

    // 首页的导航条

    renderNavBar(){

        return(

            <View style={styles.navBarStyle}>

                <TouchableOpacity onPress={()=>{this.pushToDetail()}} >

                    <Text style={styles.leftTitleStyle}>宁波</Text>

                </TouchableOpacity>

                <TextInput placeholder="输入商家,品类,商圈" style={styles.topInputStyle} />

                <View style={styles.rightNavViewStyle}>

                    <TouchableOpacity onPress={()=>{alert('点击了')}} >

                        <Image source={{uri:'icon_homepage_message'}} style={styles.navRightImgStyle} />

                    </TouchableOpacity>

                    <TouchableOpacity onPress={()=>{alert('点击了')}} >

                        <Image source={{uri:'icon_homepage_scan'}} style={styles.navRightImgStyle} />

                    </TouchableOpacity>

                </View>

            </View>

        )

    },

    // 跳转到首页详细页

    pushToDetail(){

        this.props.navigator.push({

            component:HomeDetail,   // 要跳转过去的组件

            title:'首页详细页'

        });

    }

});

const styles = StyleSheet.create({

    // 导航栏

    navBarStyle:{

        height:Platform.OS === 'ios' ? 64 : 44,

        backgroundColor:'rgba(255,96,0,1)',

        // 主轴方向

        flexDirection:'row',

        // 侧轴对齐方式 垂直居中

        alignItems:'center',

        // 主轴对齐方式

        justifyContent:'space-around', // 平均分布

    },

    // 导航条左侧文字

    leftTitleStyle:{

        color:'white',

    },

    // 导航栏输入框

    topInputStyle:{

        width:screenW * 0.71,

        height:Platform.OS === 'ios' ? 35 : 30,

        backgroundColor:'white',

        marginTop:Platform.OS === 'ios' ? 18 : 0,

        // 圆角

        borderRadius:18,

        paddingLeft:10,

    },

    // 导航条右侧视图

    rightNavViewStyle:{

        flexDirection:'row',

        height:64,

        // 侧轴对齐方式

        alignItems:'center',

        // backgroundColor:'blue',

    },

    // 导航栏右侧图片

    navRightImgStyle:{

        width:Platform.OS === 'ios' ? 28 : 24,

        height:Platform.OS === 'ios' ? 28 : 24,

    },

    container: {

        flex: 1,

        backgroundColor: '#e8e8e8',

    },

    welcome: {

        fontSize: 20,

        textAlign: 'center',

        margin: 10,

    },

});

// 输出

module.exports = Home;
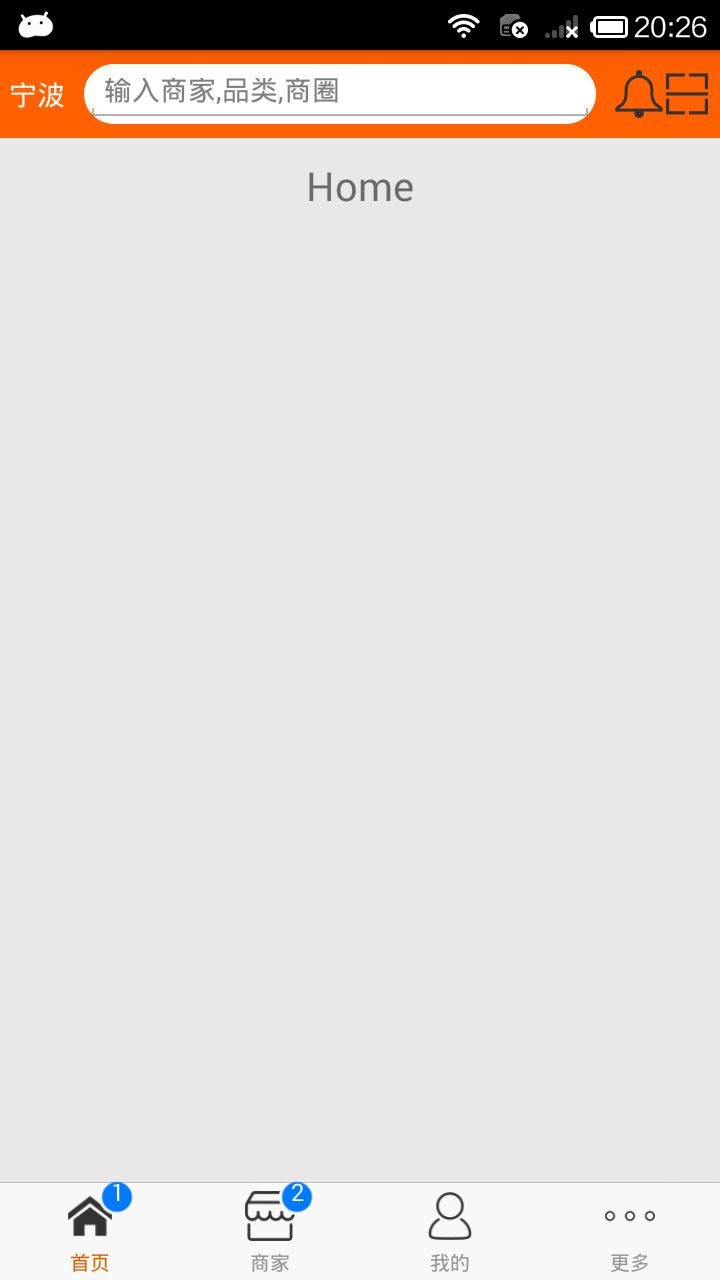
2.效果图
React Native商城项目实战05 - 设置首页的导航条的更多相关文章
- React Native商城项目实战07 - 设置“More”界面导航条
1.More/More.js /** * 更多 */ import React, { Component } from 'react'; import { AppRegistry, StyleShee ...
- React Native商城项目实战08 - 设置“More”界面cell
1.自定义可复用的cell More/CommonCell.js: /** * 自定义可复用的cell */ import React, { Component } from 'react'; imp ...
- React Native商城项目实战06 - 设置安卓中的启动页
1.Main 目录下新建LaunchImage.js: /** * 启动页 */ import React, { Component } from 'react'; import { AppRegis ...
- React Native商城项目实战12 - 首页头部内容
1.HomeTopView为首页头部内容,HomeTopListView为HomeTopView子视图. 2.HomeTopView.js /** * 首页头部内容 */ import React, ...
- React Native商城项目实战15 - 首页购物中心
1.公共的标题栏组件TitleCommonCell.js /** * 首页购物中心 */ import React, { Component } from 'react'; import { AppR ...
- React Native商城项目实战14 - 首页中间下部分
1.MiddleBottomView.js /** * 首页中间下部分 */ import React, { Component } from 'react'; import { AppRegistr ...
- React Native商城项目实战13 - 首页中间上部分内容
1.HomeMiddleView.js /** * 首页中间上部分内容 */ import React, { Component } from 'react'; import { AppRegistr ...
- React Native商城项目实战16 - 购物中心详细页
逻辑分析: 首页(Home)加载的购物中心组件(ShopCenter),传递url数据: ShopCenter里根据url加载购物中心详细页组件(ShopCenterDetail), ShopCent ...
- React Native商城项目实战04 - 封装TabNavigator.Item的创建
1.Main.js /** * 主页面 */ import React, { Component } from 'react'; import { StyleSheet, Text, View, Im ...
随机推荐
- iter的特殊用法以及偏函数partial
iter()的特殊用法 常规使用 iter(obj),会返现一个迭代器,如果 obj 不是可迭代对象,则会报错. 特殊用法(哨兵模式) iter(object[, sentinel]) sentine ...
- java springmvc poi 导出Excel,先简单记录,后期会详细描写
POI jar包下载 : http://poi.apache.org/download.html jsp代码 <%@ page language="java" content ...
- 手把手带你了解sass
sass的使用 减少重复的工作 1.变量的声明: 是以$开头给变量命名; $height-color: #F30 2.变量的使用范围: 变量可以在多个地方存在,不一定限制在代码块中.但是如果定义在了代 ...
- 判断浏览器类型JS
// 判断浏览器类型 getExplorer() { var explorer = window.navigator.userAgent, compare = function (s) { retur ...
- mysql 关于log_bin_trust_function_creators变量
在mysql创建自定义函数的时候,有时候会报以下错误: Error Code: 1418. This function has none of DETERMINISTIC, NO SQL, or RE ...
- poj 1543 Perfect Cubes (暴搜)
Perfect Cubes Time Limit: 1000MS Memory Limit: 10000K Total Submissions: 15302 Accepted: 7936 De ...
- windows中ftp下载脚本(bat+vb)
做了个ftp下载脚本: ftpdownload.bat @rem 注释:从ftp服务器每小时下载北向性能文件的脚本 @rem 用vb脚本取昨天 for /f %%a in ('cscript //no ...
- Python之模块和包补充
包的补充 1.包A和包B下有同名模块也不会冲突,如A.a与B.a来自俩个命名空间 2.常见目录结构 1 import os 2 os.makedirs('glance/api') 3 os.maked ...
- jvm——NIO
https://blog.csdn.net/Evankaka/article/details/48464013 https://www.cnblogs.com/aspirant/p/9166944.h ...
- HTML5测试(一)
HTML5测试一 1. 问题:HTML5 之前的 HTML 版本是什么? A.HTML 4.01 B.HTML 4 C.HTML 4.1 D.HTML 4.9 答案:A HTML5 是 HTML 最新 ...