React Native商城项目实战04 - 封装TabNavigator.Item的创建
1.Main.js
/**

 * 主页面

 */

import React, { Component } from 'react';

import {

    StyleSheet,

    Text,

    View,

    Image,

    Platform,  //判断当前运行的系统

} from 'react-native';

/*=============导入外部组件类==============*/

import TabNavigator from 'react-native-tab-navigator';

import CustomerComponents, { Navigator } from 'react-native-deprecated-custom-components';

// 引入外部的组件(此处注意是相当于了项目根目录)

var Home = require('../Component/Home');

var Message = require('../Component/Message');

var Find = require('../Component/Find');

var Mine = require('../Component/Mine');

// ES5

var Main = React.createClass({

    // 初始化函数(变量是可以改变的,充当状态机的角色)

    getInitialState(){

        return{

            selectedTab:'home' // 默认选中的tabBar

        }

    },

    render() {

        return (

            <TabNavigator>

                {/*--首页--*/}

                {this.renderTabBarItem('首页','icon_tabbar_home','icon_tabbar_home_selected','home','首页',Home,1)}

                {/*--消息--*/}

                {this.renderTabBarItem('消息','icon_tabbar_message','icon_tabbar_message_selected','message','消息',Message,2)}

                {/*--发现--*/}

                {this.renderTabBarItem('发现','icon_tabbar_find','icon_tabbar_find_selected','find','发现',Find)}

                {/*--我的--*/}

                {this.renderTabBarItem('我的','icon_tabbar_mine','icon_tabbar_mine_selected','mine','我的',Mine)}

            </TabNavigator>

        );

    },

    // 封装tabBarItem

    renderTabBarItem(title,iconName,selectedIconName,selectedTab,componentName,component,badgeText){

        return(

            <TabNavigator.Item

                title={title}

                renderIcon={() => <Image source={{uri:iconName}} style={styles.iconStyle} />}

                renderSelectedIcon={() => <Image source={{uri:selectedIconName}} style={styles.iconStyle} />}

                selected={this.state.selectedTab === selectedTab}

                onPress={() => this.setState({ selectedTab: selectedTab })}

                selectedTitleStyle={styles.selectedTitleStyle} //tabBarItem选中的文字样式

                badgeText={badgeText}

            >

                <Navigator

                    initialRoute={{name: componentName, component:component}}

                    configureScene={()=>{

                        return Navigator.SceneConfigs.PushFromRight;

                    }}

                    renderScene={(route, navigator) =>{

                        let Component = route.component;

                        return <Component {...route.passProps} navigator={navigator} />

                    }}

                />

            </TabNavigator.Item>

        )

    }

});

const styles = StyleSheet.create({

    // icon默认样式

    iconStyle:{

        width: Platform.OS === 'ios' ? 30 : 25,

        height:Platform.OS === 'ios' ? 30 : 25,

    },

    // tabBarItem选中的文字样式

    selectedTitleStyle:{

        color: 'rgba(212,97,0,1)',

    }

});

// 输出

module.exports = Main;
简化代码
2.Home.js
/**

 * 首页

 */

import React, { Component } from 'react';

import {

    AppRegistry,

    StyleSheet,

    Text,

    View,

    Image,

    TouchableOpacity,

    Platform

} from 'react-native';

var Home = React.createClass({

    render() {

        return (

            <View style={styles.container}>

                {/*导航条*/}

                {this.renderNavBar()}

                <Text style={styles.welcome}>

                    首页

                </Text>

            </View>

        );

    },

    // 导航条

    renderNavBar(){

        return(

            <View style={styles.navOutViewStyle}>

                <Text style={{color:'white',fontSize:16,fontWeight:'bold'}}>首页</Text>

            </View>

        )

    }

});

const styles = StyleSheet.create({

    // 导航条视图

    navOutViewStyle:{

        height:Platform.OS === 'ios' ? 64 : 44,

        backgroundColor:'#468AFF',

        // 主轴方向

        flexDirection:'row',

        // 侧轴对齐方式 垂直居中

        alignItems:'center',

        // 主轴方向居中

        justifyContent:'center',

    },

    container: {

        flex: 1,

        backgroundColor: '#F5FCFF',

    },

    welcome: {

        fontSize: 20,

        textAlign: 'center',

        margin: 10,

    },

});

// 输出类

module.exports = Home;
3.Message.js
/**

 * 消息

 */

import React, { Component } from 'react';

import {

    AppRegistry,

    StyleSheet,

    Text,

    View,

    Image,

    TouchableOpacity,

    Platform

} from 'react-native';

var Message = React.createClass({

    render() {

        return (

            <View style={styles.container}>

                {/*导航条*/}

                {this.renderNavBar()}

                <Text style={styles.welcome}>

                    消息

                </Text>

            </View>

        );

    },

    // 导航条

    renderNavBar(){

        return(

            <View style={styles.navOutViewStyle}>

                <Text style={{color:'white',fontSize:16,fontWeight:'bold'}}>消息</Text>

            </View>

        )

    }

});

const styles = StyleSheet.create({

    // 导航条视图

    navOutViewStyle:{

        height:Platform.OS === 'ios' ? 64 : 44,

        backgroundColor:'#468AFF',

        // 主轴方向

        flexDirection:'row',

        // 侧轴对齐方式 垂直居中

        alignItems:'center',

        // 主轴方向居中

        justifyContent:'center',

    },

    container: {

        flex: 1,

        backgroundColor: '#F5FCFF',

    },

    welcome: {

        fontSize: 20,

        textAlign: 'center',

        margin: 10,

    },

});

// 输出类

module.exports = Message;
4.Find.js
/**

 * 发现

 */

import React, { Component } from 'react';

import {

    AppRegistry,

    StyleSheet,

    Text,

    View,

    Image,

    TouchableOpacity,

    Platform

} from 'react-native';

var Find = React.createClass({

    render() {

        return (

            <View style={styles.container}>

                {/*导航条*/}

                {this.renderNavBar()}

                <Text style={styles.welcome}>

                    发现

                </Text>

            </View>

        );

    },

    // 导航条

    renderNavBar(){

        return(

            <View style={styles.navOutViewStyle}>

                <Text style={{color:'white',fontSize:16,fontWeight:'bold'}}>发现</Text>

            </View>

        )

    }

});

const styles = StyleSheet.create({

    // 导航条视图

    navOutViewStyle:{

        height:Platform.OS === 'ios' ? 64 : 44,

        backgroundColor:'#468AFF',

        // 主轴方向

        flexDirection:'row',

        // 侧轴对齐方式 垂直居中

        alignItems:'center',

        // 主轴方向居中

        justifyContent:'center',

    },

    container: {

        flex: 1,

        backgroundColor: '#F5FCFF',

    },

    welcome: {

        fontSize: 20,

        textAlign: 'center',

        margin: 10,

    },

});

// 输出类

module.exports = Find;
5.Mine.js
/**

 * 我

 */

import React, { Component } from 'react';

import {

    AppRegistry,

    StyleSheet,

    Text,

    View,

    Image,

    TouchableOpacity,

    Platform

} from 'react-native';

var Mine = React.createClass({

    render() {

        return (

            <View style={styles.container}>

                {/*导航条*/}

                {this.renderNavBar()}

                <Text style={styles.welcome}>

                    我的

                </Text>

            </View>

        );

    },

    // 导航条

    renderNavBar(){

        return(

            <View style={styles.navOutViewStyle}>

                <Text style={{color:'white',fontSize:16,fontWeight:'bold'}}>我的</Text>

            </View>

        )

    }

});

const styles = StyleSheet.create({

    // 导航条视图

    navOutViewStyle:{

        height:Platform.OS === 'ios' ? 64 : 44,

        backgroundColor:'#468AFF',

        // 主轴方向

        flexDirection:'row',

        // 侧轴对齐方式 垂直居中

        alignItems:'center',

        // 主轴方向居中

        justifyContent:'center',

    },

    container: {

        flex: 1,

        backgroundColor: '#F5FCFF',

    },

    welcome: {

        fontSize: 20,

        textAlign: 'center',

        margin: 10,

    },

});

// 输出类

module.exports = Mine;
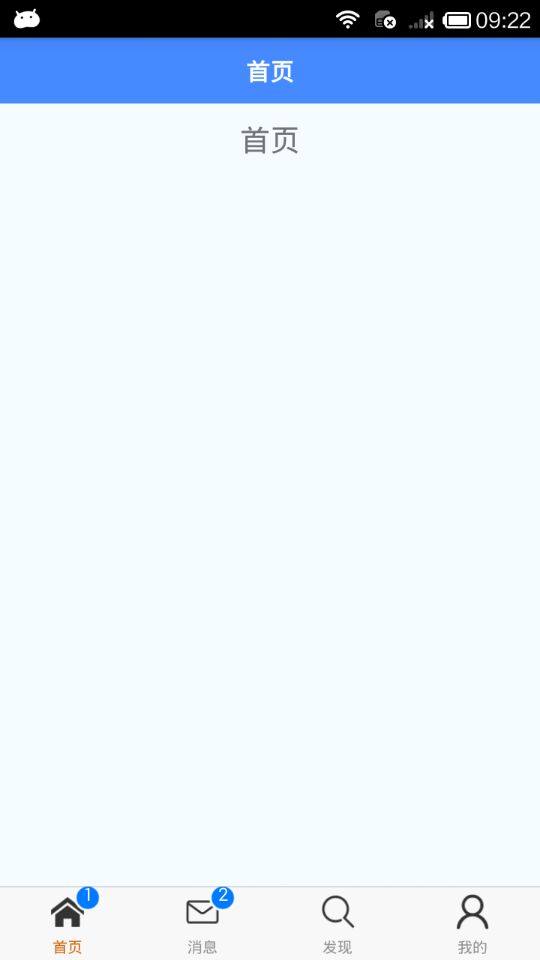
6.效果图
React Native商城项目实战04 - 封装TabNavigator.Item的创建的更多相关文章
- React Native商城项目实战02 - 主要框架部分(tabBar)
1.安装插件,cd到项目根目录下执行: $ npm i react-native-tab-navigator --save 2.主框架文件Main.js /** * 主页面 */ import Rea ...
- React Native商城项目实战03 - 包装Navigator
1.在Home目录下新建首页详细页HomeDetail.js /** * 首页详情页 */ import React, { Component } from 'react'; import { App ...
- React Native商城项目实战01 - 初始化设置
1.创建项目 $ react-native init BuyDemo 2.导入图片资源 安卓:把文件夹放到/android/app/src/main/res/目录下,如图: iOS: Xcode打开工 ...
- React Native商城项目实战11 - 个人中心头部内容
1.创建MineHeaderView.js /** * 个人中心头部内容 */ import React, { Component } from 'react'; import { AppRegist ...
- React Native商城项目实战10 - 个人中心中间内容设置
1.新建一个MineMiddleView.js,专门用于构建中间的内容 /** * 个人中心中间内容设置 */ import React, { Component } from 'react'; im ...
- React Native商城项目实战07 - 设置“More”界面导航条
1.More/More.js /** * 更多 */ import React, { Component } from 'react'; import { AppRegistry, StyleShee ...
- React Native商城项目实战05 - 设置首页的导航条
1.Home.js /** * 首页 */ import React, { Component } from 'react'; import { AppRegistry, StyleSheet, Te ...
- React Native商城项目实战06 - 设置安卓中的启动页
1.Main 目录下新建LaunchImage.js: /** * 启动页 */ import React, { Component } from 'react'; import { AppRegis ...
- React Native商城项目实战16 - 购物中心详细页
逻辑分析: 首页(Home)加载的购物中心组件(ShopCenter),传递url数据: ShopCenter里根据url加载购物中心详细页组件(ShopCenterDetail), ShopCent ...
随机推荐
- npm 关联 git包
npm 关联 git包 由于现在项目越做越多,很多公共的部分相互公用,需要尽可能早地提炼出来,这样便可以在其他项目进行引用,而不是每次建一个项目就需要进行拷贝,这样太痛苦了,因而想通过类似npm包管理 ...
- 使用 tablib 来自动化管理测试用例,其他的工具都不用学了
你在学习 python 自动化测试吗?听过 requests 库吗?tablib 是 requests 库作者常年维护的一个可以操作 Excel 等多种文件格式,将他们变成一种通用数据集的第三方库. ...
- 初探 -1 JavaScript
JavaScript 教程 JavaScript 是 Web 的编程语言. 所有现代的 HTML 页面都使用 JavaScript. JavaScript 非常容易学. 本教程将教你学习从初级到高级J ...
- 3.SpringBoot整合Mybatis(一对多)
前言: Mybatis一对多的处理关系: 一个人有好多本书,每本书的主人只有一个人.当我们查询某个人拥有的所有书籍时,就涉及到了一对多的映射关系. 一.添加数据表: CREATE TABLE `boo ...
- KVM虚拟化网卡管理
brctl常用命令 查看当前虚拟网桥状态 brctl show 添加一个网桥 addbr 删除一个网桥 delbr 添加网口 addif 删除网口 delif VALN LAN 表示 Local Ar ...
- QWidget 设置背景图片
QWidget 设置背景图片办法: 利用 QPaltette QPixmap pixmap("back.png"); QPalette palette; palette.setBr ...
- valgrind 性能测试工具学习使用
一.valgrind简介 Valgrind工具套件提供了许多调试和分析工具,可帮助您使程序更快,更正确.这些工具中最受欢迎的是Memcheck.它可以检测许多与C和C ++程序中常见的内存相关的错误, ...
- 单调队列优化DP || [NOI2005]瑰丽华尔兹 || BZOJ 1499 || Luogu P2254
题外话:题目极好,做题体验极差 题面:[NOI2005]瑰丽华尔兹 题解: F[t][i][j]表示第t时刻钢琴位于(i,j)时的最大路程F[t][i][j]=max(F[t-1][i][j],F[t ...
- idea 导出可以直接运行的jar 文件
刚开始采用的maven插件是 <plugin> <groupId>org.apache.maven.plugins</groupId> <artifactId ...
- 集合综合练习<四>
package com.JiHeTotal; import java.io.BufferedReader; import java.io.BufferedWriter; import java.io. ...