iphone dev 入门实例1:Use Storyboards to Build Table View
http://www.appcoda.com/use-storyboards-to-build-navigation-controller-and-table-view/
Creating Navigation Controller in Storyboards
Now let’s get our hands dirty and create our own Storyboards. In this tutorial, we’ll build a simple app that makes use of both UITableView and UINavigationController. We use the table view to display a list of recipes. When users select any of the recipe, the app navigates to the next screen showing the details. It’ll be easy.
First, fire up Xcode (make sure you’re using 4.2 or up) and create a new project using “Single View application” template.

Xcode Project Template Selection
Click “Next” to continue. In reference to the below figure, fill in all the required values for the Xcode project. Make sure you enables the “Use Storyboards” option.
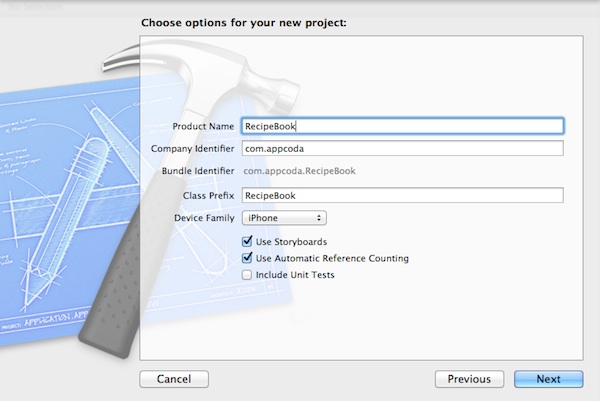
RecipeBook Xcode Project
Click “Next” to continue. Xcode then asks you where you saves the “SimpleTable” project. Pick any folder (e.g. Desktop) to save your project.
You may notice there is a minor difference in the Xcode project, as compared with those you came across in previous tutorials. The .xib file (interface builder) is replaced with the MainStoryboard.storyboard file.
Default Storyboard in Xcode
By default, Xcode creates a standard view controller. As we’ll use navigation controller to control the screen navigation, we first change the view controller to navigation controller. Select the Simply select “Editor” in the menu and select “Embed in”, followed by “Navigation Controller”.
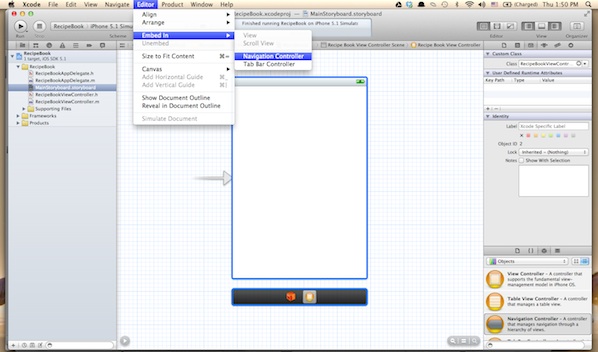
Embed View Controller in Navigation Controller
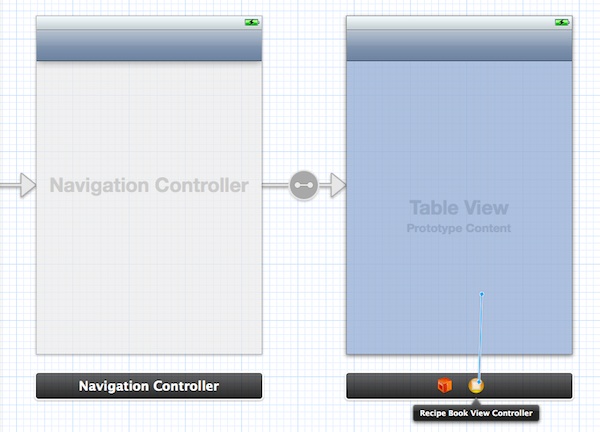
Xcode automatically embeds the RecipeBook View Controller with Navigation Controller. Your screen should look like this:
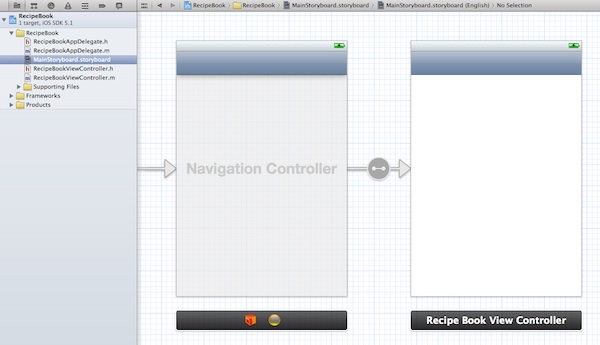
Embedded View Controller with Navigation Controller
Before moving on, let’s run the app and see how it looks. Hit the “Run” button and you should get an app with a blank view but added with a navigation bar. This shows you’ve successfully embed your RecipeBook View Controller in a Navigation Controller.
Recipe Book App with Empty View Controller
Adding Table View for Your Data
Next, we’ll add a table view for displaying our recipes. Select “Table View” in Object Library and drag it into “Recipe Book View Controller”.
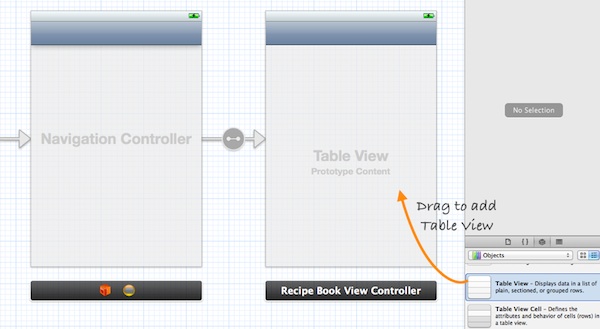
Add Table View to Recipe Book View Controller
The next thing we have to do is to write code to populate the table data (i.e. recipes). In Project Navigator, select “RecipeBookViewController.h”. Append “<uitableviewdelegate, uitableviewdatasource="">” after “UIViewController”. Your code should look like below:
|
1
2 3 4 5 |
#import <UIKit/UIKit.h>
@interface RecipeBookViewController : UIViewController <UITableViewDelegate, UITableViewDataSource> @end |
Next, select “RecipeBookViewController.m” and define an instance variable (i.e. recipes array) for holding the table data.
|
1
2 3 |
In the “viewDidLoad” method, add the following code to initialize the “recipes” array:
|
1
2 3 4 5 6 |
- (void)viewDidLoad
{ [super viewDidLoad]; // Initialize table data recipes = [NSArray arrayWithObjects:@"Egg Benedict", @"Mushroom Risotto", @"Full Breakfast", @"Hamburger", @"Ham and Egg Sandwich", @"Creme Brelee", @"White Chocolate Donut", @"Starbucks Coffee", @"Vegetable Curry", @"Instant Noodle with Egg", @"Noodle with BBQ Pork", @"Japanese Noodle with Pork", @"Green Tea", @"Thai Shrimp Cake", @"Angry Birds Cake", @"Ham and Cheese Panini", nil]; } |
Lastly, we have to implement two datasource methods to populate the table data: “tableView:numberOfRowsInSection” and “tableView:cellForRowAtIndexPath”. Recalled that these two methods are part of the UITableViewDataSource protocol, it’s mandatory to implement the methods when configuring a UITableView. The first method is used to inform the table view how many rows are in the section, while the second method is used to fill the cell data. So let’s add the below code.
|
1
2 3 4 5 6 7 8 9 10 11 12 13 14 15 16 17 18 |
- (NSInteger)tableView:(UITableView *)tableView numberOfRowsInSection:(NSInteger)section
{ return [recipes count]; } - (UITableViewCell *)tableView:(UITableView *)tableView cellForRowAtIndexPath:(NSIndexPath *)indexPath |
For your reference, this is the complete source code of “RecipeBookViewController.m”.
|
1
2 3 4 5 6 7 8 9 10 11 12 13 14 15 16 17 18 19 20 21 22 23 24 25 26 27 28 29 30 31 32 33 34 35 36 37 38 39 40 41 42 43 44 45 46 47 48 49 50 51 52 53 54 55 56 57 |
//
// RecipeBookViewController.m // RecipeBook // // Created by Simon Ng on 14/6/12. // Copyright (c) 2012 Appcoda. All rights reserved. // #import "RecipeBookViewController.h" @interface RecipeBookViewController () @end @implementation RecipeBookViewController { - (void)viewDidLoad - (void)viewDidUnload - (BOOL)shouldAutorotateToInterfaceOrientation:(UIInterfaceOrientation)interfaceOrientation - (NSInteger)tableView:(UITableView *)tableView numberOfRowsInSection:(NSInteger)section - (UITableViewCell *)tableView:(UITableView *)tableView cellForRowAtIndexPath:(NSIndexPath *)indexPath @end |
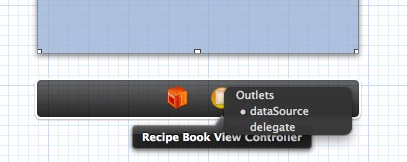
Lastly, we have to establish the connection between the Table View and the two methods we just created. Go back to the Storyboard. Press and hold the Control key on your keyboard, select the “Table View” and drag to the View Controller icon. Your screen should look like this:
Connect Table View with Datasource and Delegate
Release both buttons and a pop-up shows both “dataSource” & “delegate”. Select “dataSource” to make a connection between the Table View and its data source. Repeat the above steps and make a connection with the delegate.
Adding Detail View Controller
Finally it comes to the last part of the tutorial. What’s missing is the detail view controller that shows the details of recipe. The detail view controller should be displayed when user taps on any of the recipes.
Okay, let’s add a new View Controller as the detail view controller.
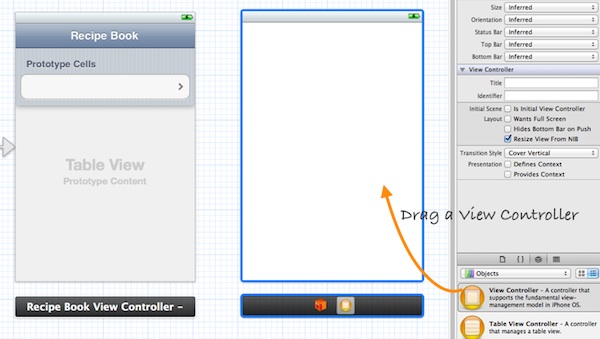
Add a New View Controller
The primary purpose of this tutorial is to show you how to implement navigation controller. We’ll keep the detail view as simple as possible. Let’s just a label displaying the recipe name. Drag the label from Object library and place it at the center of the view. You may change the font size or type to make the label look better.
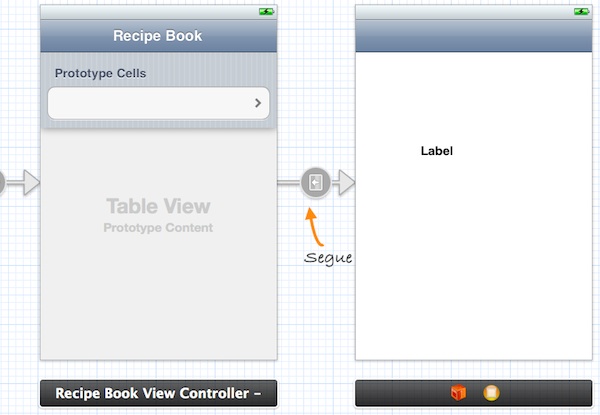
Next, we’ll add a segue to connect the prototype cell and the new View Controller. It’s very straightforward to add a segue object. Press and hold the control key, click on the prototype cell and drag to the View Controller.
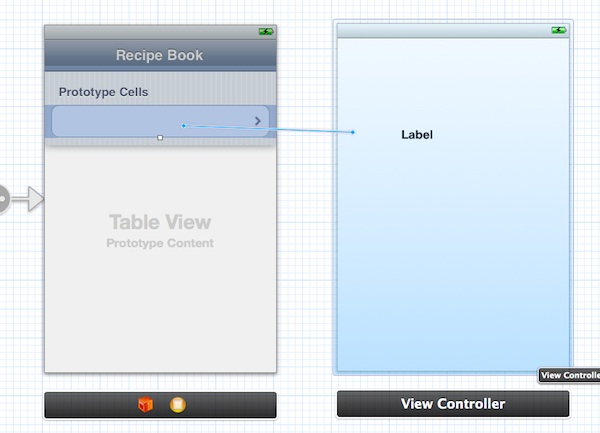
Connect Both Scenes with Segue
Release both buttons and a pop-up shows three types of Segues (push, modal and custom).
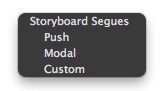
Storyboard Segues (Push, Modal and Custom)
As explained before, segue defines the type of transition between scenes. For standard navigation, we use “Push”. Once chosen, Xcode automatically connects both scenes with Push segue. Your screen should look like this:
Storyboard Segue
Now, let’s run the app again. As you select any of the recipes, the app shows the detail view controller. Though the detail view controller just shows a label, you already make the navigation work.

Receipe App With Detail Controller
Datasource and Delegate Outlets
Before we test out the app, one last thing to do is add a title for the navigation bar. Simply select the navigation bar of “Recipe Book View Controller” and fill in the “Title” under “Attributes Inspector”. Remember to hit ENTER after keying in the title to effectuate the change.
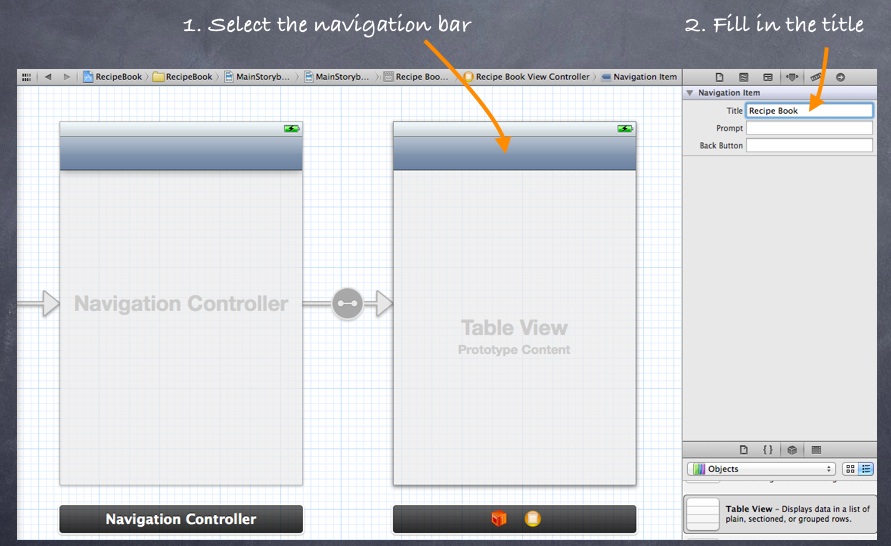
Assign a Title for the Navigation Bar
Now, it’s time to execute your code. Hit the Run button and test out your app. If your code is correct, you should end up with an app displaying a list of recipes. The app should be very similar to the Simple Table app you’ve built before. Here, the major difference is it’s embedded in a Navigation Controller.
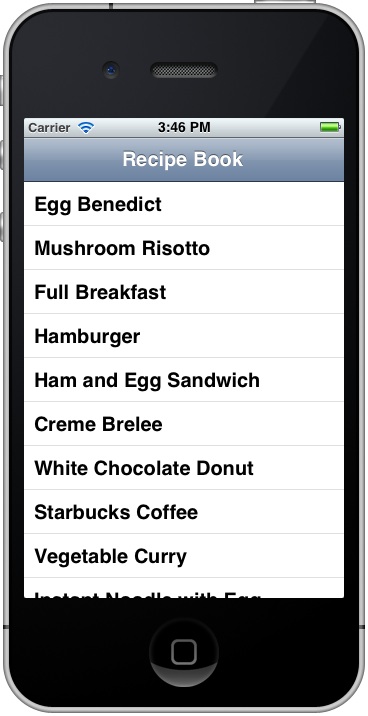
Simple Table App with Navigation Bar
Introducing Prototype Cell
Do you remember how we customize the table cell? Several weeks ago, we showed you how to design your own custom table cell using Interface Builder. In brief, you need to create a separate nib for the cell and programmatically load it in the table. With the introduction of Prototype Cell in Storyboard, it’s much simpler to create a custom cell. Prototype cell allows you to easily design the layout of a table cell right in the Storyboard editor.
We will not go into the details of the customization in this tutorial but just simply add “Disclosure Indicator” in the cell.
To add a prototype cell, select the Table View. Under “Attributes Inspector”, change the “Prototype Cells” value from “0″ to “1″. As soon as you change the value, Xcode automatically shows you a prototype cell. In order to show you another table style, let’s also change the “Style” option from “Plain” to “Group”.
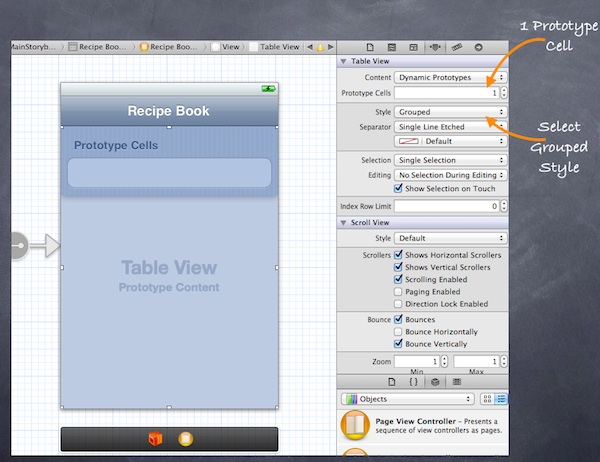
Adding Prototype Cell for Table View
Next, select the “Prototype Cell”. You should be able to customize the options of the cell. To display a disclosure indication for each cell, change the “Accessory” to “Disclosure Indicator”. It’s important to define the Reuse identifier. You can think of this identifier as the cell’s ID. We can use it to refer to a particular prototype cell. Here, we define the identifier as “RecipeCell” that matches with our code.
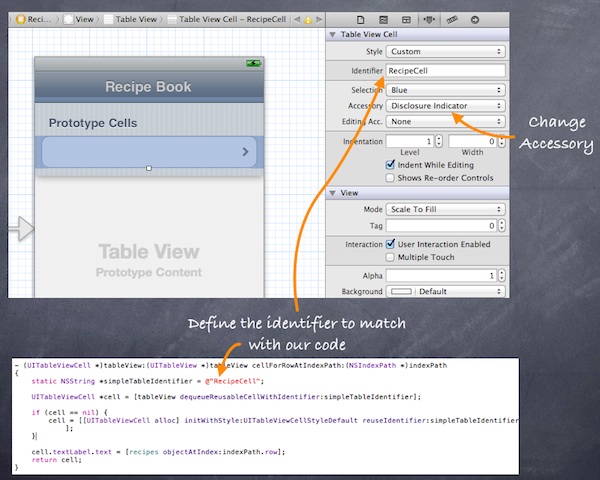
Define Identifier and Accessory for Prototype Cell
Now, run the app again. It looks a bit difference and we’re making progress. We’ve changed the table style to “Grouped” style and added the disclosure indicator.
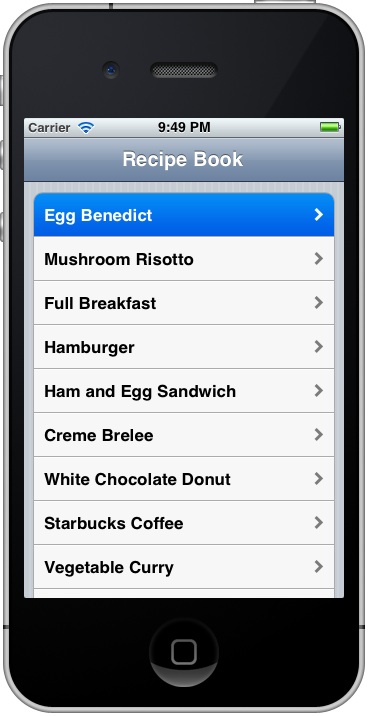
Recipe App with Disclosure Indicator
iphone dev 入门实例1:Use Storyboards to Build Table View的更多相关文章
- iphone dev 入门实例6:How To Use UIScrollView to Scroll and Zoom and Page
http://www.raywenderlich.com/10518/how-to-use-uiscrollview-to-scroll-and-zoom-content Getting Starte ...
- iphone dev 入门实例2:Pass Data Between View Controllers using segue
Assigning View Controller Class In the first tutorial, we simply create a view controller that serve ...
- iphone dev 入门实例7:How to Add Splash Screen in Your iOS App
http://www.appcoda.com/how-to-add-splash-screen-in-your-ios-app/ What’s Splash Screen? For those who ...
- iphone dev 入门实例5:Get the User Location & Address in iPhone App
Create the Project and Design the Interface First, create a new Xcode project using the Single View ...
- iphone dev 入门实例4:CoreData入门
The iPhone Core Data Example Application The application developed in this chapter will take the for ...
- iphone dev 入门实例3:Delete a Row from UITableView
How To Delete a Row from UITableView I hope you have a better understanding about Model-View-Control ...
- iphone Dev 开发实例10:How To Add a Slide-out Sidebar Menu in Your Apps
Creating the Xcode Project With a basic idea about what we’ll build, let’s move on. You can create t ...
- iphone Dev 开发实例9:Create Grid Layout Using UICollectionView in iOS 6
In this tutorial, we will build a simple app to display a collection of recipe photos in grid layout ...
- iphone Dev 开发实例8: Parsing an RSS Feed Using NSXMLParser
From : http://useyourloaf.com/blog/2010/10/16/parsing-an-rss-feed-using-nsxmlparser.html Structure o ...
随机推荐
- 推荐一些android开发学习的资料
网址: 1:http://v.youku.com/v_show/id_XMTgwMTQ1MTgw.html 2:http://mars.apkbus.com/ 3:http://wenku.baidu ...
- 【渗透测试学习平台】 web for pentester -3.XSS
Example 1 http://192.168.91.139/xss/example1.php?name=hacker<script>alert('xss')</script> ...
- HDU 2095 find your present (2)
HDU 2095 find your present (2) 解法一:使用set 利用set,由于只有一个为奇数次,对一个数进行查询,不在集合中则插入,在集合中则删除,最后剩下的就是结果 /* HDU ...
- windows下AppServ安装php的memcached扩展
memcache和memcached的区别 在自己的新程序中打算全面应用memcached技术,这个很容易理解这是memcached是内存缓存,但是怎么还有memcache呢? 其实很简单,mem ...
- ThinkPHP缓存微信公众号access_token
access_token作为微信的全局票据,在高级接口中需要频繁调用,其有效期为7200秒,即2小时,而微信官方对调用Token的次数有限制(参见接口频率限制说明),获取access_token每日限 ...
- opencv矩阵总结
OpenCV 矩阵操作 CvMat 转自:http://hi.baidu.com/xiaoduo170/blog/item/10fe5e3f0fd252e455e72380.html 每回用矩阵都要查 ...
- python3基础语法
一.编码 默认情况下, python3源码文件以UTF-8编码,所有字符串都是unicode字符串.当然你也可以为源码文件指定不同的编码: # -*- coding: gbk -*- 二.标识符 1. ...
- Thinking Clearly about Performance
http://queue.acm.org/detail.cfm?id=1854041 The July/August issue of acmqueue is out now acmqueue is ...
- 使用Animation实现摄像机动画
项目剧情模块分给了我做,其中很重要的一个功能就是摄像机旋转平移等操作,本来打算使用Camera Path这个插件制作的,但是鉴于项目Unity版本还停留在4.3,低于插件要求版本,另外编辑器做出来是交 ...
- Spring MVC静态资源处理——<mvc:resources /> ||<mvc:default-servlet-handler /> 转载
Spring MVC静态资源处理——<mvc:resources /> ||<mvc:default-servlet-handler /> mvcmvc:resources ...