吴裕雄 python深度学习与实践(10)
import tensorflow as tf

input1 = tf.constant(1)

print(input1)

input2 = tf.Variable(2,tf.int32)

print(input2)

input2 = input1

sess = tf.Session()

print(sess.run(input2))

import tensorflow as tf

input1 = tf.placeholder(tf.int32)

input2 = tf.placeholder(tf.int32)

output = tf.add(input1, input2)

sess = tf.Session()

print(sess.run(output, feed_dict={input1:[1], input2:[2]}))

import numpy as np
import tensorflow as tf """
这里是一个非常好的大数据验证结果,随着数据量的上升,集合的结果也越来越接近真实值,
这也是反馈神经网络的一个比较好的应用
这里不是很需要各种激励函数
而对于dropout,这里可以看到加上dropout,loss的值更快。
随着数据量的上升,结果就更加接近于真实值。
""" inputX = np.random.rand(3000,1)
noise = np.random.normal(0, 0.05, inputX.shape)
outputY = inputX * 4 + 1 + noise #这里是第一层
weight1 = tf.Variable(np.random.rand(inputX.shape[1],4))
bias1 = tf.Variable(np.random.rand(inputX.shape[1],4))
x1 = tf.placeholder(tf.float64, [None, 1])
y1_ = tf.matmul(x1, weight1) + bias1 y = tf.placeholder(tf.float64, [None, 1])
loss = tf.reduce_mean(tf.reduce_sum(tf.square((y1_ - y)), reduction_indices=[1]))
train = tf.train.GradientDescentOptimizer(0.25).minimize(loss) # 选择梯度下降法 init = tf.initialize_all_variables()
sess = tf.Session()
sess.run(init) for i in range(1000):
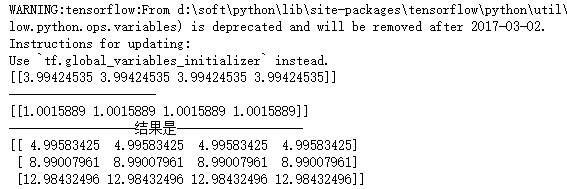
sess.run(train, feed_dict={x1: inputX, y: outputY}) print(weight1.eval(sess))
print("---------------------")
print(bias1.eval(sess))
print("------------------结果是------------------") x_data = np.matrix([[1.],[2.],[3.]])
print(sess.run(y1_,feed_dict={x1: x_data}))
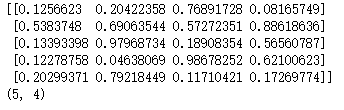
import numpy as np

aa = np.random.rand(5,4)

print(aa)

print(np.shape(aa))
import tensorflow as tf
import numpy as np """
这里是一个非常好的大数据验证结果,随着数据量的上升,集合的结果也越来越接近真实值,
这也是反馈神经网络的一个比较好的应用
这里不是很需要各种激励函数
而对于dropout,这里可以看到加上dropout,loss的值更快。
随着数据量的上升,结果就更加接近于真实值。
""" inputX = np.random.rand(3000,1)
noise = np.random.normal(0, 0.05, inputX.shape)
outputY = inputX * 4 + 1 + noise #这里是第一层
weight1 = tf.Variable(np.random.rand(inputX.shape[1],4))
bias1 = tf.Variable(np.random.rand(inputX.shape[1],4))
x1 = tf.placeholder(tf.float64, [None, 1])
y1_ = tf.matmul(x1, weight1) + bias1
#这里是第二层
weight2 = tf.Variable(np.random.rand(4,1))
bias2 = tf.Variable(np.random.rand(inputX.shape[1],1))
y2_ = tf.matmul(y1_, weight2) + bias2 y = tf.placeholder(tf.float64, [None, 1]) loss = tf.reduce_mean(tf.reduce_sum(tf.square((y2_ - y)), reduction_indices=[1]))
train = tf.train.GradientDescentOptimizer(0.25).minimize(loss) # 选择梯度下降法 init = tf.initialize_all_variables()
sess = tf.Session()
sess.run(init) for i in range(1000):
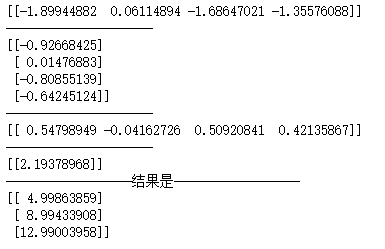
sess.run(train, feed_dict={x1: inputX, y: outputY}) print(weight1.eval(sess))
print("---------------------")
print(weight2.eval(sess))
print("---------------------")
print(bias1.eval(sess))
print("---------------------")
print(bias2.eval(sess))
print("------------------结果是------------------") x_data = np.matrix([[1.],[2.],[3.]])
print(sess.run(y2_,feed_dict={x1: x_data}))
吴裕雄 python深度学习与实践(10)的更多相关文章
- 吴裕雄 python深度学习与实践(18)
# coding: utf-8 import time import numpy as np import tensorflow as tf import _pickle as pickle impo ...
- 吴裕雄 python深度学习与实践(17)
import tensorflow as tf from tensorflow.examples.tutorials.mnist import input_data import time # 声明输 ...
- 吴裕雄 python深度学习与实践(16)
import struct import numpy as np import matplotlib.pyplot as plt dateMat = np.ones((7,7)) kernel = n ...
- 吴裕雄 python深度学习与实践(15)
import tensorflow as tf import tensorflow.examples.tutorials.mnist.input_data as input_data mnist = ...
- 吴裕雄 python深度学习与实践(14)
import numpy as np import tensorflow as tf import matplotlib.pyplot as plt threshold = 1.0e-2 x1_dat ...
- 吴裕雄 python深度学习与实践(13)
import numpy as np import matplotlib.pyplot as plt x_data = np.random.randn(10) print(x_data) y_data ...
- 吴裕雄 python深度学习与实践(12)
import tensorflow as tf q = tf.FIFOQueue(,"float32") counter = tf.Variable(0.0) add_op = t ...
- 吴裕雄 python深度学习与实践(11)
import numpy as np from matplotlib import pyplot as plt A = np.array([[5],[4]]) C = np.array([[4],[6 ...
- 吴裕雄 python深度学习与实践(7)
import cv2 import numpy as np img = np.mat(np.zeros((,))) cv2.imshow("test",img) cv2.waitK ...
随机推荐
- hadoop day 5
1.Zookeeper Zookeeper的安装和配置(集群模式) 1)在conf目录下创建一个配置文件zoo.cfg, tickTime=2000——心跳检测的时间间隔(ms) dataDir=/U ...
- 通用base.css —— 《编写高质量代码 web前端开发修炼之道》
@charset "utf-8"; /*CSS reset*/ html{color:#000;background:#FFF;} body,div,dl,dt,dd,ul,ol, ...
- C#词频统计 效能分析
在邹老师的效能分析的建议下对上次写过的词频统计的程序进行分析改进. 效能分析:个人很浅显的认为就是程序的运行效率,代码的执行效率 1.VS 提供了自带的分析工具:performance tool (性 ...
- Windows10下搭建Android Studio3.12开发环境
1.准备工作: 操作系统:Windows10 专业版或企业版 JDK安装:参考文章 http://www.cnblogs.com/yuwentao/p/4742575.html =========== ...
- js 在线引用
<!DOCTYPE html> <html> <head> <meta charset="utf-8" /> <meta ht ...
- Centos7 安装nginx1.14
一丶官网 http://nginx.org/en/download.html 至于安装那个版本首先要看清楚版本代表什么意思 Nginx官网提供了三个类型的版本Mainline version:Main ...
- String 与 StringBuffer的差别
原文:http://blog.csdn.net/yirentianran/article/details/2871417 在Java中有3个类来负责字符的操作. 1.Character 是进行单个字符 ...
- 全志A33 lichee lvds屏幕配置
开发平台 * 芯灵思SinlinxA33开发板 淘宝店铺: https://sinlinx.taobao.com/ 嵌入式linux 开发板交流 QQ:641395230 芯灵思SinlinxA33开 ...
- Python3 Flask+nginx+Gunicorn部署(上)
前言:一般在本地运行flask项目通常是直接python3 文件名.py,然后打开:http://127.0.0.1:5000 查看代码结果 这次主要是记录flask在python3 环境结合ngin ...
- node 下less无法编译的问题
vue+less的项目中,npm run dev不通过,提示以下错误: These dependencies were not found: * !!vue-style-loader!css-load ...