
吴裕雄 python神经网络 水果图片识别(5)
#-*- coding:utf-8 -*-
### required libaraied
import os
import matplotlib.image as img
import matplotlib.pyplot as plt
import skimage
from skimage import color, data, transform
from scipy import ndimage
import numpy as np
import tensorflow as tf
from IPython.core.pylabtools import figsize
from natsort import natsorted
import time
import keras
from keras.models import Sequential
from keras.layers import Dense,Flatten,Dropout
from keras.optimizers import Adadelta
from keras import applications
import random
%matplotlib inline
#设置文件目录
Training = r'C:\Users\lcb\fruits-360\Training'
Test = r'C:\Users\lcb\fruits-360\Test'
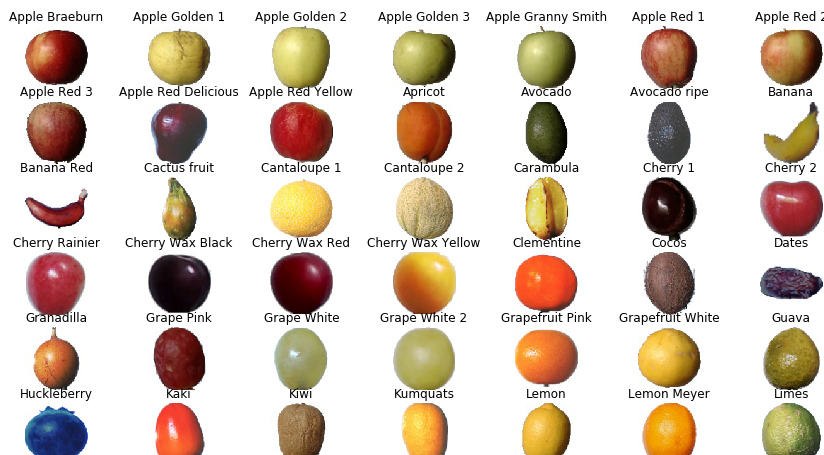
#获取每类水果中的第五张图像
def load_print_img(root) :
print_img = []
print_label = []
for i in range(len(os.listdir(root))) : #遍历水果种类目录
child1 = os.listdir(root)[i]
child2 = os.listdir(os.path.join(root, child1))
child2 = natsorted(child2) #对第二层目录进行自然数排序,os.listder默认为str排序
path = os.path.join(root, child1, child2[4]) #取出每类的第五张图像
if(path.endswith('.jpg')) :
print_img.append(skimage.data.imread(path))
print_label.append(child1)
return print_img, print_label
#打印每类水果的第五张图像
def print_fruit(print_img, print_label, size) :
plt.figure(figsize(size, size))
for i in range(len(print_img)) :
plt.subplot(11, 7,(i+1)) #图像输出格式为11行7列
plt.imshow(print_img[i]) #打印图像
plt.title(format(print_label[i])) #打印水果种类
plt.axis('off')
plt.show()
#打印水果
print_fruit(load_print_img(Training)[0], load_print_img(Training)[1], 15)
#随机获取水果种类
def get_random_fruits(root, n_classes) :
fruits = []
for i in range(len(os.listdir(root))) : #创建一个1到水果种类总数的list
fruits.append(i)
random_fruits = random.sample(fruits, n_classes) #随机获取n_classes个随机不重复的水果种类
return random_fruits
#获取随机抽取的10类水果的图像
def load(root, random_fruits) :
image_data = [] #存放图像
image_label = [] #存放标签
num_label = [] #存放图像标签码
for i in range(len(random_fruits)) : #遍历水果类型
child1 = os.listdir(root)[i] #第一层子目录(水果种类)
child2 = os.listdir(os.path.join(root, child1)) #第二层子目录(水果图像)
child2 = natsorted(child2) #对第二层目录进行自然数排序,os.listder默认为str排序
for j in range(len(child2)) : #遍历水果图像
path = os.path.join(root, child1, child2[j]) #结合第一二层子目录
if(path.endswith('.jpg')) : #只读取'.jpg'文件(文件后缀是否为'.jpg')
image_data.append(skimage.data.imread(path)) #把文件读取为图像存入image_data
image_label.append(child1) #储存第一层子目录文件名(即水果名)
num_label.append(i) #把第一层子目录文件名的下标作为水果类型的编码
num_label = keras.utils.to_categorical(num_label, n_classes) #把水果类型编码转换为one_hot编码
#print("图片数:{0}, 标签数:{1}".format(len(image_data), len(os.listdir(root))) #输出图片和标签数
return image_data, image_label, num_label
#裁剪图像
def crop(image_data) :
crop_data = []
for i in image_data :
I_crop = skimage.transform.resize(i, (32, 32)) #把图像转换成32*32的格式
crop_data.append(I_crop) #把转换后的图像放入Icrop_data
return crop_data
def fruits_type(random_fruits) :
print('fruits_type:')
for i in random_fruits :
print( os.listdir(Training)[i])
n_classes = 10 #定义水果种类数
#batch_size = 256 #定义块的大小
#batch_num = int(np.array(crop_img).shape[0]/batch_size) #计算取块的次数
x = tf.placeholder(tf.float32,[None, 32, 32, 3]) #申请四维占位符,数据类型为float32
y = tf.placeholder(tf.float32,[None, n_classes]) #申请二维占位符,数据累型为float32
keep_prob = tf.placeholder(tf.float32) #申请一维占位符,数据类型为float32
#epochs=2 #训练次数
dropout=0.75 #每个神经元保留的概率
k_size = 3 #卷积核大小
Weights = {
"conv_w1" : tf.Variable(tf.random_normal([k_size, k_size, 3, 64]), name = 'conv_w1'), \
"conv_w2" : tf.Variable(tf.random_normal([k_size, k_size, 64, 128]), name = 'conv_w2'), \
#"conv_w3" : tf.Variable(tf.random_normal([k_size, k_size, 256, 512]), name = 'conv_w3'), \
"den_w1" : tf.Variable(tf.random_normal([int(32*32/4/4*128), 1024]), name = 'dev_w1'), \
"den_w2" : tf.Variable(tf.random_normal([1024, 512]), name = 'den_w2'), \
"den_w3" : tf.Variable(tf.random_normal([512, n_classes]), name = 'den_w3')
}
bias = {
"conv_b1" : tf.Variable(tf.random_normal([64]), name = 'conv_b1'), \
"conv_b2" : tf.Variable(tf.random_normal([128]), name = 'conv_b2'), \
#"conv_b3" : tf.Variable(tf.random_normal([512]), name = 'conv_b3'), \
"den_b1" : tf.Variable(tf.random_normal([1024]), name = 'den_b1'), \
"den_b2" : tf.Variable(tf.random_normal([512]), name = 'den_b2'), \
"den_b3" : tf.Variable(tf.random_normal([n_classes]), name = 'den_b3')
}
def conv2d(x,W,b,stride=1):
x=tf.nn.conv2d(x,W,strides=[1,stride,stride,1],padding="SAME")
x=tf.nn.bias_add(x,b)
return tf.nn.relu(x)
def maxpool2d(x,stride=2):
return tf.nn.max_pool(x,ksize=[1,stride,stride,1],strides=[1,stride,stride,1],padding="SAME")
def conv_net(inputs, W, b, dropout) :
## convolution layer 1
## 输入32*32*3的数据,输出16*16*64的数据
conv1 = conv2d(x, W["conv_w1"], b["conv_b1"])
conv1 = maxpool2d(conv1, 2)
tf.summary.histogram('ConvLayer1/Weights', W["conv_w1"])
tf.summary.histogram('ConvLayer1/bias', b["conv_b1"])
## convolution layer2
## 输入16*16*64的数据,输出8*8*128的数据
conv2 = conv2d(conv1, W["conv_w2"], b["conv_b2"])
conv2 = maxpool2d(conv2, 2)
tf.summary.histogram('ConvLayer2/Weights', W["conv_w2"])
tf.summary.histogram('ConvLayer2/bias', b["conv_b2"])
## convolution layer3
#conv3 = conv2d(conv2, W["conv_w3"], b["conv_b3"])
#conv3 = maxpool2d(conv3, 2)
#tf.summary.histogram('ConvLayer3/Weights', W["conv_w3"])
#tf.summary.histogram('ConvLayer3/bias', b["conv_b3"])
## flatten
## 把数据拉伸为长度为8*8*128的一维数据
flatten = tf.reshape(conv2,[-1, W["den_w1"].get_shape().as_list()[0]])
## dense layer1
## 输入8192*1的数据,输出1024*1的数据
den1 = tf.add(tf.matmul(flatten, W["den_w1"]), b["den_b1"])
den1 = tf.nn.relu(den1)
den1 = tf.nn.dropout(den1, dropout)
tf.summary.histogram('DenLayer1/Weights', W["den_w1"])
tf.summary.histogram('DenLayer1/bias', b["den_b1"])
## dense layer2
## 1024*1的数据,输出512*1的数据
den2 = tf.add(tf.matmul(den1, W["den_w2"]), b["den_b2"])
den2 = tf.nn.relu(den2)
den2 = tf.nn.dropout(den2, dropout)
tf.summary.histogram('DenLayer2/Weights', W["den_w2"])
tf.summary.histogram('DenLayer2/bias', b["den_b2"])
## out
## 512*1的数据,输出n_classes*1的数据
out = tf.add(tf.matmul(den2, W["den_w3"]), b["den_b3"])
tf.summary.histogram('DenLayer3/Weights', W["den_w3"])
tf.summary.histogram('DenLayer3/bias', b["den_b3"])
return out
def get_data(inputs, batch_size, times):
i = times * batch_size
data = inputs[i : (times+1)*batch_size]
return data
def train_and_test(train_x, train_y, test_x, test_y, epochs, batch_size, times = 1) :
# 初始化全局变量
init=tf.global_variables_initializer()
start_time = time.time()
with tf.Session() as sess:
sess.run(init)
# 把需要可视化的参数写入可视化文件
writer=tf.summary.FileWriter('C:/Users\lcb/fruits-360/tensorboard/Fruit_graph' + str(times), sess.graph)
for i in range(epochs):
batch_num = int(np.array(crop_img).shape[0]/batch_size)
sum_cost = 0
sum_acc = 0
for j in range(batch_num):
batch_x = get_data(train_x, batch_size, j)
batch_y = get_data(train_y, batch_size, j)
sess.run(optimizer, feed_dict={x:batch_x,y:batch_y,keep_prob:0.75})
loss,acc = sess.run([cost,accuracy],feed_dict={x:batch_x,y:batch_y,keep_prob: 1.})
sum_cost += loss
sum_acc += acc
#if((i+1) >= 10 and ((i+1)%10 == 0)) :
#print("Epoch:", '%04d' % (i+1),"cost=", "{:.9f}".format(loss),"Training accuracy","{:.5f}".format(acc))
result=sess.run(merged,feed_dict={x:batch_x, y:batch_y, keep_prob:0.75})
writer.add_summary(result, i)
arg_cost = sum_cost/batch_num
arg_acc = sum_acc/batch_num
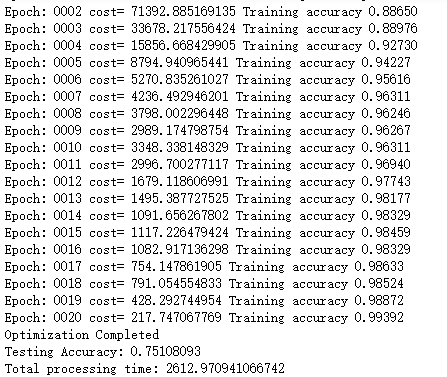
print("Epoch:", '%04d' % (i+1),"cost=", "{:.9f}".format(arg_cost),"Training accuracy","{:.5f}".format(arg_acc))
end_time = time.time()
print('Optimization Completed')
print('Testing Accuracy:',sess.run(accuracy,feed_dict={x:test_x, y:test_y,keep_prob: 1}))
print('Total processing time:',end_time - start_time)
pred=conv_net(x,Weights,bias,keep_prob)
cost=tf.reduce_mean(tf.nn.softmax_cross_entropy_with_logits(logits=pred,labels=y))
tf.summary.histogram('loss', cost)
optimizer=tf.train.AdamOptimizer(0.01).minimize(cost)
correct_pred=tf.equal(tf.argmax(pred,1),tf.argmax(y,1))
accuracy=tf.reduce_mean(tf.cast(correct_pred,tf.float32))
merged=tf.summary.merge_all()
for i in range(10) :
random_fruits = get_random_fruits(Training, n_classes)
img_data, img_label, num_label = load(Training, random_fruits)
crop_img = crop(img_data)
test_data, test_label, test_num_label = load(Test, random_fruits)
crop_test = crop(test_data)
print("TIMES"+str(i+1))
fruits_type(random_fruits)
print("\n")
train_and_test(crop_img, num_label, crop_test, test_num_label, 20, 256, (i+1))
print("\n\n\n")


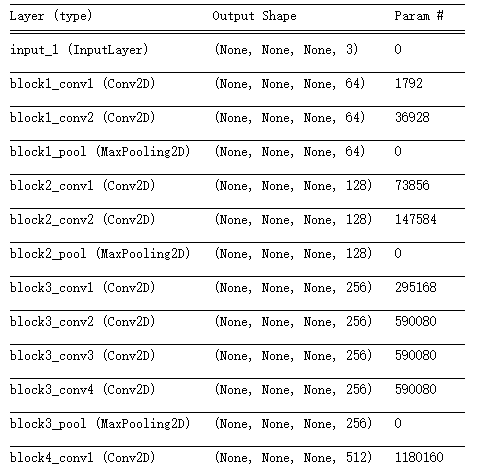
vgg_model=applications.VGG19(include_top=False,weights='imagenet')
vgg_model.summary()
bottleneck_feature_train=vgg_model.predict(np.array(crop_img),verbose=1)
bottleneck_feature_test=vgg_model.predict(np.array(crop_test),verbose=1)

print(bottleneck_feature_train.shape,bottleneck_feature_test.shape)

my_model=Sequential()
my_model.add(Flatten())
my_model.add(Dense(512,activation='relu'))
my_model.add(Dropout(0.5))
my_model.add(Dense(256,activation='relu'))
my_model.add(Dropout(0.5))
my_model.add(Dense(n_classes,activation='softmax'))
my_model.compile(optimizer=Adadelta(),loss="categorical_crossentropy",\
metrics=['accuracy'])
my_model.fit(bottleneck_feature_train,num_label,batch_size=128,epochs=50,verbose=1)

evaluation=my_model.evaluate(bottleneck_feature_test,test_num_label,batch_size=128,verbose=0)
print("loss:",evaluation[0],"accuracy:",evaluation[1])


random_fruits = get_random_fruits(Training, n_classes)
img_data, img_label, num_label = load(Training, random_fruits)
crop_img = crop(img_data)
test_data, test_label, test_num_label = load(Test, random_fruits)
crop_test = crop(test_data)
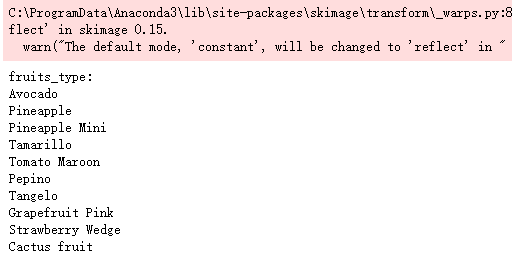
fruits_type(random_fruits)
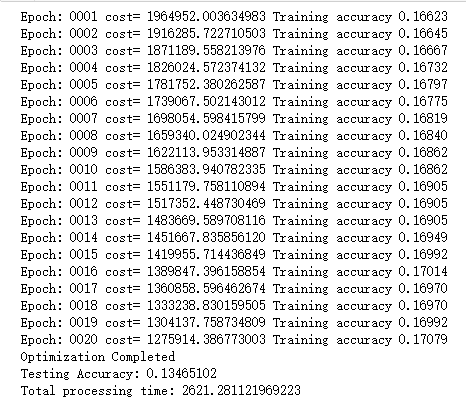
optimizer=tf.train.AdadeltaOptimizer(0.01).minimize(cost)
train_and_test(crop_img, num_label, crop_test, test_num_label, 20, 256, 'Adadelta')
optimizer=tf.train.AdagradOptimizer(0.01).minimize(cost)
train_and_test(crop_img, num_label, crop_test, test_num_label, 20, 256, 'Adagrad')

optimizer=tf.train.FtrlOptimizer(0.01).minimize(cost)
train_and_test(crop_img, num_label, crop_test, test_num_label, 20, 256, 'Ftrl')
吴裕雄 python神经网络 水果图片识别(5)的更多相关文章
- 吴裕雄 python神经网络 水果图片识别(4)
# coding: utf-8 # In[1]:import osimport numpy as npfrom skimage import color, data, transform, io # ...
- 吴裕雄 python神经网络 水果图片识别(3)
import osimport kerasimport timeimport numpy as npimport tensorflow as tffrom random import shufflef ...
- 吴裕雄 python神经网络 水果图片识别(2)
import osimport numpy as npimport matplotlib.pyplot as pltfrom skimage import color,data,transform,i ...
- 吴裕雄 python神经网络 水果图片识别(1)
import osimport numpy as npimport matplotlib.pyplot as pltfrom skimage import color,data,transform,i ...
- 吴裕雄 python神经网络 花朵图片识别(10)
import osimport numpy as npimport matplotlib.pyplot as pltfrom PIL import Image, ImageChopsfrom skim ...
- 吴裕雄 python神经网络 花朵图片识别(9)
import osimport numpy as npimport matplotlib.pyplot as pltfrom PIL import Image, ImageChopsfrom skim ...
- 吴裕雄 python 神经网络——TensorFlow图片预处理调整图片
import numpy as np import tensorflow as tf import matplotlib.pyplot as plt def distort_color(image, ...
- 吴裕雄 python 神经网络——TensorFlow 花瓣识别2
import glob import os.path import numpy as np import tensorflow as tf from tensorflow.python.platfor ...
- 吴裕雄 python 神经网络——TensorFlow图片预处理
import numpy as np import tensorflow as tf import matplotlib.pyplot as plt # 使用'r'会出错,无法解码,只能以2进制形式读 ...
随机推荐
- c语言数据类型(二)
char 类型 1.char 变量 常量 char c; 定义一个char变量 c = ‘a’ 'a'字符常量 char 的本质就是一个整数,只有一个字节大小的整数 2.printf 输出char ...
- Distributed traceability with Spring Cloud: Sleuth and Zipkin
I. Sleuth 0. Concept Trace A set of spans that form a call tree structure, forms the trace of the re ...
- hive的select重命名字段显示成中文
select '越南'as `版本`, viplevel, t.dbname, t.account, FightPower from ods t where dt = '2017-03-08' and ...
- vue获取dom
//使用ref属性来获取当前的div的dom属性 <div class="list" ref="wrapper"></div> //在j ...
- 数组转换成json key-value形式
eg1(数组中包含的是数组): var jsonData = {}; var arr = [[1, 'boy', 'dabing'], [2, 'girl', 'dabing']]; for (var ...
- PowerDesigner 物理数据模型(PDM) 说明
ref: https://blog.csdn.net/tianlesoftware/article/details/6874067 一. PDM 介绍 物理数据模型(Physical Data ...
- 第一次调用从server获取Cookie
System.setProperty("javax.net.ssl.trustStore", certPath); public String getCookieString(St ...
- [UGUI]滑动列表优化(循环利用)
需要注意的有下面几点: 1. 区分好表现上的index和逻辑上的index.表现上的index是指这个go是go列表中的第几项,但实际上这个index的意义并不大,因为在滚动的过程中go列表是轮转的: ...
- sql server转oracle需要注意的几点
1. 字符型的字段相加需要用“||”,如果用“+”的话,会报“无效的数字”的错误. 2. Top 1 类似的脚本需要通过where rownum<=1来实现. 3. ISNULL函 ...
- [Android] android.util.Log
android.util.Log常用的方法有以下5个:Log.v() Log.d() Log.i() Log.w() 以及 Log.e() .根据首字母对应VERBOSE,DEBUG,INFO, W ...